

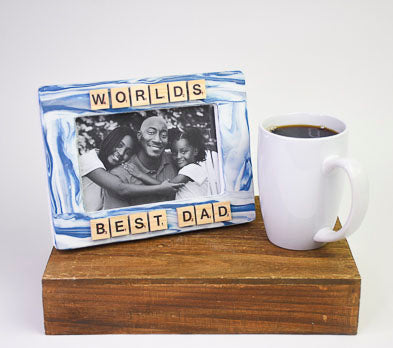
Original Sculpey® and Sculpey III® World’s Best Dad Frame
Original Sculpey® and Sculpey III® World’s Best Dad Frame
Designed by Amy Koranek
Read More
Read Less
Create this clever frame using marbled Sculpey clays and wooden letter pieces in an afternoon!
COMPLETION TIME:65 Minutes to make, bake, and assemble
ADDITIONAL SUPPLIES
- Wood frame
- Sandpaper
- White acrylic paint
- Paintbrush
- Game tiles spelling out your Father’s Day greeting
- Clear drying white craft glue
Project Instructions
Please make sure your work area is covered and you are not working on an unprotected surface. We recommend working on the Sculpey® Oven Safe Work Mat, wax paper, metal baking sheet, or disposable foil. Uncured clay may damage unprotected furniture or finished surfaces. Be sure to cover your crafting area appropriately.
Start with clean hands, unwrap and knead clay until soft and smooth, or condition by running clay though a Pasta Machine. We recommend using a designated machine for clay purposes only. When working with multiple colors, clean hands with soap and water or baby wipes (we have found that baby wipes work best) before switching colors. Shape clay, pressing pieces firmly together. Wash hands after use.
Baking:
Begin by preheating oven to 275 °F (130 °C). After you are done creating; for best results bake clay on an oven-proof surface such metal, aluminum foil, an index card or the Sculpey® Oven Safe Work Mat at 275°F (130 °C) for 15 minutes per ¼" (6 mm) thickness according to package directions. Oven safe glass or ceramic surfaces are also acceptable for baking; however please note that the baking times may take longer as the glass or ceramic surfaces take longer to heat up. For best baking results, use an oven thermometer. DO NOT USE MICROWAVE OVEN. DO NOT EXCEED THE ABOVE TEMPERATURE OR RECOMMENDED BAKING TIME. BAKING SHOULD BE DONE BY AN ADULT.
First prepare the frame for mounting clay to it. Sand rough edges wherever needed with sandpaper. Paint the back and edges of the frame where it will not be finished with clay.
Allow the paint to dry completely.
Allow the paint to dry completely.

Squirt a bead of clear drying white craft glue on the surface of the frame.

Spread the glue into an even layer over the surface of the frame - I use my fingertips. Add more glue as needed to create a uniform layer. Allow the glue to dry completely. You should still be able to see the wood grain through the glue once it is dry. This will provide a tacky layer that the oven bake clay likes to stick to. Wash your hands before moving onto the clay part of the project.

My frame is approximately 5.5” x 8” and holds a 4” x 6” photo. So the following amounts of clay are for this size frame. You can adjust the amounts for your own frame size.
From 1/4 of the 1 pound box of Original Sculpey® make a thick log. From 1/2 of the 2 ounce bar of Navy Pearl make a smaller log that is the same length. Push the two logs together side by side.
From 1/4 of the 1 pound box of Original Sculpey® make a thick log. From 1/2 of the 2 ounce bar of Navy Pearl make a smaller log that is the same length. Push the two logs together side by side.

Roll and twist the two colors together.

Fold the twist in half and then in half again.

Roll and twist the colors together some more.

Fold the log in half and then in half again.

Roll and twist the colors together some more. This will make the White and the Navy Pearl start to blend. You can repeat the rolling and twisting as little or as much as you like to create the marbled effect.

Flatten the log into a long rope with the Roller. You will need the flattened rope to be long enough and wide enough to cover each rail of the frame. I needed a total of 24” of the flattened clay rope to cover the front of my frame.
Press the clay to the top and bottom rail first and trim the ends.
Press the clay to the top and bottom rail first and trim the ends.

Fill inside rails next and trim them to fit. Smooth all the seams together with your fingertips.

Trim out the area for the photo and all around the outside edges with the clay knife tool. Smooth all the cut edges with your fingertips.
The area where the letter tiles will be added needs to be really flat for the tiles to look neat, so go over these areas one more time with the roller.
The area where the letter tiles will be added needs to be really flat for the tiles to look neat, so go over these areas one more time with the roller.

Bake the frame following the baking instructions for Sculpey III®. Allow the frame to cool completely. If the frame released some wood sap during the baking, this can be easily scraped away and touched up with paint.
Glue the tiles onto the frame and allow to dry completely before handling.
Glue the tiles onto the frame and allow to dry completely before handling.

- Choosing a selection results in a full page refresh.
- Opens in a new window.