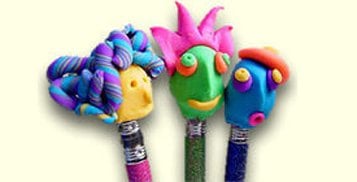
Sculpey Bake Shop® Eraser Clay Kooky Faces
Sculpey Bake Shop® Eraser Clay Kooky Faces
Read More
Read Less
Make these wild looking heads to use as erasers on your pencils.
ADDITIONAL SUPPLIES
- Toothpicks
- Pencils

Project Instructions
- Getting Started:
Start with clean hands, unwrap and knead clay until soft and smooth, or condition by running clay though a Pasta Machine. We recommend using a designated machine for clay purposes only. When working with multiple colors, clean hands with soap and water or baby wipes (we have found that baby wipes work best) before switching colors. Shape clay, pressing pieces firmly together. Wash hands after use.
- Baking:
To make the Green face:
Roll a ball of Lime clay that is approximately 1 inch in diameter. Gently press the ball onto the top of your pencil.
Roll a ball of Lime clay that is approximately 1 inch in diameter. Gently press the ball onto the top of your pencil.

Create the nose by pinching the clay, using your thumb and forefingers. If you grasp the pencil in your hand and pinch from the bottom of the "face", you will create eye sockets.

Now let's add some eyes. Roll small balls of Orange clay and flatten them. Add these to the head and then smaller balls of Lime to the Orange balls and poke a hole for the "pupil" of the eye. The hole also helps anchor the pieces of clay to the larger head piece.

The mouth is created by added a small curved coil of Yellow clay.
The wild hair is a small ball of Pink clay that had been flattened on one side and stretched a little. Use the plastic knife to cut out triangles of clay to create the spikes. Once this piece is curved to fit the head shape, you can gently curl the tops of the spikes if you wish. Attach this to the top of the head and your Lime kid is ready for baking!

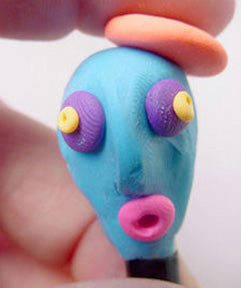
To make the Blue kid:
Repeat steps 1 through 3 above using Blue clay. For eyes, make 2 small balls of Purple and 2 smaller balls of Yellow for the pupils. Add the eyes and poke through. To create the mouth, add a small flattened ball of Pink and then poked the hole for the mouth, so he looks like he is whistling!
Repeat steps 1 through 3 above using Blue clay. For eyes, make 2 small balls of Purple and 2 smaller balls of Yellow for the pupils. Add the eyes and poke through. To create the mouth, add a small flattened ball of Pink and then poked the hole for the mouth, so he looks like he is whistling!

His beret is a larger ball of Orange, flattened and attached to the head. Top this off with a small ball of Yellow and your kid is ready to bake!
For the Yellow kid:
Repeat steps 1 - 3 above using Yellow clay. Use a toothpick to poke holes for the eyes and use the side of the tool to create the mouth.
Repeat steps 1 - 3 above using Yellow clay. Use a toothpick to poke holes for the eyes and use the side of the tool to create the mouth.

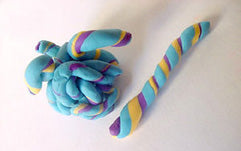
Make small snakes of Blue, Purple and a Yellow clay about 2 inches in length. Twist these snakes together.

Now alternate rolling the coils smooth on your worksurface and twisting to make the coils tighter. When you are satisfied with your pattern, pinch off 2 inch pieces of the coil. Jumble your pieces together and there is your hair!! Attach to the head.
You can bake the kids on their pencils, but if you wish, you can gently remove the clay from the pencil and bake just the clay. Bake as directed above in Step 1.
- Choosing a selection results in a full page refresh.
- Opens in a new window.