Sculpey Premo™ Happy Garden Snail
Sculpey Premo™ Happy Garden Snail
Read More
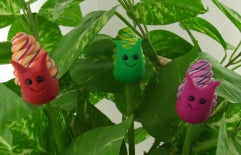
These plant pokes are cute and so easy to make. They can be used for indoor plants or out in the garden. They also would be cute sitting in a little terrarium!
Read Less
ADDITIONAL SUPPLIES
- Craft knife
- Wooden dowels
- Glass teardrop beads
Project Instructions
- Getting Started:
Start with clean hands, unwrap and knead clay until soft and smooth, or condition by running clay though a Pasta Machine. We recommend using a designated machine for clay purposes only. When working with multiple colors, clean hands with soap and water or baby wipes (we have found that baby wipes work best) before switching colors. Shape clay, pressing pieces firmly together. Wash hands after use.
- Baking:
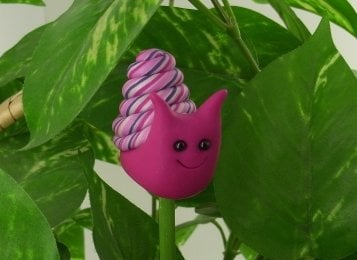
Condition 1/4 of a bar of Fuchsia and make a stubby log forming a pointed tail at one end.

Round the other end and then make two pinches to form two antennae. Shape these and round out the head. Bend the head to curve upwards. Press in the middle of the snail’s body to flatten it a bit.

If you are making your snail into a plant poke then take your wooden dowel and poke a hole in the bottom of your snail. Add two black bead eyes. The teardrop beads make great eyes because they are round on one end and pointed at the other, just push the pointed end right into the clay. If you don’t have these then simply make two little balls of black clay and press them on. Using your craft knife make a nice little curvy smile on your snails face. Set aside the body.

Condition a 1/4 brick of Pearl clay. Roll it into a log that is approximately 2 ½ to 3” long. It should be about a ½” thick. Set this aside.

Roll 2 very thin snakes of each of the remaining colors; the same length as the Pearl log. (2-Fuchsia, 2-Magenta Pearl, 2-Purple)

Press the thinner snakes to your large Pearl log alternating colors and leaving Pearl clay to show in between. Roll the log so the colors become one with the Pearl clay.
Roll a long snake that is approx. 1/4” thick and 12” long.
Gently twist the snake so the colors start to swirl.

Roll one end so that it is a tiny bit thinner in diameter and then start to coil the snake into a shell. You may have to twirl the snake as you coil to keep your swirls looking uniform. As you coil make the shell gradually get larger and larger forming a cone shape. Make about 6 or 7 coils and then cut the excess off and tuck end piece in. Shape shell if need be to make it uniform looking.

Now you are ready to press the shell onto the snail’s body. I place the end that has the tucked piece behind the snails head.
Bake as directed above. Once he is cooled you can push the wooden dowel into the hole. Might need a little glue to secure but sometimes the fit it snug enough that you don’t need it. Your cute little snail is ready to be displayed in an indoor plant or in your garden.
Colors used for other snails: Green Snail: Premo Pearl, Green, Cadmium Yellow, Bright Green Pearl Red Snail: Premo Pomegranite, Pearl, Orange, Cadmium Yellow