
Bake Shop Light Unicorn
Bake Shop Light Unicorn
Designed by Phoebe Doehring
Read More
Read Less
This friendly guy will love hanging out with you and your friends!
ADDITIONAL SUPPLIES
- Black Sharpie marker

Project Instructions
- Getting Started:
Start with clean hands, unwrap and knead clay until soft and smooth, or condition by running clay though a Pasta Machine. We recommend using a designated machine for clay purposes only. When working with multiple colors, clean hands with soap and water or baby wipes (we have found that baby wipes work best) before switching colors. Shape clay, pressing pieces firmly together. Wash hands after use.
- Baking:
Roll an oblong ball of White Pluffy approximately 3 long. This will be the unicorns head and body combined. Roll 3 equal sized balls of White approximately 3/4” in size. These will be 3 of the legs. For the last back leg roll a ball of White Pluffy 1” in diameter. Roll two small balls 1/4“ in size for the ears. Set aside. Roll a small ball of Blue clay for the unicorn’s horn. Combine some Red and White clay and mix to make Pink. Roll the Pink clay into a long thin snake or two. This will be used to make the unicorn’s mane. Combine some Blue and White clay and mix to make Light Blue. Roll this into a long thin snake as well.
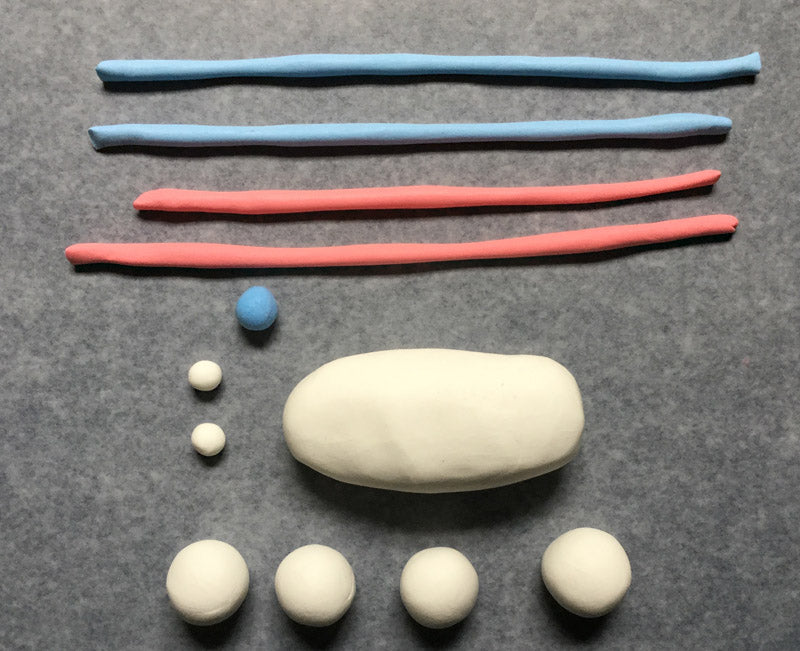
Shape the head with your fingers giving the unicorn a longish neck and kind of a boxy nose. Shape the White ball of Pluffy that you made for ears into pointed triangle shapes and attach to the top of the head for ears. Roll the remaining three smaller balls into barrel leg shapes all the same size. With the last larger ball of White, shape one end to be a barrel shape and then flatten the other end for a rounded thigh shape. Attach the legs to the body. Two legs will come out off the front the the thigh leg in the back and the other remaining leg underneath the thigh.

Shape the Blue ball of clay into a pointed horn and attach to the top of the head. For the mane and tail cut pieces off of the snakes of Pink and LIght blue.Pieces might be approx. 3/4” to 1” depending on what fits. Pieces can be cut to fit or stretched slightly to fit. Roll the one end of each piece to create a point. Arrange these alternating Pink and Light Blue pieces onto the head to create the unicorn’s mane. Wrap a couple of the pieces around the horn. The rest can drape to one side of the unicorn’s head and neck. For the tail just press a bunch of pieces together alternating colors and length of pieces until you are satisfied the tail is thick enough and attach to the unicorn’s rear. Smooth your unicorn to where you are satisfied.

Bake according to the package directions. Allow to cool. With a Black Sharpie marker make eyes closed on your unicorn and add lashes if you want!