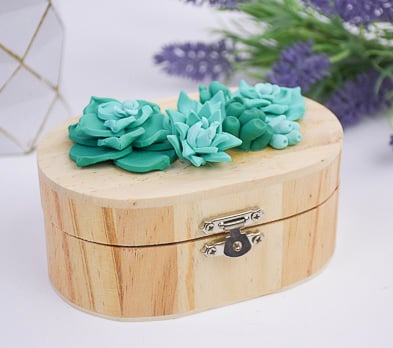

Sculpey Soufflé™ Faux Succulent Box
Sculpey Soufflé™ Faux Succulent Box
Designed by syndee holt
Read More
Faux succulents are quite popular now and you can easily create your own using the gorgeous Soufflé™ Figi color.
TIME TO COMPLETION: 60 mins
ARTIST NOTE: Soufflé™ Ivory can be substituted for the Soufflé™ Igloo or use them both!
Read Less
TIME TO COMPLETION: 60 mins
ARTIST NOTE: Soufflé™ Ivory can be substituted for the Soufflé™ Igloo or use them both!
ADDITIONAL SUPPLIES
- Small wooden box (you can paint it if you wish)
- Clear drying glue (I used Gorilla for crafts)
- Small sheets of paper to work on
- Small smooth tile
- Rubbing alcohol and cotton swab

Project Instructions
- Getting Started:
Start with clean hands, unwrap and knead clay until soft and smooth, or condition by running clay though a Pasta Machine. We recommend using a designated machine for clay purposes only. When working with multiple colors, clean hands with soap and water or baby wipes (we have found that baby wipes work best) before switching colors. Shape clay, pressing pieces firmly together. Wash hands after use.
- Baking:
I used the 1 inch cutter to mix small amounts of the three colors together. Here is my mixes. So 1:1 means that I used 1 circle of each color. The 2:1 mix is two parts Igloo to 1 part Figi, The Figi Jade 4:1 mix is 4 parts Figi to 1 part Jade.

I sheeted out some of the Figi color mix on a medium-thin setting on the clay machine and I used the 1 inch round cutter to cut out several pieces. Then I just pinched one edge as shown. (NOTE! Cut your nails before you start this project!)
Lay the pinched pieces in an overlapping circle as shown.
Lay the pinched pieces in an overlapping circle as shown.

The next layer was created in the same fashion, using the .75 round cutter and the Igloo/Figi 1:1 mix. I tried to position these petals so that the pointed end was centered between the two petals below it.

I used the round cutter from the mini cutter set to create the final layer of petals using the Igloo/Figi 2:1 mix.

For the center of the succulent, I rolled a small piece of my lightest color and use the largest Etch n’ Pearl to create little petals that I placed around a small ball of the same color. (NOTE: I added a little more Igloo into my mix for this!).
How easy was that? I also used several of these centers as baby plants to fill in around the edges of my design.
How easy was that? I also used several of these centers as baby plants to fill in around the edges of my design.

To add texture and more colors (as well as fill void spaces between the larger plants), I rolled a rough tube of clay, pulled a piece off and rounded it. Then I put several of them into a bunch and use the small or medium ball stylus to gently press into the larger end of the leaves. (This is modeled after one of my favorite succulents in my garden). These can be created in whatever colors and sizes you need for your design!

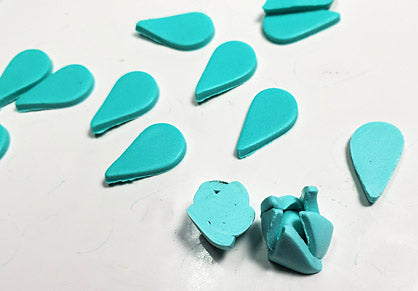
I also used the small teardrop from the mini cutter set to create some spiker versions of the succulents. I started by wrapping about 4 teardrops around a small ball of clay. Then I cut the bottom off (as shown). Then simply add some more leaves until you are satisfied with the design!
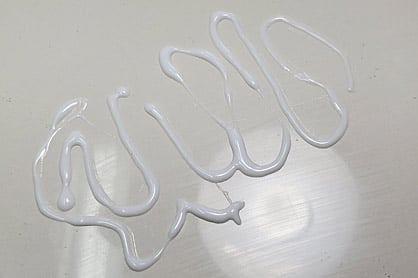
Once you have your design laid out on a small sheet of paper, place a small amount of the Sculpey Oven Bake Adhesive on the smooth tile in the approximate area that will be covered by your design.
Carefully slide or lift your design onto this area. Wipe away any excess adhesive that you see on the edges – BUT, it doesn’t have to be perfect. I’m only creating a better flat edge for the final adhesive to bond to on the box and making it easier to shift the design to the box after baking.
Bake according to the directions in Step 1 and allow the clay to cool completely.
NOTE: While your clay is baking, this is a great time to lightly sand your box. I decided to leave my box as natural wood, but you can paint yours with acrylic paint while the clay is baking as well!
Bake according to the directions in Step 1 and allow the clay to cool completely.
NOTE: While your clay is baking, this is a great time to lightly sand your box. I decided to leave my box as natural wood, but you can paint yours with acrylic paint while the clay is baking as well!

Slide/work your blade along the tile to release the Oven Bake Adhesive and the clay. You should be able to carefully invert the design and add the air-dry adhesive (mine is Gorilla Glue for Crafting) before applying the design to your box top. I find that rubbing alcohol on a cotton swab helps remove the excess glue, especially the 91% alcohol. Allow to dry thoroughly before enjoying your new box!

Here is a final look at my box!
