Skip to product information
1 of 1

Sculpey Premo™ Wind Chime Project

Sculpey Premo™ Wind Chime Project

Designed by Lauren Medina
Read More
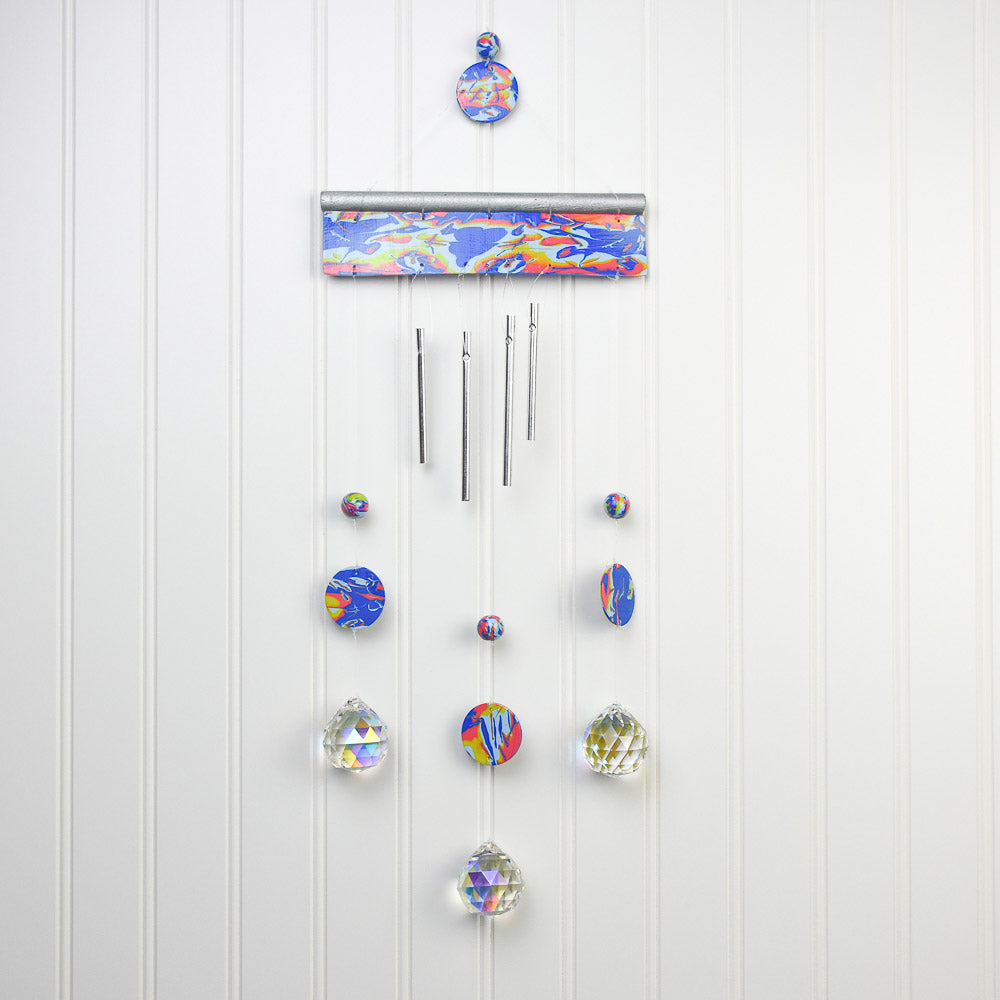
Create and assemble this colorful wind chime in just an afternoon! What an addition to your garden or give it as a gift to that special friend. Project time: 50 mins Bake time: Beads 50 mins Disks and rectangle 30 mins
Read Less
ADDITIONAL SUPPLIES
  • 4 wind chime bells
  • 8-inch wooden dowel
  • Outdoor metallic craft paint
  • Crystals
  • Fishing wire
View full details
Project Instructions

Step 1

Getting Started:

Please make sure your work area is covered and you are not working on an unprotected surface. We recommend working on the Sculpey® Oven-Safe Work Mat, wax paper, metal baking sheet, or disposable foil. Uncured clay may damage unprotected furniture or finished surfaces. Be sure to cover your crafting area appropriately.

Start with clean hands, unwrap and knead clay until soft and smooth, or condition by running clay though a Pasta Machine. We recommend using a designated machine for clay purposes only. When working with multiple colors, clean hands with soap and water or baby wipes (we have found that baby wipes work best) before switching colors. Shape clay, pressing pieces firmly together. Wash hands after use.

Baking (also called Curing):

Begin by preheating oven to 275 °F (130 °C). After you are done creating; for best
results bake/cure clay on an oven-proof surface such metal, aluminum foil, an
index card or the Sculpey® Clay Mat at 275°F (130 °C) for 30 minutes per
1/4" (6 mm) thickness according to package directions. Oven safe glass or
ceramic surfaces are also acceptable for baking/curing; however please note
that the baking/curing times may take longer as the glass or ceramic surfaces
take longer to heat up. For best baking results, use an oven thermometer. DO
NOT USE MICROWAVE OVEN. DO NOT EXCEED THE ABOVE TEMPERATURE OR RECOMMENDED BAKING TIME.

Step 2

Cobalt Blue is my main color, so I am using the most of that color. Clay ratios: 2 ounces of Cobalt Blue, 1 ounce Pale Blue,1 ounce Blush and 0.5 ounce Wasabi.

Step 3

Condition and roll out your clay pieces into sheets. Stack your colors however you like, trim the edges off. I stacked pink, cobalt blue, pale blue and a very thin sheet of wasabi. They can be whatever thickness you’d like. The Mokume Gane technique is one of the most forgiving and versatile!

Step 4

Cut your stack in half, stack in the same order to maintain your color pattern. Repeat 2 times. You should have about 16 individual layers.

Step 5

Make deep marks in your clay to start to create a pattern.

Step 6

Squeeze clay back together, maintaining the block shape. You want to get rid of the air pockets you just created.

Step 7

Flip clay over and make marks on that side, squeeze the block back together like the previous steps.

Step 8

Reduce your block’s height (I used an acrylic roller to flatten it a bit)

Step 9

Use different cutters to create more patterns.

Step 10

Squeeze block back together. Roll out until it is about an inch high.

Step 11

Cut block in half, on the “grain” side. The grain side is the side that has all the layers showing. Cutting this way exposes your unique Mokume Gane pattern.

Step 12

Join and align the pattern. Squeeze and reduce again.

Step 13

Cut block in half. Set one half aside for later. Cut one of the halves in half again along the grain.

Step 14

Join the two thin rectangles to create one long rectangle. This will be the main component of the windchime. Send it through your pasta machine at the thickest setting. Trim edges to create a 8 inch long by 1-1/2 inch wide rectangle.

Step 15

Add five holes along the top of the rectangle.
Make holes at the 1 inch, 3 inch, 4 inch, 5 inch and 7 inch marks. Use the photo below as a guide for the remaining holes along the bottom edge. You
should have 12 holes total.

Step 16

Roll out the other half you set aside before.
Use this to cut out four, 1½ inch circles. Save your scraps to create beads in
the next step.

Step 17

One disk needs three holes. The remaining disks need just two holes. Use the photo as a placement guide.

Step 18

Use your scraps create 4 beads. Add holes that go all the way through so you can string these later. Bake these separately, they will require a longer baking time. I baked my beads at 275°F for about 50 mins.

Step 19

Bake the remaining pieces for 30 mins at 275°F.

Step 20

While your clay pieces bake, paint an 8 inch long wooden dowel using outdoor paint. The type of paint and color is up to you. I used a ¼ - ½ inch thick dowel and metallic silver paint. I applied this with a regular paint brush.

Tip: You can use gardening shears, and a little elbow grease, to trim your wooden dowel to the correct length.

Step 21

Once your clay pieces have fully cooled, you can attach the elements together using fishing wire. I started with the wind chimes. You should have placed 5 holes near each other, skip the middle hole, see photo.

NOTE: If you plan to hang your finished piece outside, you can coat the individual elements with Sculpey UV glaze and allow to dry before beginning assembly.

Step 22

Attach the wooden dowel with fishing wire to the side with five holes. Tie only the three holes in the middle, leave the two on the ends for the next step.

Step 23

Cut two 12-inch pieces of fishing wire for the far left and far right holes. Feed the wire through the clay rectangle and around the dowel. You should have a lot of wire to one end, tie a knot. Do the same on the opposite end.

Start on the left, feed the long end through
hole 1 and 2. Take the free end on the right side and feed the wire through
hole 3 then 2. You should have two strings coming through hole 2 now.

Step 24

Start on the left, feed the long end through hole 1 and 2. Take the free end on the right side and feed the wire through hole 3 then 2. You should have two strings coming through hole 2 now

Step 25

Tie a knot and then add a clay bead. Tie another knot to hold the bead in place. You should have a little string left, tie the ends in a knot to create a hanging loop for your project.

Step 26

Cut two 12 inch pieces and two 5 inch pieces of fishing wire. Start on the left. Tie one end to the rectangular piece, add bead and then make a double knot at about 6 inches this will keep the bead from falling down past that point. You should have enough string to leave an inch of space and then connect a clay disk. Trim any remaining fishing wire. Using one 5 inch piece connect a crystal bobble to the disk, trim excess wire. Repeat on the other side.