
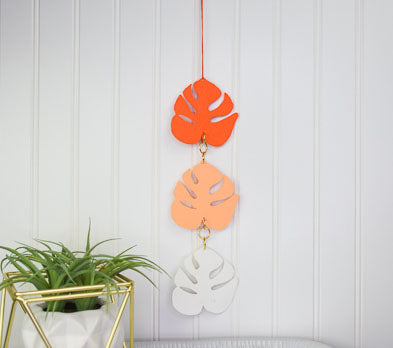
Sculpey Premo™ Monstera Wall Hanging
Sculpey Premo™ Monstera Wall Hanging
Designed by Gretchen Amberg
Read More
Create a dynamic wall hanging for yourself or for a gift in just an hour using Sculpey Premo™ Burnt Orange, Apricot and White clays. Or change up the color scheme to match your home decor! This project is also a great way to utilize some extra pretty marbled scrap clay.
TIME TO COMPLETE: 30 minutes to make/assemble 30 minutes to bake
Read Less
ADDITIONAL SUPPLIES
- Craft Knife
- 40 Grit Wet/Dry Sandpaper – Optional
- Baking Tray
- Plain Copy Paper
- Needle tool or toothpick
- 10 mm Gold Tone Jump Rings (6-pieces)
- Needle Nose Jewelry Pliers
- Thin Orange Hemp or Other Cord for Hanging
Project Instructions
- Getting Started:
Start with clean hands, unwrap and knead clay until soft and smooth, or condition by running clay though a Pasta Machine. We recommend using a designated machine for clay purposes only. When working with multiple colors, clean hands with soap and water or baby wipes (we have found that baby wipes work best) before switching colors. Shape clay, pressing pieces firmly together. Wash hands after use.
- Baking:
Condition 1-block each of Orange, White, and Apricot clay. Set the clay conditioning machine to a medium width setting and roll out a sheet of each color.
Use the 60-grit sandpaper to texture one side of each sheet of clay.
Cut out the monstera leaf paper template, including the small gaps. Place the template onto the textured side of one sheet of clay.
Use the 60-grit sandpaper to texture one side of each sheet of clay.
Cut out the monstera leaf paper template, including the small gaps. Place the template onto the textured side of one sheet of clay.

Use the craft knife to trim around the outside of the template and in the small gaps. Remove the excess clay and the paper template. Place the leaf to the side and perform the same process of placing the template and cutting out the shape with the remaining 2 textured sheets of clay.
Use the 60-grit sandpaper to texture the opposite side of the leaves.
Use the 60-grit sandpaper to texture the opposite side of the leaves.

Use a toothpick or needle tool to poke a hole in the top and bottom of the Apricot and Orange leaves. Poke a hole in the top of the White leaf, this leaf does not need a hole in the bottom. Make sure the holes are large enough to slip onto the jump rings.
Bake all three leaves for 30-minutes and let cool.
Bake all three leaves for 30-minutes and let cool.

Attach one jump ring through the following holes on the leaves. White leaf – top, Apricot leaf – top and bottom, Orange leaf – bottom. Note: When opening the jump rings be sure to open them side-to-side. If you pull the cut ends of the jump ring straight apart from each other, you risk distorting the shape of the ring. Close the jump rings.

Open two more jump rings. Pick up the Orange and Apricot leaves. Loop the open jump ring through the ring at the bottom of the Orange leaf and ring at the top of the Apricot leaf. Use the needle nose pliers to close jump ring.
Repeat this process to connect the top of the White leaf to the bottom of the Apricot leaf.
Repeat this process to connect the top of the White leaf to the bottom of the Apricot leaf.
