

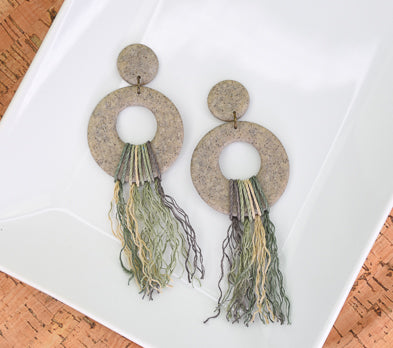
Sculpey Premo™ Hemp Cord Tasseled Earrings
Sculpey Premo™ Hemp Cord Tasseled Earrings
Designed by syndee holt
Read More
Sculpey Premo™ Gray Granite is the perfect partner to team up with Hemptique Cording to create these great tasseled earrings in earth tones.
SUBSTITUTIONS:
• If you don’t have a Clay Conditioning Machine, you can also use the roller in the Essential Tools set to roll the clay out to about 1/8-inch thickness.
• If you don’t have Liquid Sculpey® Clear, you can substitute other colors. You can also just use a Super Glue to glue to post to the clay, but the Liquid Sculpey is the most optimal way.
TIME TO COMPLETION: 1 hour including baking
Read Less
ADDITIONAL SUPPLIES
- Hemptique Mini Long Card in Camouflage
- Small piece of deli wrap or kitchen wrap
- Stainless steel posts (2) or ear wires (2)
- 8 mm jump rings (2) Mine are Antique Gold-toned
- Jewelry pliers or small needle nose pliers
- Couple of pieces of clean paper
- Scissors to trim the cording
- Instant glue (optional)
- Small craft knife (Like Exacto)
Project Instructions
Getting Started:
Please make sure your work area is covered and you are not working on an unprotected surface. We recommend working on the Sculpey® Oven-Safe Work Mat, wax paper, metal baking sheet, or disposable foil. Uncured clay may damage unprotected furniture or finished surfaces. Be sure to cover your crafting area appropriately. Start with clean hands, unwrap and knead clay until soft and smooth, or condition by running clay though a Pasta Machine. We recommend using a designated machine for clay purposes only. When working with multiple colors, clean hands with soap and water or baby wipes (we have found that baby wipes work best) before switching colors. Shape clay, pressing pieces firmly together. Wash hands after use.
Baking:
Begin by preheating oven to 275 °F (130 °C). After you are done creating; for best results bake clay on an oven-proof surface such metal, aluminum foil, an index card or the Sculpey® Clay Mat at 275°F (130 °C) for 30 minutes per 1/4" (6 mm) thickness according to package directions. Oven safe glass or ceramic surfaces are also acceptable for baking; however please note that the baking times may take longer as the glass or ceramic surfaces take longer to heat up. For best baking results, use an oven thermometer. DO NOT USE MICROWAVE OVEN. DO NOT EXCEED THE ABOVE TEMPERATURE OR RECOMMENDED BAKING TIME.
Sheet or roll out the clay to about 1/8-inch thickness. Lay the sheet of deli plastic or kitchen plastic on top of the sheet and position the 2-inch cutter with the .75-inch cutter centered, but slightly higher on one side. The deli plastic will gently curve the outside edges of the circles for us.

Use a small board or book to FIRMLY press the cutters down (I don’t recommend using your hands to push them down!) Once you have pushed them sufficiently, you can gently spin each cutter while applying pressure. This will help work the cutter through the last little bit of the clay.

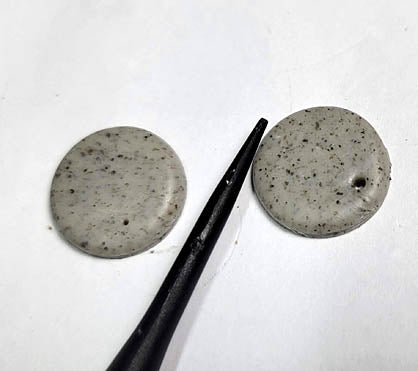
Gently peel the remaining clay away from the outside of the circle and set aside to create the second earring. You can lightly run the craft knife around the smaller circle to ensure that it is completely separated. Remove the larger circle of clay from the center circle. But keep the center circle for the post portion of the earring design.
You may need to carefully use the craft knife to clean up the edges of the circles. I also like to use the top of my thumbnail to run around the edges and help smooth them.
You may need to carefully use the craft knife to clean up the edges of the circles. I also like to use the top of my thumbnail to run around the edges and help smooth them.

I like to use the Blunt Point Tool from the Essential Tools set to create the holes in my clay. I position my holes in the clay as shown. Move the larger circles to your baking tray.
There are many ways to attach a post finding to the back of the clay, but I prefer to do so with a quick drop of Liquid Sculpey™ to cover the bottom of the post. (Please make sure that you stir your Liquid Sculpey™ before using it!)

Allow the Liquid Sculpey™ to settle and flow completely around the post back as shown.
Place the post backs on the baking sheet and bake the clays according to the directions in Step 1 above.
Place the post backs on the baking sheet and bake the clays according to the directions in Step 1 above.

While the baked clay is cooling cut some 7-inch lengths of the hemp cording. I cut about 10 pieces.
Once the clay has cooled, I add the cording to the bottom portion of each earring by pushing a loop of the clay through the hole in the center of the clay from the back.
Once the clay has cooled, I add the cording to the bottom portion of each earring by pushing a loop of the clay through the hole in the center of the clay from the back.

Pull the 2 loose ends of the cord through the loop and lightly tighten the loop against the clay. NOTE: I left mine a little loose as I worked so that I could reposition them as I worked.

Once you have all cording looped around the clay to your satisfaction, you can tighten the loops by pulling gently but firmly on them. (I was pleasantly surprised at how nicely this cording held the knot tension for me!).
Use the metal needle tool to shred the hemp threads to create the fringe. Start at the bottom of each piece and stroke toward the end of the cord and just work your way up. (This is a great way to work while watching a movie or doing a Zoom call!)
NOTE: You can add a tiny drop of instant glue to the back of the outside loops to keep them tightened if you wish!

Here is a quick look at the completed post top. It is firmly embedded in the baked Liquid Sculpey™!

Assemble the earrings with the jump rings and you are ready to go!
NOTE: These earring tops to NOT have the posts on back, so that they can be photographed easier.
NOTE: These earring tops to NOT have the posts on back, so that they can be photographed easier.

- Choosing a selection results in a full page refresh.
- Opens in a new window.