Skip to product information
1 of 1

Sculpey Premo™ and Liquid Sculpey® Breakfast Pastry Keychain

Sculpey Premo™ and Liquid Sculpey® Breakfast Pastry Keychain

Read More
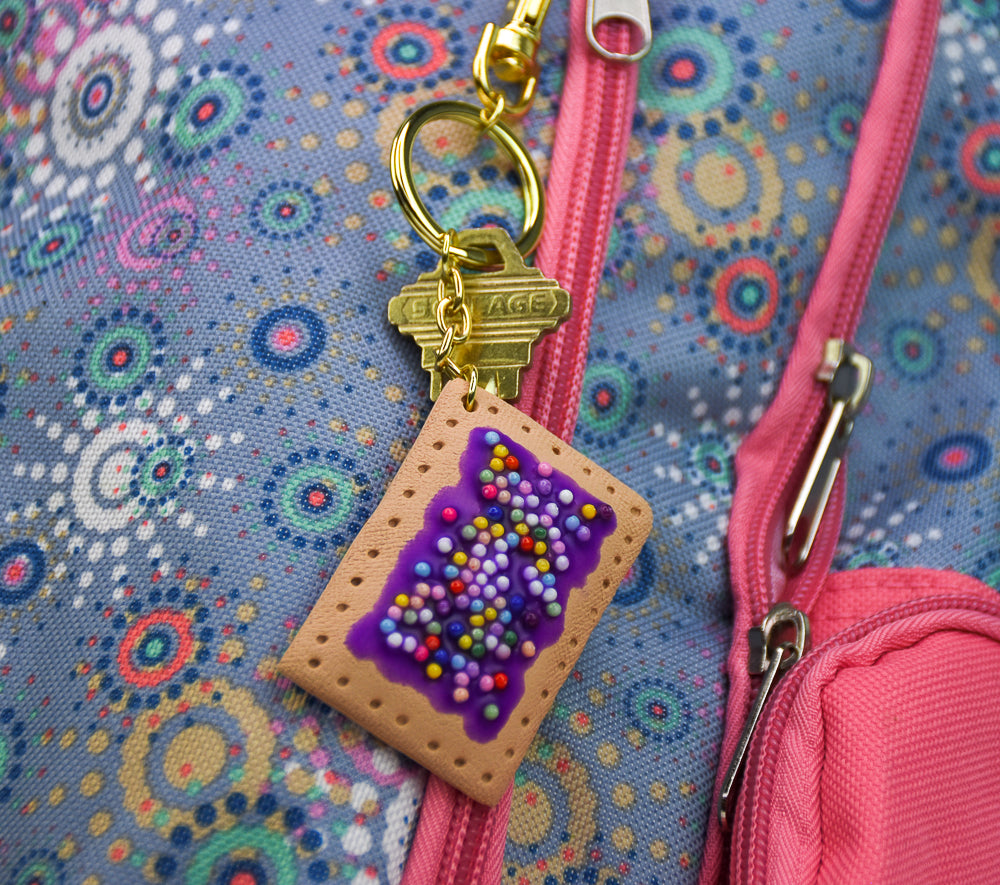
Create a mini version of your favorite snack to dangle from your backpack or purse! Why not make them in all your favorite flavors? TIME TO COMPLETION: 90 Minutes to make, bake (twice), and assemble Designed by Amy Koranek
Read Less
ADDITIONAL SUPPLIES
  • Coarse sand paper, or stair tread, or screen for making a pastry texture
  • Paper towel
  • Bakeable craft sprinkles
  • Gold tone split key ring with chain and lobster clasp - a jump ring is not needed for my sample because the key chain already has a jump ring on the end of the chain
View full details
Project Instructions

Step 1

Getting Started with Liquid Sculpey®

Please make sure your work area is covered and you are not working on an unprotected surface. We recommend working on the Sculpey® Oven
Safe Work Mat, wax paper, metal baking sheet, or disposable foil. Uncured
Liquid Polymer Clay may damage unprotected furniture or finished surfaces. Be
sure to cover your crafting area appropriately. - Stir Liquid Sculpey® completely. Thin with Sculpey® Liquid Clay Softener as needed - Wash hands after use (we have found that baby wipes work best)

Baking:

-It is important to use oven thermometer when you bake the
liquids so that you can ensure your oven is at the correct temperature.

-Do not microwave the liquids. They must be baked in a
Preheated oven at 275 ºF (130 ºC) for liquid colors and 300 ºF (149 ºC) for
Clear – Do not exceed baking temperatures.

-If your piece is less than 1/4” bake for 15 minutes. For
thicker pieces that are 1/4” or above bake for 30 minutes.

-If your liquid project has become yellowed or discolored in
the oven, when you remake it, tent it by placing either – folding an index card
in half and placing your project under it by using aluminum foil over your
project.

Here’s a tip for baking perfectly in silicone molds. Dampen a dish
towel with water and wring out as much of the water as you can. Fold the damp
towel so that the molds can sit level on top of it. The damp towel will slow
down the curing process so that the LS will cure evenly throughout and avoid
warping.


Step 2

Mix White Premo™ with Raw Sienna Premo™ in a 4:1 ratio or 1/4 bar White to 1/16 bar Raw Sienna. Mix completely to create Light Raw Sienna.

Roll the Light Raw Sienna with Clay Roller to 1/8” thickness.

Cut out two pieces 2” X 1-1/4” and one piece 1-1/2” X 7/8”

Step 3

Stack the smaller piece in the center of a larger piece.

Step 4

Sandwich the remaining larger piece over the top of the smaller one.

Step 5

Push the edges of the top large piece down around the edges to create a mound in the center.

Blend the seams around the edges with your fingertips.

Press a texture all over the top with coarse sandpaper, or rubber stair tread, or a
piece of screen creating a light texture.

Step 6

Poke holes around the outside edges with the Blunt Point Tool.

Step 7

Squirt a small amount of Purple Liquid Sculpey (LS) onto the surface.

Step 8

Spread the LS around with the Ball Point Tool.

Clean tools with paper towel.

Step 9

Poke a hole in the top left corner of the pastry with the Blunt Point Tool.

Sprinkle craft sprinkles into the LS randomly as shown.

Step 10

Bake following the baking instructions for Sculpey Premo™.

Allow to cool completely before handling.

Step 11

I added another layer of Purple LS as carefully as possible between the sprinkles using the Blunt Point Tool to make the Purple areas even brighter. Then I baked a
second time.

Step 12

Here’s the layout for the keychain.

Step 13

Connect the keychain to the pastry using flat nose pliers to open and close the jump
ring.