Skip to product information
1 of 1

Sculpey III® Mini Fairy Garden Terrarium

Sculpey III® Mini Fairy Garden Terrarium

Designed by Amy Koranek
Read More
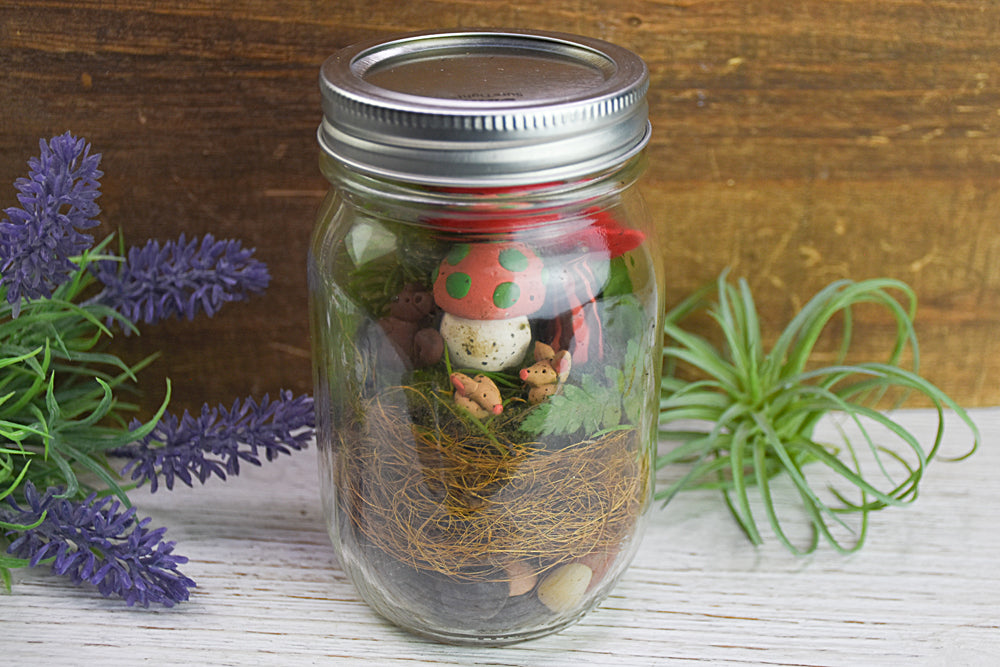
This is a fun project which includes a scavenger hunt to find moss, leaves, sticks, and rocks to use a real life accents to your terrarium. A great way to spend time in nature. COMPLETION TIME: 2 Hours to make, bake, and assemble - plus time to find cool stuff to add to your jar!
Read Less
ADDITIONAL SUPPLIES
  • 32 Ounce canning jar with or without lid
  • Toothpicks - one for each creative element
  • Small rocks and pebbles
  • Sisal
  • Moss
  • Leaves like ferns and cuttings from evergreen trees
  • Wire cutters or cuticle cutters
  • Optional - floral foam or styrofoam (or you can use unbaked scrap clay)
View full details
Project Instructions

Step 1

Getting Started:

Please make sure your work area is covered and you are not working on an unprotected surface. We recommend working on the Sculpey® Oven Safe Work Mat, wax paper, metal baking sheet, or disposable foil. Uncured clay may damage unprotected furniture or finished surfaces. Be sure to cover your crafting area appropriately.

Start with clean hands, unwrap and knead clay until soft and smooth, or condition by running clay though a Pasta Machine. We recommend using a designated machine for clay purposes only. When working with multiple colors, clean hands with soap and water or baby wipes (we have found that baby wipes work best) before switching colors. Shape clay, pressing pieces firmly together.  Wash hands
after use.

Baking:

Begin by preheating oven to 275 °F (130 °C). After you are done creating; for best results bake clay on an oven-proof surface such as metal, aluminum foil, an index card or the Sculpey® Oven Safe Work Mat at 275°F (130 °C) for 15 minutes per ¼" (6
mm) of thickness according to package directions. Oven safe glass or ceramic
surfaces are also acceptable for baking; however please note that the baking
times may take longer as the glass or ceramic surfaces take longer to heat up. For
best baking results, use an oven thermometer. DO NOT USE MICROWAVE OVEN. DO NOT EXCEED THE ABOVE TEMPERATURE OR RECOMMENDED BAKING TIME.

Step 2

Let’s make mushrooms first! You will need to make your mushrooms based on the size of your jar. I’m using a standard sized canning jar (32 ounce).

Start with a Coral mushroom cap that is a domed cone and a White base that is a
little cylinder. These two pieces are the same volume of clay, just different
shapes.

Step 3

Push the base to the cap as shown.

Step 4

Decorate with tiny Leaf Green dots. Set this mushroom aside for now.

Step 5

For the next style mushroom, make caps from Red Hot Red that are cone shaped but
really pinch the edges to make them kind of thin but still thick in the middle.
Make two different size caps to add variety.

Step 6

For the stems, make a small log of Coral and border it with very thin stripes of
Chocolate Brown.

Step 7

Roll the log on your work surface to make the Brown smooth into the Coral. You will want the log to be about 3” long and 1/4” thick. Taper each end of the log with your fingertips to a point


Step 8

Cut the log in half to make stems.

Step 9

Push a toothpick up into each of the stems allowing the tip of the toothpick to poke
out through the top of the stem.

Step 10

Add the caps to the striped stems by pushing the cap onto the toothpick tip. Allow
the base of the toothpick to stick out the bottom of the stem. Set these aside
while we make some critters.

Step 11

For a tiny bunny, use Tan clay to make a round head, oval body, and rice shaped
ears. For size reference you can look ahead to Steps 17 and 18 to see how the
little critters compare to the mushrooms. My mushrooms are giant compared to my
critters.

Step 12

Push the shapes together to make a bunny.

Step 13

I used the same shapes to make a second bunny, but positioned the head
differently so one bunny appears to be standing and one appears to be crouched
down.

Add little Coral bits to the ears and the nose. Poke holes for eye sockets with the
Needle Tool.

Step 14

Next lets make a tiny squirrel. The tiny squirrel is Chocolate Brown and it consists
of a round head, round body, tail that is tapered on both ends, round ears, and
tapered arms.

Step 15

Push all the parts together as shown and add a tiny Black nose. Poke holes for eyes.

Step 16

For baking we will take a lump of scrap clay and push the toothpicks into it. The lump
of scrap should be very flat on the bottom so it stays stable while baking. Add
a toothpick to the mushroom we made in Steps 2-4 up through the stem and the
cap, and push the other end of the toothpick into the scrap clay.

Step 17

Place the toothpicks of all the mushrooms into the scrap clay. This will keep their
caps nice during baking. Add toothpicks to the tiny critters as well. I laid
the critters carefully on the baking sheet because I didn’t want to
accidentally distort them by pushing them into the scrap clay.

Bake following the baking instructions for SculpeyIII®.

Step 18

When the pieces are cool, carefully remove them from the scrap clay.

Step 19

Place a few rocks in the bottom of the terrarium.

Step 20

Make a lump of fresh scrap clay (or you could use floral foam or styrofoam for the
base). You just need something you can push the toothpicks from each element
into.

Step 21

Here I have kneaded and blended my scrap clay to be more neutral in color.

Step 22

Make sure the scrap clay (or floral foam or styrofoam) will fit into the jar.

Step 23

I surrounded by scrap clay with sisal so it doesn’t show through the side of the
jar.

Step 24

Put the scrap clay and sisal into the jar on top of the rocks.

Step 25

Use a tool to push the sisal down so it is more compact and won’t hide your
decorations too much.

Step 26

Here’s how my scrap clay looks in the base of the jar with the sisal around it.

Step 27

Add moss to the top if you like. This helps to conceal the top of the scrap clay
and makes a nice carpet for your critters and mushrooms.

Step 28

Add found natural greenery around the outside edges of the sisal and create a
backdrop for the scenery.

Step 29

Poke holes into the moss and the raw clay (or foam or styrofoam) with a skewer or
Etch ‘n Pearl to receive the toothpicks.

Step 30

Trim the toothpicks with cuticle cutters or wire cutters to at least 1/2” tails.

Step 31

Position all mushrooms and critters in the scene by pushing the toothpick supports down into the holes you made in the moss.

Step 32

Enjoy a few more views of my little terrarium.

Step 33

You can spritz the inside of the jar with a spray bottle of water from time to time
to keep the moss fresh.

Step 34

You can switch out the natural elements throughout the seasons to give your scene a
fresh look.