Skip to product information
1 of 1

Sculpey Bake Shop® Bendy Bee Sculpture

Sculpey Bake Shop® Bendy Bee Sculpture

Designed by Amy Koranek
Read More
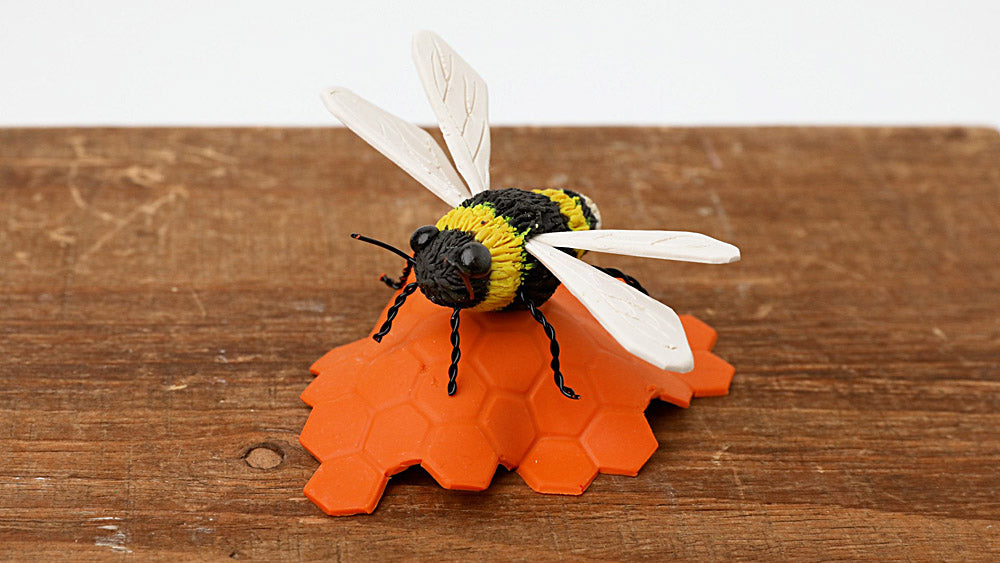
Create a "buzz" with this cute little bee and honeycomb! Display on your desk, your favorite indoor plant or even in your kitchen. TIME TO COMPLETE: 2 Hours to make and bake (3 times), and assemble
Read Less
ADDITIONAL SUPPLIES
  • Honeycomb texture sheet
  • Black craft wire
  • Wire cutters
  • Flat nose pliers
  • Small paintbrush or applicator
  • Instant drying glue
  • NOTE: When sculpting a realistic design like this one, I always look up photos on the internet for reference. From there I can choose to make the piece as realistic or as fictional as I want.

View full details
Project Instructions

Step 1

 Getting Started:

Please make sure your work area is covered and you are not working on an unprotected surface. We recommend working on the Sculpey® Oven Safe Work Mat, wax paper, metal baking sheet, or disposable foil. Uncured clay may damage unprotected furniture or finished surfaces. Be sure to cover your crafting area appropriately.

Start with clean hands, unwrap and knead clay until soft and smooth, or condition by running clay though a Pasta Machine. We recommend using a designated machine for clay purposes only. When working with multiple colors, clean hands with soap and water or baby wipes (we have found that baby wipes work best) before switching colors. Shape clay, pressing pieces firmly together. Wash hands
after use.

Baking:

Begin by preheating oven to 285°F (140°C). After you are done creating; for best results bake clay on an oven-proof surface such metal, aluminum foil, an index card or the Sculpey® Oven Safe Work Mat at 285°F (140°C) for 15 minutes per ¼" (6 mm) thickness according to package directions.  Oven safe glass or ceramic surfaces are also acceptable for baking; however please note that the baking times may take
longer as the glass or ceramic surfaces take longer to heat up.  For best
baking results, use an oven thermometer. DO NOT USE MICROWAVE OVEN. DO NOT EXCEED THE ABOVE TEMPERATURE OR RECOMMENDED BAKING TIME. BAKING SHOULD BE DONE BY AN ADULT.

Step 2

First we will make the wings and pre-bake them so that they are rigid enough to push into the body.

Use 1/8 bar White to make both of the two large wings. Use 1/16 bar White to make both of the two small wings.

To make the wings, make very flat teardrops. The large wings are about 1.5” long. The small wings are about 1” long. If you like, you can use a Clay Blade to make some of the outside edges more straight. Use the Needle Tool to etch details in each wing.

Bake the wings following the baking instructions for Bendy Clay. Allow to cool completely before handling.

Step 3

The baked wings in the following photos are for size reference.

For the body, make a 1/4 bar oval from Black for the center area. From 1/8 bar Yellow make the two Yellow bands on either side of the Black. From 1/16 bar Black, make both a round head and smaller band toward the tail. Use 1/32 bar White To make a tiny tail piece.

Step 4

Push all the pieces together except for the head. Make sure they join really well.

Step 5

Shape the striped body (without the head) so that it makes a bulb shape. Smooth the outside edges so all the colors share the same outside profile.

Step 6

Push the head on top in a dome.

Step 7

Starting at the head and working your way down in a radiating fashion, make score lines with the Needle Tool creating a deep fuzzy texture.

Step 8

When you get to the next color just keep texturing allowing the colors to drag into each other.

Step 9

Keep texturing all the way down the entire body to the tail. Set the bee body aside while we make the legs and antennae.

Step 10

Now we will prepare wire for the legs and antennae. The antennae are each 1.25” long and have a little bend on the end which can be bent with pliers.

The front legs are each 2.25” long and you will need two of these. Bend the wires in half.

The middle legs are each 3.25” long and you will need two of these. Bend the wires in half.

The back legs are each 4” long and you will need two of these. Bend the wires in half.

Step 11

Next pinch the loop end of the wire and grasp the open ends with pliers. Then use the pliers to spin the wires twisting them tightly all the way down the length. This will make the legs a little stronger and also give some texture to them.

Step 12

Push the antennae into the head.


Step 13

Push the legs in place as shown.

Step 14

Push the wings into place next.

Step 15

Add Black dome shaped eyes to the head.

Step 16

Here’s a look at the assembled bee.

Carefully pull the baked wings back out of the body and set them aside for final assembly. Do not bake the wings again.

Bake the bee following the baking instructions for Bendy Clay. Leave the legs splayed for this baking. It will be much easier to pose the bee and position the legs after he is baked. After baking allow the bee to cool completely.

Step 17

Next we will work on the honey for the bee to sit on.

Use all the remaining bar of Yellow and mix it with 1/8 bar Red to make the honey color.

Step 18

Roll the honey out into a thin sheet about 1/8” thick with the Clay Roller.

Step 19

Texture the honey by embossing it deeply with the honeycomb texture sheet using hand pressure.

Step 20

Cut out around the outside of the honey using a Clay Blade.
Randomly cut away the incomplete hexagon shapes to make your honeycomb.

Step 21

Gather up all the scraps of honey that you cut away in the preceding step and wad it up into a ball. Mound it up on the work surface so that it is flat on the bottom.

Step 22

Drape the honeycomb over the mound.

Step 23

Use pliers to curl little feet at the ends of each leg of the bee. Use pliers to bend knees in the bee’s legs. Push the bee body into the top of the mound to create a place for him to land. Make sure the feet are positioned so that they will touch the clay.

Remove the bee from the honey and set him aside. Bake the honey following the baking instructions for Bendy Clay. Allow to cool completely before handling.

Step 24

While the honey is baking, glaze the bee’s eyes with Glossy Glaze using a paintbrush or small applicator.

Use instant drying glue to glue the wings back into the holes that you created in Step 14. Allow glaze and glue to dry completely. It is not necessary to glue the legs in as they made good connection during baking.

Step 25

Here’s a look at our completed Bendy Bee Sculpture.