Skip to product information
1 of 1

Sculpey Air-Dry™ Botanical Wall Hanging

Sculpey Air-Dry™ Botanical Wall Hanging

Read More
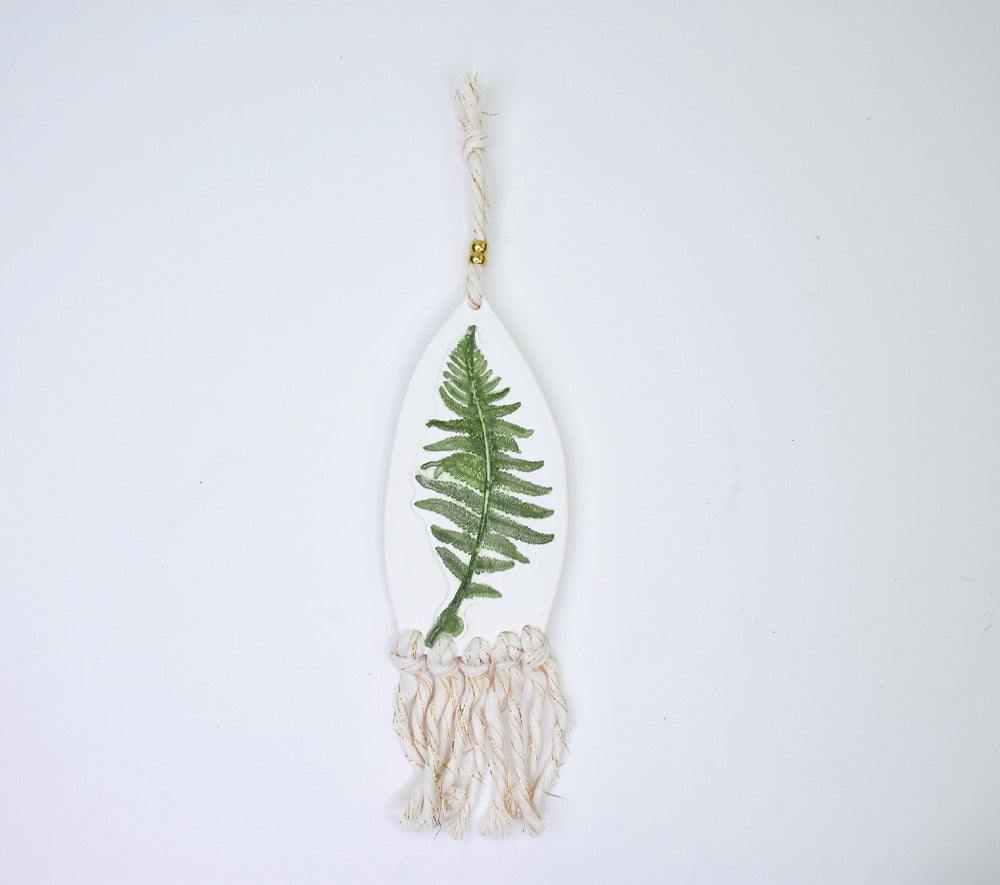
Use your favorite botanical stamp to make up a cool wall hanging. The design is highlighted with watered down paint. COMPLETION TIME: 30 Minutes plus drying time - recommended that you let the wall hanging dry overnight before finishing. Designed by Amy Koranek
Read Less
ADDITIONAL SUPPLIES
  • Large fern leaf stamp
  • Zip tight bag for storing excess clay
  • Water
  • Dark green acrylic paint
  • Fine line paintbrush
  • Water
  • Cup for mixing paint
  • Metal pony beads (2) with 8mm holes
  • Thick yarn
  • Scissors
  • Ruler
  • Bobby pin
View full details
Project Instructions

Step 1

Getting Started with Sculpey Air-Dry™

Please make sure your work area is covered. We recommend working on the Sculpey® Oven-Safe Work Mat, wax paper, or disposable foil.

Start with clean hands, unwrap and knead clay until soft and smooth.  Wash hands after use. Wrap any extra clay in the wrapper and then put in an airtight container.


Step 2

Condition 1/3 block of the clay. Roll out a piece that is large enough to accommodate your rubber stamp and at least 3/16” thick.

Step 3

Impress the stamp deeply into the sheet of clay.

Step 4

Use the Flexible Blade to cut a nice, curved shape around the stamped image.

Be sure to leave enough room around the edges for the holes across the bottom and a hole at the top.

Place the unused clay wrapped tightly in a zip tight bag for later use.

Step 5

Now we will poke holes in the piece for the bottom fringe and the top hanger. We will start by poking small holes and then gradually making them larger. You will want to have a container of water handy. Dip the 2 mm Ball Tool into the water. Poke a series of holes along the bottom for decorative tassels to be added later. Poke a hole at the top for the hanger. Dip the tool into water before each hole. Flip the
project over and poke each hole from the back as well using the same method.

Step 6

Re-poke each hole using the same method, front and back, but push the 2 mm Ball Tool in deeper so that it starts to expand to the neck of the tool.

Step 7

Re-poke each hole using the same method, front and back, with the 6 mm Ball Tool.

Step 8

Make sure the holes look large enough to accommodate the yarn doubled. Use fingertips to smooth the areas around the holes front and back.

Allow the piece to dry overnight. You will know the piece is completely dry when it no longer feels cool to the touch.

For flat pieces like these, I usually flip them at least once during drying time to make sure both sides get directly exposed to the air.

Step 9

After the piece is completely dry, it’s time to add details with paint.

Mix the paint so that it is thinned with water, about 1:1 ratio. Thinning the paint will help it flow and you can always darken areas as desired.

Step 10

Add paint to all areas thinly, adding more where you’d like it darker. I used my clean paintbrush dipped in only water to lift some paint back off to create the lighter lines
down the center for detail.

Step 12

Cut yarn into 12” lengths.
Thread the yarn at the halfway point through a bobby pin as shown.

Step 12

This makes a great “needle” for threading through the holes.

Step 13

Use the bobby pin to pull the doubled yarn through.

711-14

If you like, you can thread the tails back through the loop of the yarns at each hole or secure with your favorite knot.

Step 15

At the top, I threaded the tails both through two pony beads with 8 mm holes for a finished detail.

Step 16

Trim tails of the tassels at the bottom as desired.