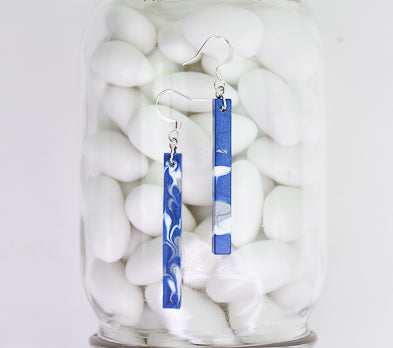

Liquid Sculpey® Marbled Bar Earrings
Liquid Sculpey® Marbled Bar Earrings
Designed by Amy Koranek
Read More
A classic earring shape created with Liquid Sculpey® - these earrings will become your “go to” earrings for work or play!
TIME TO COMPLETE:
60 Minutes to make, bake, and assemble
Read Less
ADDITIONAL SUPPLIES
- Paper towel
- Let’s Resin Earring Mold
- Silver tone ear wires (2)
- Silver tone jump rings (4)
- Flat nose pliers

Project Instructions
- Getting Started with Liquid Sculpey®:
- Baking:
- It is important to use oven thermometer when you bake the liquids so that you can ensure your oven is at the correct temperature.
- Do not microwave the liquids. They must be baked in a Preheated oven at 275 ºF (130 ºC) for liquid colors and 300 ºF (149 ºC) for Clear – Do not exceed baking temperatures.
- If your piece is less than 1/4” bake for 15 minutes. For thicker pieces that are 1/4” or above bake for 30 minutes.
- If your liquid project has become yellowed or discolored in the oven, when you remake it, tent it by placing either – folding an index card in half and placing your project under it or by using aluminum foil over your project.
Here’s a tip for baking perfectly in silicone molds. Dampen a dish towel with water and wring out as much of the water as you can. Fold the damp towel so that the molds can sit level on top of it. The damp towel will slow down the curing process so that the LS will cure evenly throughout and avoid warping.
Drip three randomly sized dots of Navy Metallic into the sticks shape.

Add White drops next to the Navy Metallic.

Add Silver drops next.

Layer like colors over like colors to fill the mold to level.

Starting at the top of the mold, insert the tip of the Needle Tool in the very top and drag it through the dots of colors. Drag in a zig-zag motion so you do create a swirly line.

Carefully use a flat sided tool to scrape away excess clay from the sides of the mold if necessary.
Bake the mold following the baking instructions for Liquid Sculpey®.
Bake the mold following the baking instructions for Liquid Sculpey®.

When the mold is completely cool, remove the pieces by gently flexing.
Add jump rings and ear wires using flat nose pliers.
Add jump rings and ear wires using flat nose pliers.
