

Sculpey Soufflé™ Chunky Chain Bracelet
Sculpey Soufflé™ Chunky Chain Bracelet
Designed by syndee holt
Read More
Read Less
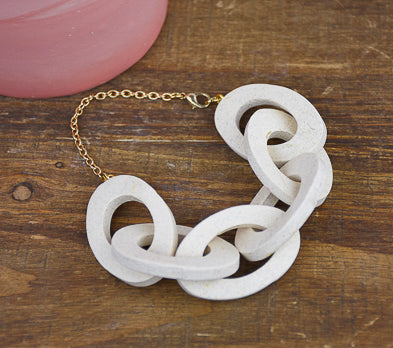
Big chain bracelets are very on trend and this clever bracelet solves both the problem with weight and using a mouse at your office desk!
TIME TO COMPLETION: 45 minutes
ADDITIONAL SUPPLIES
- Clear Instant glue (I prefer Gorilla Glue with the dual tip)
- Gold-toned screw-in eyelets (2)
- 8 mm gold-toned jump ring (1)
- Gold-toned necklace extender
- Small piece of wood or plastic block
- Baby Wipe
Project Instructions
- Getting Started:
Start with clean hands, unwrap and knead clay until soft and smooth, or condition by running clay though a Pasta Machine. We recommend using a designated machine for clay purposes only. When working with multiple colors, clean hands with soap and water or baby wipes (we have found that baby wipes work best) before switching colors. Shape clay, pressing pieces firmly together. Wash hands after use.
- Baking:
I created a gently marbled clay for this project by sheeting out about the package of the conditioned Ivory Souffle on the widest setting on the clay conditioning machine. Then sheet out about 1/3 package of the other two clays on the widest setting and then move to a thin setting. Tear small pieces (fingernail size or smaller) of these two clays and stick them onto the sheeted Ivory Souffle, leaving plenty of the Ivory showing. Fold in half and roll through the clay conditioning machine on the widest setting. Continue to fold and roll until you are pleased with the mix of colors. NOTE: You can add more of either of these two colors if you wish!

Cut the sheet in half and stack on top of each other (still on the widest setting). Position the 1.75 inch cutter on the stacked sheets and center the smallest (.75 inch) cutter in the middle of this cutter. Put the small piece of wood or plastic block on top of the cutters and press firmly down. Remove the excess clay from the outside of the large cutter and lift the smaller cutter – that should remove the center of the oval, then use your finger to gently nudge the clay out of the larger oval. Repeat to make 6 ovals.

Use the rubber chisel end of the middle Duel End Detail tool to help smooth any rough edges on the links. Bake as directed in step 1 above.

So HOW are we going to link these baked links together? Use the Clay Blade to cut through one of the links in the MIDDLE of one side of the link. Thread two links onto this link.

Repeat by this process to add the other links as shown. Once all the links are in place, measure the links against your wrist – I prefer not to have any links on the inside of my wrist. Adjust as necessary and use the instant glue to secure the cuts. Wipe any excess glue off immediately with a baby wipe. Allow the glue to dry.

Assemble your hardware and use the needle tool to make a “starter hole” in the side edge of the two end links.

Twist a threaded eye pin into each hole with your fingers. You can put a tiny drop of glue onto the threads of the eye pin before you twist, but I find it unnecessary.

Attach the 8 mm jump ring at one end and the necklace extended to the other end. It’s ready to wear!

- Choosing a selection results in a full page refresh.
- Opens in a new window.