

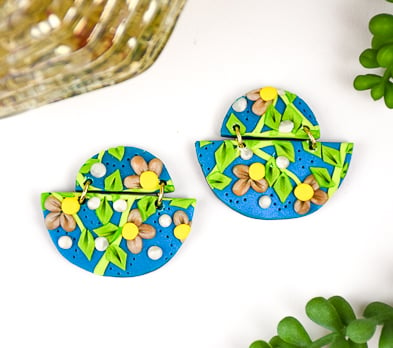
Sculpey Soufflé™ and Premo™ Floral Slab Earrings
Sculpey Soufflé™ and Premo™ Floral Slab Earrings
Designed by Amy Koranek
Read More
Floral motifs (often called “Slab”) can look intimidating to create. But our own Amy Koranek explains the process in this beautiful project that evokes a Summer day!COMPLETION TIME:75 Minutes to make, bake, and assemble
Read Less
ADDITIONAL SUPPLIES
- Gold tone earring posts and backs (2)
- 6 mm Gold tone jump rings (4)
- Flat nose jewelry pliers
- Silicone glue or instant drying glue
Project Instructions
- Getting Started:
Start with clean hands, unwrap and knead clay until soft and smooth, or condition by running clay though a Pasta Machine. We recommend using a designated machine for clay purposes only. When working with multiple colors, clean hands with soap and water or baby wipes (we have found that baby wipes work best) before switching colors. Shape clay, pressing pieces firmly together. Wash hands after use.
- Baking:
For this project we will need 1/2 bar of Peacock Pearl for the background.
1/16 bar Bright Green Pearl for the leaves.
1/16 bar Pistachio for the vines.
1/16 bar Canary for the flower centers.
1/16 bar of Beige mixed completely with a pinch Pearl for the flower petals.
1/16 bar (minus the pinch) Pearl for the buds.
1/16 bar Bright Green Pearl for the leaves.
1/16 bar Pistachio for the vines.
1/16 bar Canary for the flower centers.
1/16 bar of Beige mixed completely with a pinch Pearl for the flower petals.
1/16 bar (minus the pinch) Pearl for the buds.

Roll Peacock Pearl flat to make a little sheet 1/8” thick for the background using the roller in the Jewelry Making Kit or your own clay roller .

Sheet Pistachio into a very thin sheet 1/16” thick. Use the Small Blade to cut very thin strips of the Pistachio and place onto the background color as vines.

Place more vines on the background.

Add little teardrop shapes in clusters of threes to the vines for petals.

Add details to the petals with the Mini Needle Tool.


Add a little ball of Canary to the center of each flower.

Roll Bright Green Pearl to a very thin sheet 1/16” thick. Use the Small Blade to cut strips and then cut the strips diagonally to make diamonds.
Add the diamonds to the vines and use the Mini Needle Tool to texture them.
Add the diamonds to the vines and use the Mini Needle Tool to texture them.


Add tiny balls of Pearl randomly.

Use the Mini Needle Tool to add dot details.

Use the Template Sheet to cut out the design shapes. Two large half round shapes and two small half round shapes. Organize the shapes as you want them to layout. Poke holes with the Mini Needle Tool so they can be assembled with jump rings after baking.
Bake following the baking instructions in Step 1 above. Allow to cool completely before handling.
Bake following the baking instructions in Step 1 above. Allow to cool completely before handling.

Here’s a look at the layout for the earring design.

Use flat nose pliers and jump rings to connect the pieces together.
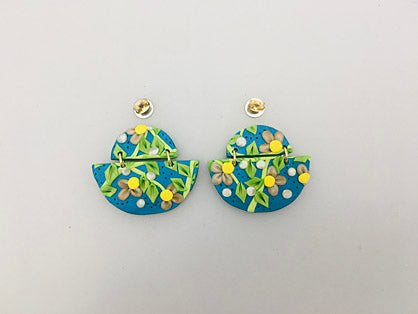
Glue the posts to the backs of the earrings. Allow to dry completely.

- Choosing a selection results in a full page refresh.
- Opens in a new window.