

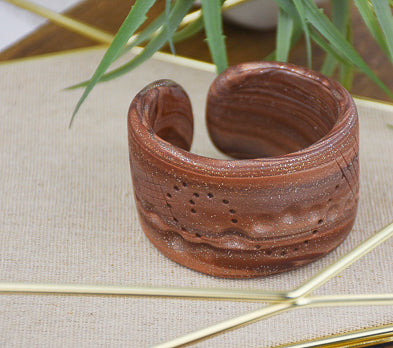
Sculpey Premo™ Textured Cuff Bracelet
Sculpey Premo™ Textured Cuff Bracelet
Designed by Amy Koranek
Read More
Read Less
This clever bracelet teams marbled Premo clay with a soda can or jar to create this versitile textured cuff bracelet.
COMPLETION TIME:75 Minutes to make and bake
ADDITIONAL SUPPLIES
Empty clean soda can or glass bottle that is the approximate diameter of your wrist
Project Instructions
Getting Started: Please make sure your work area is covered and you are not working on an unprotected surface. We recommend working on the Sculpey® Oven Safe Work Mat, wax paper, metal baking sheet, or disposable foil. Uncured clay may damage unprotected furniture or finished surfaces. Be sure to cover your crafting area appropriately. Start with clean hands, unwrap and knead clay until soft and smooth, or condition by running clay though a Pasta Machine. We recommend using a designated machine for clay purposes only. When working with multiple colors, clean hands with soap and water or baby wipes (we have found that baby wipes work best) before switching colors. Shape clay, pressing pieces firmly together. Wash hands after use. Baking: Begin by preheating oven to 275 °F (130 °C). After you are done creating; for best results bake clay on an oven-proof surface such metal, aluminum foil, an index card or the Sculpey® Oven Safe Work Mat at 275°F (130 °C) for 30 minutes per 1/4" (6 mm) thickness according to package directions. Oven safe glass or ceramic surfaces are also acceptable for baking; however please note that the baking times may take longer as the glass or ceramic surfaces take longer to heat up. For best baking results, use an oven thermometer. DO NOT USE MICROWAVE OVEN. DO NOT EXCEED THE ABOVE TEMPERATURE OR RECOMMENDED BAKING TIME. BAKING SHOULD BE DONE BY AN ADULT.
The directions in this tutorial are based on one-ounce bars of clay. Roll 1/2 bar (1/2 ounce) of each color into equal size ropes. Bundle the ropes together with sides touching.

Roll and twist the colors together then bend the rope in half.

Bend the rope in half again and roll and twist.

Keep bending the rope in half and half again and twisting. Each time you do this the stripes will be multiplied. Keep going until you have lots and lots of thin stripes. When you like the stripes, push on both ends of the rope to form it into a thick rope.

Flatten the thick rope with the Roller Tube. Keep the flattened piece the shape of a long rectangle.

At this point I wanted my colors more blended so I folded the sheet in half.

Then rolled it out flat again making sure it stays in a long rectangle shape about 7” - 7.5” long. The bracelet shape is about 1.5” wide and 1/4” thick.
Apply a cross-hatching texture with the Needle Tool.
Apply a cross-hatching texture with the Needle Tool.

Add a series of impressed dots by using the Ball Tool and the Blunt Point Tool. If you press the Ball Tool deeper it will make larger divots. If you press the Ball Tool shallower, it will make smaller divots. Make the dot and divot pattern go right across the cross-hatching.

Wrap the clay around your bracelet form - soda can or glass water bottle. The form should be larger enough to wrap the bracelet around it but leave a very small gap between the ends of the bracelet.
Bake the clay on the form following the baking instructions in Step 1 above.
Bake the clay on the form following the baking instructions in Step 1 above.

When the form is completely cool, carefully pop the clay off of the form with your fingertips.
