

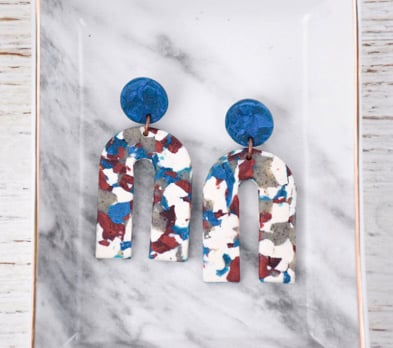
Sculpey Premo™ Terrazzo Arch Earrings
Sculpey Premo™ Terrazzo Arch Earrings
Designed by Amy Koranek
Read More
Read Less
Create a whole new wardrobe of earrings in an afternoon using Sculpey Premo™ and the Sculpey Tools™ Jewelry Templates Design Pack.
COMPLETION TIME:60 Minutes to make, bake, and assemble
ADDITIONAL SUPPLIES
- Scrap paper or deli paper or wax paper (2 small pieces)
- Sharp craft knife like an X-acto
- Silicone glue or instant dry glue
- 8mm Copper jump rings (2)
- Ear posts (2)
- Ear nuts (2)
- Flat nose pliers
Project Instructions
- Getting Started:
Start with clean hands, unwrap and knead clay until soft and smooth, or condition by running clay though a Pasta Machine. We recommend using a designated machine for clay purposes only. When working with multiple colors, clean hands with soap and water or baby wipes (we have found that baby wipes work best) before switching colors. Shape clay, pressing pieces firmly together. Wash hands after use.
- Baking:
For this terrazzo technique we will start with 1/8 bar of Frost White Glitter, 1/16 bar of Bronze, 1/16 bar of Gray Granite, and 1/16 bar of Peacock Pearl. This tutorial is what I call a “true terrazzo” technique. Instead of little pinches of color being applied to a slab of background clay, this technique chops all the colors up together to form a slab with the colors going all the way through. I’ve chosen this technique over the slab style so that the pattern is visible from both sides.

Place the little blocks of clay onto a piece of scrap paper. The scrap paper will keep all the little bits organized in one area and won’t allow the bits to stick to your work surface. Chop the colors up with the Clay Blade until they are really little and randomly mixed up.

Use your fingertips to push the chips into a square shape that is the thickness of only a few chips. This square shape should be just large enough to accommodate two of the arch shapes that you want to cut out. I am using the largest arch shape.
Gently press on the top of the slab of chips with your fingertips to help them start sticking to each other.
Gently press on the top of the slab of chips with your fingertips to help them start sticking to each other.

Place a piece of paper over the top of the chips. I like to use deli paper because it is translucent enough to see the clay through. Roll over the paper and the chips with the Acrylic Clay Roller to flatten it evenly and help the chips all stick together. The slab should be between 1/8” and 3/16” thick.

Peel the paper away and double check again that it is large enough to accommodate two of the earring shapes that you want to use.

To begin cutting the large arch shapes out, I first cut a vertical and a horizontal line perpendicular to each other along the left bottom edge of the clay. Then I lined the large arch shape up to these guidelines. Then I marked and cut the right side straight edge with the Clay Blade as well.
Reposition the template shape to these guidelines and then cut the top curved edge with a sharp craft knife.
Cut the inner curve out as well. Repeat for a second matching shape.
Reposition the template shape to these guidelines and then cut the top curved edge with a sharp craft knife.
Cut the inner curve out as well. Repeat for a second matching shape.

To make the circles at the top, chop up 1/16 bar of Peacock Pearl on a piece of scrap paper. Push all the little chips closely together.
This will be a single-color terrazzo pattern. The single-color terrazzo works because there is mica in the Peacock Pearl clay. As the little chips of Peacock Pearl get turned and tumbled in the slab, the mica will reflect the light in different directions giving you a mica shift effect.
This will be a single-color terrazzo pattern. The single-color terrazzo works because there is mica in the Peacock Pearl clay. As the little chips of Peacock Pearl get turned and tumbled in the slab, the mica will reflect the light in different directions giving you a mica shift effect.

Roll over the chips to seal them together into a little sheet between 1/8” and 3/16” thick.

Cut out two 1/2” circles to use as the dangle disks for the earrings.

Lay out the arches and the disks so that you can poke holes with the Needle Tool to later accommodate the jump rings that will hook them together.
Bake the pieces following the baking instructions in Step 1 above. Allow them to cool before assembly.
Bake the pieces following the baking instructions in Step 1 above. Allow them to cool before assembly.

Open the jump rings with flat nose pliers and hook a circle to an arch. Close the rings with pliers. Glue ear posts to the back of each circle and allow the glue to dry completely before wearing.

- Choosing a selection results in a full page refresh.
- Opens in a new window.