

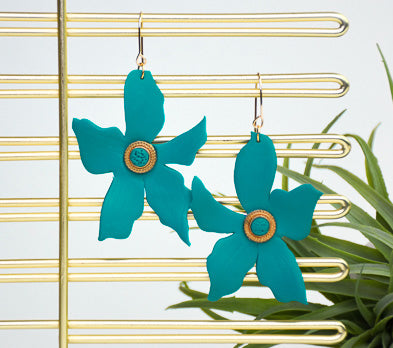
Sculpey Premo™ Teal 3D Floral Earrings
Sculpey Premo™ Teal 3D Floral Earrings
Designed by syndee holt
Read More
Sculpey Premo™ Teal teams up with the Sculpey Tools™ Hollow Bead Maker to make these simple shaped earrings more and flow like real flowers.
TIME TO COMPLETION: 45 minutes
Read Less
ADDITIONAL SUPPLIES
- Gold-toned beads or buttons for center
- Gold-toned ear wires (2)
- Gold-toned jump-rings (2)
- Jewelry pliers
- Exacto knife or craft knife
- Instant glue (I prefer Gorilla glue)
- A couple of small sheets of plain paper
- Printer to print out the template provided or to create your own shape
Project Instructions
- Getting Started:
Start with clean hands, unwrap and knead clay until soft and smooth, or condition by running clay though a Pasta Machine. We recommend using a designated machine for clay purposes only. When working with multiple colors, clean hands with soap and water or baby wipes (we have found that baby wipes work best) before switching colors. Shape clay, pressing pieces firmly together. Wash hands after use.
- Baking:
Start with a sheet of conditioned clay slightly larger than your template and rolled out on a middle setting.
Print out your selected template. If you are using my template provided, please note that there are left and right images on it that I’ve marked 1 and 2 for left and right! Use the pointed tool (not the needle tool) from your Clay Tool Starter Set to trace around the outline onto a prepared sheet of clay. Repeat for the opposite flower as well.
If you are using another template, you can just flip it over to trace it to create the mirrored image.


Use the Exacto knife to cut out your flower outline. Repeat for the other flower.

Once you remove the excess clay you will notice that the edges of the petals look a little too sharp to look like a petal. I just put a sheet of thin paper over the flower and gently run my finger over the edges to soften them.

You can use the back of a clay blade or the knife tool in your set to also draw lines from the center of the flower flowing to the tips of each petal for more detail.

Here is a look at my flower now. The edges are softened and we have detail in the petals.

Now position your flower on the “bump side” of the Hollow Bead Maker so that the petals flow naturally. Gently press the metal detail (in my case, small button) into the center. Repeat with the other flower.

I wanted to cover the button holes in my metal detail, so I rolled a small ball of the Teal clay, added a drop of Sculpey Oven Bake Adhesive and pressed it gently into the center of the button. Then I used a needle tool or toothpick to texture it. Repeat on the other flower if you are also using a clay center.

Use the needle tool from your kit to add the holes to suspend the earring. I chose to put the hole in the same petal on each earring as shown. Bake according to the directions in Step 1 above. Allow the clay to cool to warm before removing.

Once the clay was baked and cooled, I popped off the buttons and added a drop of instant glue before returning them to the flower centers. NOTE: if you are using a button, make sure to line the holes up with the little bumps of clay that they created when you pushed the button in!
Add your jump ring to the top and your ear wires and you are done!
Add your jump ring to the top and your ear wires and you are done!
