

Sculpey Premo™ Scribbles Trinket Dish
Sculpey Premo™ Scribbles Trinket Dish
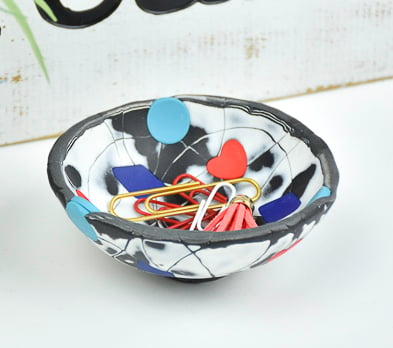
Designed by Amy Koranek
Read More
Read Less
For this project I used the Mokume Gane technique to mimic scribbling. The brightly colored shapes against the black and white scribbles really make a pop statement.
TIME TO COMPLETION: 90 minutes
ADDITIONAL SUPPLIES
- 4” Circle cookie cutter
- Wax paper or deli paper
- 6” Diameter hemisphere baking bowl for the form
Project Instructions
- Getting Started:
Start with clean hands, unwrap and knead clay until soft and smooth, or condition by running clay though a Pasta Machine. We recommend using a designated machine for clay purposes only. When working with multiple colors, clean hands with soap and water or baby wipes (we have found that baby wipes work best) before switching colors. Shape clay, pressing pieces firmly together. Wash hands after use.
- Baking:
Sheet entire blocks of White and Black Premo through the Clay Conditioning Machine on the thickest setting.

Layer the Black over the White and sheet through the Clay Conditioning Machine on the thickest setting.

Cut the Black/White sheet in half and stack. Sheet through the Clay Conditioning Machine one more time. Cut the sheet in half again and stack again. Roll over them with the Acrylic Clay Roller to seal the sheets together.

With the Black side up, cut out a large circle that will be the dimension of your finished bowl. I used a 4” circle cookie cutter. Reserve a 1” scrap of the slab for Step 17 to make a foot for the bottom of the bowl.

Start with larger circles from the Graduated Circle Cutters and cut all the way through from top to bottom making circle patterns in the clay. If the circles come out, carefully replace them back in their positions.

Keep cutting using smaller circle cutters as well. I even used my large outside circle shape to cut through the slab. Always make sure the clay pieces go back in their spots if they accidentally come out. Make sure to cut all the way through as well from top to bottom - this is what will give the bowl the same design on the inside and outside.
When you are happy with the cuts, push in from the sides all the way around to gently encourage the cuts to go back together.
When you are happy with the cuts, push in from the sides all the way around to gently encourage the cuts to go back together.

Roll over the surface with the Acrylic Clay Roller to heal the design until the cuts are barely visible.

Flip the disc over to see the same design is on the back as well but in reverse. Roll over this side too.

Carefully shave the top layer of the design away using the Flexible Super Slicer. The scribble pattern will start to emerge.

Keep carefully shaving so that you remove just enough clay to show the pattern.

This is one of my finished sides. The black splotches are either where I shaved too deeply or not deeply enough. But I think it still looks really cool, it doesn’t have to be perfect.
Shave the back side as well. Decide which side you like best and place it face up in front of you. This will be the inside of the finished bowl which you will see more often than the outside of the bowl.
Shave the back side as well. Decide which side you like best and place it face up in front of you. This will be the inside of the finished bowl which you will see more often than the outside of the bowl.

Sheet Cadmium Red through the Clay Conditioning Machine on the thickest setting. Double the sheet. Compare this thickness to the thickness of your disk. It’s ok if the Red is a little thinner but if it’s thicker than the disk you should thin it through the Clay Conditioning Machine on a thinner setting. Cut a heart shape out from the disk. Cut two Red hearts out as well.
My disk is quite thick, so I cut doubles out of all my solid color shapes and inserted a shape from the front and from the back in every cut out. You can really see this in the finished photo where the Turquoise circle is right on the edge.
My disk is quite thick, so I cut doubles out of all my solid color shapes and inserted a shape from the front and from the back in every cut out. You can really see this in the finished photo where the Turquoise circle is right on the edge.

Sheet Ultramarine Blue and Turquoise also. Remove shapes as shown from the disk and replace them with the colorful shapes. I intentionally tried to get a circle right in the center so it could later show up in the middle of the foot on the bottom side.

Place a piece of wax paper or deli paper over the top of the disk. Gently roll over it to flatten it slightly and seal in the colorful shapes. Flip the disk over and roll the other side too.

Carefully press the clay disk over the bowl form.

Take a scrap of the layered Black/White clay and cut out a 1” circle. Remove the center with the mini circle cutter.

Press the foot onto the bottom of the bowl. Stand the bowl up on the foot. Gently press the bowl down onto the foot so it will be flat. Make sure all the edges are smooth. Bake the bowl on the form following the baking instructions for Premo.

When the bowl is completely cool, carefully pop it off of the metal bowl.
