

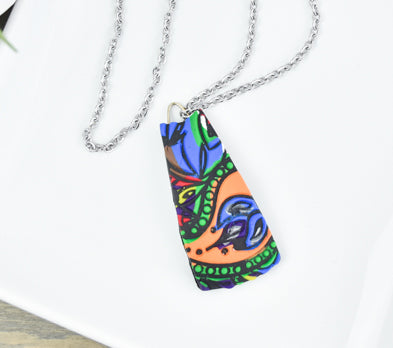
Sculpey Premo™ Pop of Color Pendant
Sculpey Premo™ Pop of Color Pendant
Designed by Anke Humpert
Read More
Read Less
Make vibrant pendants with an advanced Sutton Slice technique, that is easier that you think! All you need is one Multipack of Premo and some patience!
TIME TO COMPLETION: 75 minutes
ADDITIONAL SUPPLIES
- Cookie cutter or template to create the shape and size of your pendant
- Unmounted Stamp
- Optional: a black stamp pad ( I used Ranger´s Arcival Ink – Jet Black)
- Optional: Markers in the colors of the clay you will use. I used TomBows and PITT Artist´s in gold and silver.
- Optional: 2 index cards or other paper for stamping.
- A oven save bowl or the hollow bead maker.
- Hanging hooks for your pendants ( I made my own with wire)
- A course piece of sanding paper for texturing.
Project Instructions
- Getting Started:
Start with clean hands, unwrap and knead clay until soft and smooth, or condition by running clay though a Pasta Machine. We recommend using a designated machine for clay purposes only. When working with multiple colors, clean hands with soap and water or baby wipes (we have found that baby wipes work best) before switching colors. Shape clay, pressing pieces firmly together. Wash hands after use.
- Baking:
How to make it
These colorful pendants will be made with a Sutton Slice veneer. To do this technique you will need polymer clay, an unmounted stamp and a sharp blade. You need to use a real rubber stamp for this techique! All other stamps are not suitable! I am showing you how to make an advanced Sutton Slice technique that I like to call “off registration Sutton Slice”, because the colors will not be exactly on the pattern but slightly off, like with some off registration prints.
These colorful pendants will be made with a Sutton Slice veneer. To do this technique you will need polymer clay, an unmounted stamp and a sharp blade. You need to use a real rubber stamp for this techique! All other stamps are not suitable! I am showing you how to make an advanced Sutton Slice technique that I like to call “off registration Sutton Slice”, because the colors will not be exactly on the pattern but slightly off, like with some off registration prints.

The following steps are optional, but they make your work much easier in the long run. So I would encourage you to follow them! Before I start working with the clay I like to make two (or more!) stamp impression on an index card using a black stamp pad.

I am using markers to color one stamp imprint so I can find out how I want to place them in the pattern. If I do this with markers first I can find out if I need to change something without investing a lot of time or clay! Don’t shy away from doing that step again if you do not like the result! I also did more than one try
The second imprint is used to position the clay in the right place and does not have to be colored.
The second imprint is used to position the clay in the right place and does not have to be colored.

Try to use markers that are similar to the clay colors you will be using for the best effect! As you can see my colored piece is very close to the clay colors.

Now we start working on the clay techniques: condition all of the polymer clay you will be using and roll sheets on the second thickest setting of your clay condition machine out.

For this advanced Sutton Slice we will have to work along with our colored pattern and cut out pieces of clay to assemble them. I find it best to start somewhere in the middle of the pattern and work my way out. To make it easier to find the right shape and size place your stamp sheet on your clay and use the acrylic roller to press it in the clay. Press hard and roll only ONCE over the clay to get a good clear impression! Here I am cutting out the first piece from my silver clay sheet. You can see the piece at the tip of my needle tool. Use your exacto knife to cut out the shape.

Repeat the step before with the next color and the shape that is next to your first one. In the picture you can see the silver, blue, purple, yellow and red shapes that are forming the first paisley pattern. Combine them and press them together with a light touch.
When you have your first shape place it on your black and white stamp imprint. You can also see if the shapes are a bit distorted and you can correct that now.
When you have your first shape place it on your black and white stamp imprint. You can also see if the shapes are a bit distorted and you can correct that now.

Use your next clay color, press your stamp on it and cut out the shape to add to your paisley. I added a green leave to the top.

Now repeat this process until you have covered all of your black and white stamp pattern: select the next color and pattern, press your stamp with the acrylic roller in it, use your exacto knife to cut out the shape and combine it with the shapes you already have.

Place the clay on the stamp sheet and try to align it with the original pattern before you use your fingers to press it in the impressions of the stamp. When all of the sheet has connected use your acrylic roller to flatten the surface and press it in some more. Especially the small shapes in the pattern should also be filled!

Now use your fresh sharp blade and cut all the clay that is not in the impressions of your stamp sheet away. You want to do this carefully and in small parts. Don´t go too deep with one cut! It´s better to do a small piece at a time and in a number of layers instead of all at once. Hold your blade horizontally and controlled at all times. Be careful not to cut yourself or the stamp sheet!

Work your way through the clay layers until you reveal all of the stamps design. The further you get to finishing the reveal the smaller your cuts should be to have as much control as possible.

In the picture you can see nearly all of the stamps design and you also can see the “off registration” of some of my colors.

Now roll out a sheet of black clay from the extra pack of Premo on the second thickest setting of your clay conditioning machine.

Place the black clay sheet on top of your prepared stamp and turn it up side down. Press it down on your work surface so the back clay sticks to it. Now start tapping with your fingers the back of the stamp sheet. You want to to the tapping hard and over all the sheet. This helps to release the clay from the stamp sheet.

Carefully start rolling the stamp sheet from one side (and holding it firm on the other end!) and check if all the clay has been released. If you still have clay in te stamp: roll it back and tap some more! Do this until all of your clay pattern has been released and connected to your black clay sheet.

Some of the really small shapes did not come out. It is better to use a stamp design that is not too detailed. Cut the black clay around your pattern off. We will use that later for the backing of the pendants.

Use your cookie cutters to find the pieces in your design that you want to use for your pendants. Place them lightly on the veneer before you decide and cut them out so you still can reposition them.

When you are happy with your choice cut them out and remove the veneer around your cut outs.

Place your shapes on an oven save bowl or the hollow bead maker to give them a curve. Cure them at at 275°F/130°C for 30 minutes. Let them cool completely before taking them of your bowl.

Cover the back of your pendants with a sheet of black clay. Add the hooks for your pendant in between the backed and the fresh clay and press them into the fresh clay. Use a piece of course sanding paper to texture the back side of the pendants and clean cut all the clay that is pressed over the edge of the veneer away.
Cure the pendants again at at 275°F/130°C for 30 minutes.
Cure the pendants again at at 275°F/130°C for 30 minutes.

Let them cool completely before adding a split ring and a chain to each pendant. I got 5 pendants out of my Sutton Slice veneer. Of course you can use a smaller veneer or only part of your stamp design if you only want make one pendant.
