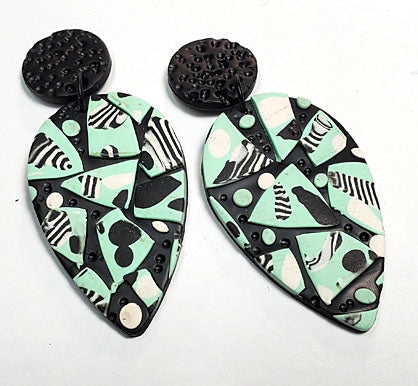
Sculpey Premo™ Minted Faux Terrazzo Earrings
Sculpey Premo™ Minted Faux Terrazzo Earrings
Designed by syndee holt
Read More
Read Less
Everything goes with black and white, but Sculpey Premo™ Mint really pops with the graphics in these earrings. And wait until you see what she does with the scraps!
TIME TO COMPLETION: 75 minutes including baking and assembling
ADDITIONAL SUPPLIES
- Several small sheets of paper or patty paper, lined index card
- 10 gauge black jump rings (6)
- Post findings (2)

Project Instructions
Please make sure your work area is covered and you are not working on an unprotected surface. We recommend working on the Sculpey® Oven-Safe Work Mat, wax paper, metal baking sheet, or disposable foil. Uncured clay may damage unprotected furniture or finished surfaces. Be sure to cover your crafting area appropriately.
Start with clean hands, unwrap and knead clay until soft and smooth, or condition by running clay though a Pasta Machine. We recommend using a designated machine for clay purposes only. When working with multiple colors, clean hands with soap and water or baby wipes (we have found that baby wipes work best) before switching colors. Shape clay, pressing pieces firmly together. Wash hands after use.
Start with clean hands, unwrap and knead clay until soft and smooth, or condition by running clay though a Pasta Machine. We recommend using a designated machine for clay purposes only. When working with multiple colors, clean hands with soap and water or baby wipes (we have found that baby wipes work best) before switching colors. Shape clay, pressing pieces firmly together. Wash hands after use.
- Baking:
Sheet a small piece of both the Black and White Premo out on the #3 setting on your clay conditioning machine (#0 is my widest). I’ve used the 1 inch square cutter to cut out and stack my squares. Stack 2 squares of each color. NOTE! When switching from a dark color to a light color (or vice versa) I always clean my clay rollers with a baby wipe. And I always clean the rollers before using White or Yellow (or similar light color).


Press the stack to flatten it slightly and sheet the stack out on the #3 setting again. See how small the stripes have become?

Restack the layers by cutting approximately 1 inch pieces and stacking them.

Now we can cut thin slices (mine are about 1/8 inch wide (3mm). Run these slices through the clay conditioning machine on the #3 setting with the stripes VERTICAL to the rollers. You will have a long thin striped slice like the one on the left in this photo.

Make about 3 striped strips this way and also sheet small pieces of Black and White clay on the #3 setting. I’m using the smallest cutters from the Irregular cutter set to cut a lot of my shapes. Other small irregular shapes I've cut with my clay blade.

Sheet out about 1/3 of a block of Premo Mint on the #2 setting (0 is my widest) and start to add bits of the sheeted clays from Step 5 above.


A couple of hints for you! I use the cutters to give me rounded shapes, but sometimes I don’t fill the entire cutter, I just take a little “nip” at the edge of the clay sheet.
Also a rounded tool, like this one from the Sculpey Clay Tool Starter Set, can help you to push the clay out of the cutters without damaging the surface too much.
Also a rounded tool, like this one from the Sculpey Clay Tool Starter Set, can help you to push the clay out of the cutters without damaging the surface too much.


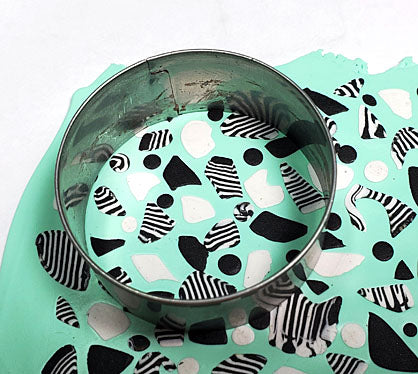
Here is a look at my sheet once I had filled it. It’s so much fun, I didn’t want to stop! Note that I've added some small black dots with my smallest Etch n/ Pearl tool as well.

Now we are going to gently press those little pieces into the Mint background. I cover my sheet with a piece of Patty Paper (plain paper will work as well). Then I gently start to roll across it from all 4 sides of the sheet of clay. (It helps to put the sheet on a piece of paper as well, so that you can rotate the paper and not the roller!)
Gently peel the paper up and check the progress. Once you are satisfied, remove the paper entirely.
Gently peel the paper up and check the progress. Once you are satisfied, remove the paper entirely.


I used the 2 inch cutter from the Sculpey Circle Cutter set to cut out my first piece. Set the rest of the sheet aside for now.
I like to place my clay circle on a lined index card, centered on the lines so that I can make a center cut.
Set your two half circles aside.
Set your two half circles aside.

Sheet out some of the Mint clay on the #2 or #3 setting – whichever is closest in thickness to your terrazzo sheet. I elected to use the middle Dual Ended Tool to texture the surface.

Use the same cutter to start the circle, but this time, center the circle cutter from the Mini Cutter Geometric in the middle of the circle. I prefer to stand and look down on the cutters to make sure that I’m centered. Then I take a piece of board, or a book or some other flat, firm surface and press firmly down on both cutters. This helps you get an even cut with both cutters without bruising your hand! I prefer to spin the circle cutter to help remove the clay from the cutter as I lift it. this also helps get rid of any notches created by the cutter seam.

Once you have your circle, place it carefully on the index card and cut the middle again to create two half circles.

If you put your holes in before baking, carefully line up the two pieces to make sure that you have your holes matching for the top and bottom pieces.
I prefer to drill after baking with a hand drill (called a pin vise) on a small block of wood. But I STILL line them up to make sure that these holes are aligned.
I prefer to drill after baking with a hand drill (called a pin vise) on a small block of wood. But I STILL line them up to make sure that these holes are aligned.


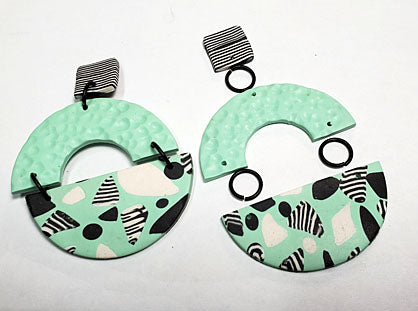
I wanted to make these post earrings (Otherwise you would put another hole in the top center of the all-Mint half circle for jump ring/ear wire). I had enough of the stripes left that I could either make small round posts or I opted for square. These slices are thin enough that I could embed a post in one of them and slip another slice over the top (with a drop of Sculpey Liquid clay (color doesn’t matter). This makes for a more secure post than just gluing it on after baking. Make sure to put a hole at the bottom center of the square to attach a jump ring after baking.


Here is a look at the post earring ready to bake. NOTE: We don’t put the post on the earring for photo purposes, but yours should have the post embedded and sticking up to bake.
Bake as directed in Step 1 above.
Assemble with the jump rings as shown.
Bake as directed in Step 1 above.
Assemble with the jump rings as shown.

Got some leftover terrazzo? Let's have some fun!
Sheet out some Black clay on the #2 setting and cut up small pieces of the leftovers and position them on the black. Fun! Use a sheet of paper over the top and gently press them into the black background. These are thicker, so they won’t be flush with the background – this only adds to the fun!
Sheet out some Black clay on the #2 setting and cut up small pieces of the leftovers and position them on the black. Fun! Use a sheet of paper over the top and gently press them into the black background. These are thicker, so they won’t be flush with the background – this only adds to the fun!

I decided to use the smaller Dual Ended tool to texture the black background.

I used the large Sculpey Teardrop to cut out the terrazzo clay and the smallest cutter from the Circle cutter set to cut out a texture piece of Black for top! Add your holes for hanging and your posts, if using. Bake your SECOND style of earring!