

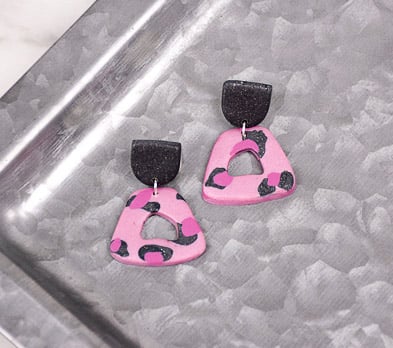
Sculpey Premo™ Leopard in Mauve Earrings
Sculpey Premo™ Leopard in Mauve Earrings
Designed by Amy Koranek
Read More
Read Less
Your favorite fashonionista will LOVE these faux-leopard print earrings created in a Premo Mauve colors.
COMPLETION TIME:45 Minutes to make and bake
ADDITIONAL SUPPLIES
- 8mm Bright silver tone jump rings (2)
- Ear posts with backs (2)
- Silicone glue or instant drying glue
- Flat nose pliers
Project Instructions
- Getting Started:
Start with clean hands, unwrap and knead clay until soft and smooth, or condition by running clay though a Pasta Machine. We recommend using a designated machine for clay purposes only. When working with multiple colors, clean hands with soap and water or baby wipes (we have found that baby wipes work best) before switching colors. Shape clay, pressing pieces firmly together. Wash hands after use.
- Baking:
First, mix together two parts of Pearl with 1 part of Mauve to create Pearl Mauve.
Sheet the Pearl Mauve using the Acrylic Clay Roller to about 1/8” thick.

Pinch pieces of Graphite Pearl spots - 1/4” to 3/8” in size - and press them randomly onto the Pearl Mauve sheet.

Pinch smaller pieces of Mauve and press them in the middle of each of the larger Graphite Pearl spots. This gives you a pattern that looks like an animal print.

Position the Fashion Icon template on the sheet of clay to determine where you would like the pattern. Cut out two shapes using the 5-in-1 Clay Tool with the knife blade.

Flip one of the shapes over backwards before cutting out the center with the smallest Irregular Rectangle Cutter. This way, the little cut outs in the middle will be mirror imaged.

Flip them both right side up. Smooth all the cut edges with your fingertips.

Sheet Graphite Pearl with the Acrylic Clay Roller to a sheet 1/8” thick. Use the Fashion Icon template and the Clay Knife to cut out two small shapes for the top pieces.

Position the pieces as you would like them to attach. Poke holes in the top of each of the Mauve pieces and the bottom of the Graphite Pearl pieces with the 5-in-1 Needle Tool.
Bake following the baking instructions in Step 1 above.
Bake following the baking instructions in Step 1 above.

Connect the tops and bottoms with jump rings and flat nose pliers through the holes in each clay piece. Glue ear posts to the backs and allow to dry completely.
