

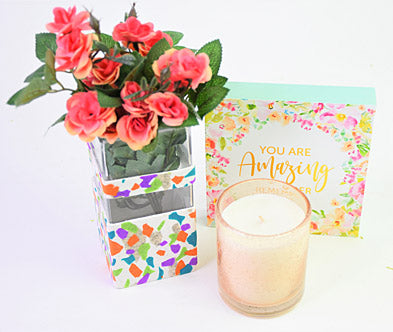
Sculpey Premo™ Granite Terrazzo Slab Vase
Sculpey Premo™ Granite Terrazzo Slab Vase
Designed by Amy Koranek
Read More
Read Less
The Granite Terrazzo Slab Vase is one project from a six-part series of projects incorporating a mix and match style approach to jewelry making and vessel decorating. The Terrazzo Slab that we make here will also be used to create earrings in a later project.
COMPLETION TIME:60 Minutes to make and bake
ADDITIONAL SUPPLIES
- Glass square shaped vase
- Ruler
Project Instructions
- Getting Started:
Start with clean hands, unwrap and knead clay until soft and smooth, or condition by running clay though a Pasta Machine. We recommend using a designated machine for clay purposes only. When working with multiple colors, clean hands with soap and water or baby wipes (we have found that baby wipes work best) before switching colors. Shape clay, pressing pieces firmly together. Wash hands after use.
- Baking:
Mix one block of White PremoTM completely together with 1/4 bar of Gray Granite to make White Granite.
Mix 1/8 bar of Purple Pearl with 1/8 bar of Gray Granite to create Purple Granite.
Mix 1/8 bar of Peacock Pearl with 1/8 bar of Gray Granite to create Peacock Granite.
Mix 1/8 bar of Bright Green Pearl with 1/8 bar of Gray Granite to create Bright Green Granite.
Mix 1/8 bar of Orange with 1/8 bar of Gray Granite to create Orange Granite.

Create a sheet that is 1/8” thick, at least 3” wide, and long enough to wrap around your vase.
Pinch off very thin pieces of Gray Granite and press them into the White Granite background. Roll over them with the Acrylic Clay Roller to make sure they sit level in the background.
Pinch off very thin pieces of Gray Granite and press them into the White Granite background. Roll over them with the Acrylic Clay Roller to make sure they sit level in the background.

Roll the granite color mixes out so that they are very thin. Pinch off bits of Peacock Granite, Bright Green Granite, and Orange Granite and press them into the background, rolling between each color to keep the sheet very flat.

Add bits of the Purple Granite as well and roll to flatten.

Measure the length of your sheet to see how tall you can make each section of clay on the vase. I have enough clay to make four 3” wide panels, and four 3/4” thin stripes on my vase. I also have enough clay to create the Granite Terrazzo Slab Earrings from that tutorial.
Cut four wide panels. Place one of the wide panels at the base of the vase on one side.
Cut four wide panels. Place one of the wide panels at the base of the vase on one side.

Trim the wide panel at the corners with the Clay Blade. Make sure there are no air bubbles trapped between the clay panel and the glass.

Repeat to add a wide panel at the bottom of each side of the vase. Make sure air bubbles are not trapped between the clay and the glass.
Smooth the corner seams with your fingertips.
Make the corner joints look more uniform by covering them with pinches of the Granite colors. Roll over the newly placed Granite pieces to make sure they are level in the background clay.
Smooth the corner seams with your fingertips.
Make the corner joints look more uniform by covering them with pinches of the Granite colors. Roll over the newly placed Granite pieces to make sure they are level in the background clay.

Turn the vase upside down and trim the excess clay away from the bottom with the Clay Blade. Also make sure the top edge of the wide panels is even all the way around.

Next you will need something to use as a guide to maintain a uniform space between the bottom wide panel and the top narrow stripes creating a window of space between them. I used a ruler that is about 1” wide as my guide. I laid the ruler across the top edge of the wide panel and then laid the narrow strip next to the top side of the ruler.

Position the narrow strips with an even space above the wide panels.
Again, check for air bubbles between the glass and the clay.
Again, check for air bubbles between the glass and the clay.

Smooth the corner seams with your fingertips.
Apply pieces of the Granite colors across the corners and flatten them into place.
Save leftover pieces from the Granite Terrazzo Slab to make earrings.
Bake the vase following the baking instructions for Sculpey PremoTM. Allow to cool completely before handling.
Apply pieces of the Granite colors across the corners and flatten them into place.
Save leftover pieces from the Granite Terrazzo Slab to make earrings.
Bake the vase following the baking instructions for Sculpey PremoTM. Allow to cool completely before handling.

- Choosing a selection results in a full page refresh.
- Opens in a new window.