

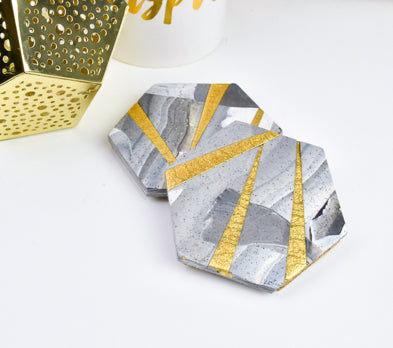
Sculpey Premo™ Granite & Gold Coasters, Set of 2
Sculpey Premo™ Granite & Gold Coasters, Set of 2
Designed by Amy Koranek
Read More
Read Less
These Sculpey Premo™ coasters are unique and quick to make. What a great guest gift to bring your host or perhaps just as a gift.
COMPLETION TIME:1 Hour to make and bake
ADDITIONAL SUPPLIES
- 4” Hexagon template printed on paper
- Scissors
- Gold composite leaf
- Gold metallic acrylic paint
- Paintbrush
- Deli paper or wax paper
- Cork in flat sheets
- Pencil
- Sharp craft knife
- Silicone glue
Project Instructions
Getting Started:
Please make sure your work area is covered and you are not working on an unprotected surface. We recommend working on the Sculpey® Oven Safe Work Mat, wax paper, metal baking sheet, or disposable foil. Uncured clay may damage unprotected furniture or finished surfaces. Be sure to cover your crafting area appropriately.
Start with clean hands, unwrap and knead clay until soft and smooth, or condition by running clay though a Pasta Machine. We recommend using a designated machine for clay purposes only. When working with multiple colors, clean hands with soap and water or baby wipes (we have found that baby wipes work best) before switching colors. Shape clay, pressing pieces firmly together. Wash hands after use.
Baking:
Begin by preheating oven to 275 °F (130 °C). After you are done creating; for best results bake clay on an oven-proof surface such metal, aluminum foil, an index card or the Sculpey® Oven Safe Work Mat at 275°F (130 °C) for 30 minutes per ¼" (6 mm) thickness according to package directions. Oven safe glass or ceramic surfaces are also acceptable for baking; however please note that the baking times may take longer as the glass or ceramic surfaces take longer to heat up. For best baking results, use an oven thermometer. DO NOT USE MICROWAVE OVEN. DO NOT EXCEED THE ABOVE TEMPERATURE OR RECOMMENDED BAKING TIME. BAKING SHOULD BE DONE BY AN ADULT.
To get the natural look of stone we are going to need two blocks of Premo Gray Granite, 1/2 block of Premo White, and 1/4 block of Premo Black.

Chop the blocks of Gray Granite into thin slices with a clay blade. Lay them in a random layer as shown.

Chop the 1/4 block of Black into thin slivers and randomly lay them over the top of the Gray Granite.

Finally chop the 1/2 block of White into thin slivers and randomly place them on top of the Gray Granite and Black.

Roll over the clays to seal them together and to thin.

Fold the sheet in half and roll over it again.

Keep folding and rolling the sheet until it is quite blended but not completely blended. We want to have a wide range of values here so don’t go too far. Roll the sheet out to a little thinner than 1/8”.

Prepare a hexagon shape to use as a template. I printed mine from a website that offers free printables of basic shapes. Once I printed the shape out I used my copier to adjust it to be approximately 4” wide from point to point. Cut the paper shape out to use as a template.

From the marbled sheet of clay cut out two hexagon shapes. Select areas of the clay that you like most because these two pieces will be the top of the coasters.

Cut out two more hexagons for bases. If your clay sheet does not accommodate cutting out two more hexagons, you can re-roll the sheet to make it the right size and shape. If you re-roll the sheet make it about the same thickness - a little less than 1/8” thick. These two hexagons will not show in the finished pieces so it’s okay if they aren’t as exciting as the first two. In this photo, my preferred pieces are the two on top and my base pieces are the two on the bottom.

From the leftover scraps of clay, roll another sheet that is the same thickness as the previous sheets. You will need a piece that is about 3” x 2”. Paint the surface of this piece with the gold paint. Allow the paint to dry. The gold paint will show through any cracking in the gold leaf and help keep the gold areas looking more solid.

Burnish a piece of gold composite leaf onto the painted clay.

Use the clay blade to cut out long thin triangular strips across the sheet of gold leafed clay.

First just lightly lay some of the gold strips across one of your coaster tops to see how it looks. Adjust accordingly until you are happy with your layout. This will be the top of one of my coasters designs.

Now place one of the base hexagons in front of you. We are going to transfer the pieces of marbled clay and the gold leafed clay pieces onto the base. Use the clay blade to cut exactly along the edge of a gold strip that is laying on your coaster top. Place this piece of marbled clay on the base matching it along the edge. Next, cut exactly along the other side of the gold strip, but this time, place the gold strip on the base right next to the first marbled piece.
In this photo the marbled piece and the gold piece at the extreme left are the top pieces that I am reconstructing on top of the base. The base is showing to the right of the gold leafed piece.
In this photo the marbled piece and the gold piece at the extreme left are the top pieces that I am reconstructing on top of the base. The base is showing to the right of the gold leafed piece.

Continue slicing the design into pieces and reassemble each piece onto the base so that the reassembled coaster is level and flat across the top. When you are done you will have left over pieces from your original marbled top where the gold pieces took their place.

When the design is completely reassembled on the base, place a piece of deli paper or wax paper on top of it. Roll over the paper to help make sure all the clay pieces are level.

Carefully remove the paper. Trim the edges all the way around using the template once again. Smooth all cut edges with your fingertips.
Repeat Steps 16-19 to create a second coaster. Bake the coasters following the baking instructions for Premo. Allow to cool completely. When the coasters are cool, paint a thin layer of Sculpey® Gloss Glaze over just the gold leaf areas to seal and protect them from moisture.
Repeat Steps 16-19 to create a second coaster. Bake the coasters following the baking instructions for Premo. Allow to cool completely. When the coasters are cool, paint a thin layer of Sculpey® Gloss Glaze over just the gold leaf areas to seal and protect them from moisture.

Coasters are likely to come into contact with moisture quite often. The clay is waterproof, but I like to finish coasters with either cork backing or felt to make them last for a long time and to preserve the artistry. With a cork or felt backing, the coaster can be flipped upside down to place a wet glass on the cork or felt, and displayed right side up when not in use.
Use the hexagon template once again to trace the shape two times onto the cork sheet. Cut out the hexagons from the cork with a sharp craft knife. Trim the corks to fit the clay pieces as needed.
Use the hexagon template once again to trace the shape two times onto the cork sheet. Cut out the hexagons from the cork with a sharp craft knife. Trim the corks to fit the clay pieces as needed.

Glue one cork to the back side of each coaster using silicone glue. Allow the coasters to dry completely before putting them into service.

- Choosing a selection results in a full page refresh.
- Opens in a new window.