

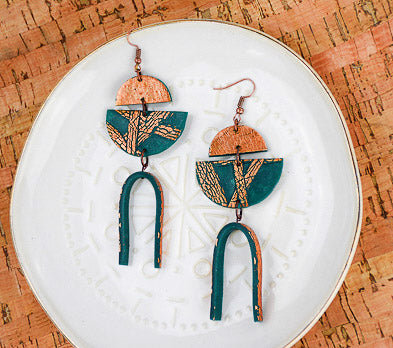
Sculpey Premo™ Forest Green Coppered Earrings
Sculpey Premo™ Forest Green Coppered Earrings
Designed by syndee holt
Read More
Read Less
Forest Green and Copper are perfect compliments for each other and really show off in this long dangle earring.
TIME TO COMPLETION: 75 minutes with assembling
ADDITIONAL SUPPLIES
- Copper metal leaf foil
- 9 mm copper-toned jump rings (4)
- 6 mm copper-toned jump rings (2)
- Copper-toned ear wires – OR- posts
- Copper-toned T-pin (1)
- Small piece of course sandpaper or Safety Stair Tred
- Small needle nose pliers and jewelry pliers
Project Instructions
- Getting Started:
Start with clean hands, unwrap and knead clay until soft and smooth, or condition by running clay though a Pasta Machine. We recommend using a designated machine for clay purposes only. When working with multiple colors, clean hands with soap and water or baby wipes (we have found that baby wipes work best) before switching colors. Shape clay, pressing pieces firmly together. Wash hands after use.
- Baking:
Sheet out about a 4x5 inch piece of the conditioned Forest Green clay on the second from widest setting on the Clay Conditioning Machine (pasta machine). Place the sheet onto a piece of copper leaf

Flip the sheet over and gently press the leaf material to the clay. Set aside.

Sheet out another piece of clay about the same size and make a cut anywhere on the sheet.

Cut a thin strip from the foiled sheet and insert it between the two cut pieces.

Repeat Steps 4 and 5 to add random foiled pieces to the plain sheet. Use the acrylic roller to lightly roll over the sheet and bond the pieces together. The foil will break apart or “crackle” on the clay.


Using the largest circle cutter (2 inches), cut 2 circles out with lots of the patterned foil in them.

I chose to lightly texture my pieces with the Safety Stair Tred to make it look sueded. Set aside for now. Cut each circle in half making sure that you have a copper pattern you like.

Cut two strips from the remaining foiled sheet that are about 1/4-inch-wide by 4-5 inches long. Rotate the strips to the cut edge and curve these strips to become the arch shapes at the bottom of the earrings. NOTE: I used the smallest circle cutter to gently wrap my strips over to create matching arches. Place these carefully on the baking sheet.


Use the 1-inch cutter to cut out a circle of the foiled sheet of clay and cut it in half for the top of the earring. Use the needle tool to put the holes in your earrings as shown. Carefully put a hole through the center of the arch from the inside through to the top of the arch. Bake as directed. NOTE: if you are going to add posts instead of ear wires, you will not need a hole in the top of the earring.

Once the clay has baked and cooled, lightly glaze over the foiled portions of the clay using the Sculpey Gloss Glaze. Allow the glaze to dry completely.

Assemble the earrings. You will need to thread the head pin through the bottom of the arch and trim to make a loop at the top of the arch to attach to the jump ring. IF you are attaching a post to the earring, you will not need the jump ring at the top of this photo.

