

Sculpey Premo™ Copper “Pocketbook” Earrings
Sculpey Premo™ Copper “Pocketbook” Earrings
Designed by syndee holt
Read More
Sculpey Premo™ teams up with Moiko silkscreens and texture sheets to create these wonderfully detailed earrings in a stylized pocketbook style.
TIME TO COMPLETION: 60 minutes including baking
Read Less
ADDITIONAL SUPPLIES
- Acrylic craft paints – I’ve used a turquoise and a dark green color
- Small brush – I like to use those inexpensive kids watercolor brushes
- Silicone 1 inch brush to spread the paint – an old credit card will work as well!
- Small spray bottle of water
- Couple sheets of plain white copy paper
- Findings: Post earrings: posts (2) and Copper jump rings (2). For Wired earrings: Copper jump rings(4), Copper Earwires
- Instant Glue (I prefer Gorilla Glue) to attach the stamped copper piece to the silkscreened piece after baking.
- A small tray of water that will fit the silkscreen – I prefer to run to my craft sink and rinse under water
- Microfiber towel or paper towels to dry the screen
Project Instructions
- Getting Started:
Start with clean hands, unwrap and knead clay until soft and smooth, or condition by running clay though a Pasta Machine. We recommend using a designated machine for clay purposes only. When working with multiple colors, clean hands with soap and water or baby wipes (we have found that baby wipes work best) before switching colors. Shape clay, pressing pieces firmly together. Wash hands after use.
- Baking:
Sheet or roll out the Copper clay on your medium setting on the Clay Conditioning Machine or roll to about 1/16 inch (2 mm). Place the silkscreen with the shiny side down on the clay (you should be able to read Moiko at the edge of the screen).
NOTE: You do NOT have to use the entire screen! I recommend that you only use half of the 1 oz of clay for the silkscreen and save the rest for the textured clay. It was just easier for me to show you the entire screen.
NOTE: You do NOT have to use the entire screen! I recommend that you only use half of the 1 oz of clay for the silkscreen and save the rest for the textured clay. It was just easier for me to show you the entire screen.

QUICKLY dot the first color of paint onto the screen, leaving space for the second color. This is MUCH easier if you are only using half of the screen!

QUICKLY dot the second color onto the screen. You do NOT have to cover the entire screen!

Use the silicone brush, credit card or silkscreen scraper to quickly spread the paints, using a wiggle motion with your wrist, to cover the entire portion of the screen that you are using.

Immediately remove the screen and wash it. I like to put my washed screen between a folded microfiber towel to dry it. Remove it right away and allow to completely air dry. THEN admire your gorgeous sheet of clay.

While your screened sheet of clay is drying, you can create the textured sheet of clay with your remaining Copper clay. (Again, I’ve used full sheets of clay, but a half sheet is more than enough!)
Roll the clay to the same thickness as before. Place the sheet inside a folded piece of plain paper.
Lightly spray your selected texture sheet with water and place face down on the clay and fold the top of the paper onto the texture sheet.
Now, find a nice flat floor surface and place the folded sheet of paper on the ground, texture sheet side up and step on it! Yep, step on it from all 4 sides (look at the soles of your shoes – if you are wearing patterned soles, change shoes!) This way you get a perfect impression!
Peel the paper from the back of the clay and set aside to dry.

I recommend using the 1.5” (38 mm) cutter and the 1/2 inch (19 mm). Place the smaller cutter into the center of the larger cutter. Use a small block of wood (like the back of a rubber stamp) to firmly press down on BOTH cutters. Gently spin each of the cutters before removing them from the clay.
Repeat to make two circles of clay.
NOTE: you can use the small circle of clay you cut out of the middle to create the “post” portion of the earring if you want posts!
Repeat to make two circles of clay.
NOTE: you can use the small circle of clay you cut out of the middle to create the “post” portion of the earring if you want posts!

Use the largest cutter in the set (2 inches or 50 mm) to cut out two of the silkscreen pieces.
Use your needle tool to place a hole in the top of the textured circle.
Use your needle tool to place a hole in the top of the textured circle.

I decided to cut the top of the screened circle off to make a “pocketbook” type pattern. I cut the first circle and then laid the piece I cut off on the second circle to cut a matching piece.
FOR POST EARRINGS: Also bake the small textured circles of clay if you wish to make post earrings. Before baking the post circles, I recommend flipping over the circle of clay and putting a small dot of Liquid Sculpey on the circle and gently pressing the post into the Liquid Sculpey. Place a hole in the bottom of the circle for hanging before baking as well. Bake all pieces as directed above, but do not attach the textured circle to the silkscreened circle until after baking.
FOR POST EARRINGS: Also bake the small textured circles of clay if you wish to make post earrings. Before baking the post circles, I recommend flipping over the circle of clay and putting a small dot of Liquid Sculpey on the circle and gently pressing the post into the Liquid Sculpey. Place a hole in the bottom of the circle for hanging before baking as well. Bake all pieces as directed above, but do not attach the textured circle to the silkscreened circle until after baking.

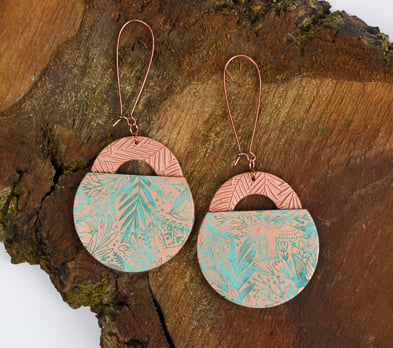
Once the pieces have baked and cooled, you can glue the textured circle to the screened circle, taking care to match the edges of the circles as shown. Then just add your jump rings (you may need 2 jump rings for the wired earrings to allow the earrings to lay correctly) and ear wire or your post backs!

Here is a look at my final earrings on my worktable
