

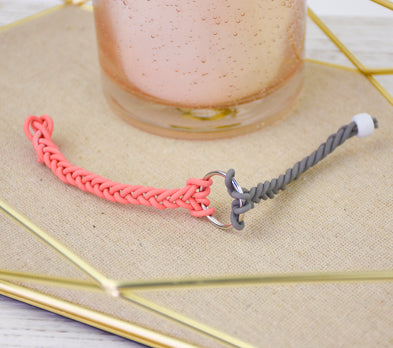
Sculpey Bake Shop® Bendy Friendship Bracelet
Sculpey Bake Shop® Bendy Friendship Bracelet
Designed by Amy Koranek
Read More
Read Less
Sculpey Bake Shop® Bendy is a super flexible oven bake clay that is strong enough to braid into Friendship Bracelets.
COMPLETION TIME:60 Minutes to make, bake, and assemble
ADDITIONAL SUPPLIES
- 1” Split key ring
- Masking tape
- White pony bead
- Instant setting glue
- Scissors
- Ruler
Project Instructions
Getting Started:
Please make sure your work area is covered and you are not working on an unprotected surface. We recommend working on the Sculpey® Oven Safe Work Mat, wax paper, metal baking sheet, or disposable foil. Uncured clay may damage unprotected furniture or finished surfaces. Be sure to cover your crafting area appropriately.
Start with clean hands, unwrap and knead clay until soft and smooth, or condition by running clay though a Pasta Machine. We recommend using a designated machine for clay purposes only. When working with multiple colors, clean hands with soap and water or baby wipes (we have found that baby wipes work best) before switching colors. Shape clay, pressing pieces firmly together. Wash hands after use.
Baking:
Begin by preheating oven to 285°F (140°C). After you are done creating; for best results bake clay on an oven-proof surface such metal, aluminum foil, an index card or the Sculpey® Oven Safe Work Mat at 285°F (140°C) for 20 minutes per 1/4" (6 mm) thickness according to package directions. Oven safe glass or ceramic surfaces are also acceptable for baking; however please note that the baking times may take longer as the glass or ceramic surfaces take longer to heat up. For best baking results, use an oven thermometer. DO NOT USE MICROWAVE OVEN. DO NOT EXCEED THE ABOVE TEMPERATURE OR RECOMMENDED BAKING TIME. BAKING SHOULD BE DONE BY AN ADULT.
First mix up custom colors in Gray and Coral. Mix 1/8 bar of Black Bake Shop Bendy with 1/8 bar of White to make Gray. Mix 1/8 bar of White with 1/16 bar of Red and 1/16 bar of Yellow to make Coral. Mix colors by kneading the clays in your hands until the new color is consistent.

Roll the Coral color into a log that is close to the diameter of the extruder but will still easily fit into the tube.

With the plunger pulled all the way back, fill the tube of the extruder with the Coral clay. Trim off excess clay that is too long for the tube.

Place the seven hole disk in the end of the Clay Extruder. Secure the end cap over the disk.

Squeeze the clay through the disk until all the clay is ejected from the tube. The strings should be approximately 10” long.

Trim the strings from the Clay Extruder with a Clay Blade.
Clean residual Coral clay from the tube. Fill with the Gray clay and extrude it through the same disk.
For each finished bracelet you will need two Gray strings and two Coral strings. Bake the strings following the baking instructions for Bake Shop Bendy.
Allow the strings to cool completely before braiding them.

Fold a Coral string in half. Place the loop at the midway point of the folded string through the key ring. Thread the tail ends through the loop and pull the tails tight. Repeat with the second Coral string. Position the two Coral strings right beside each other on one side of the key ring.

The braiding will be most easily accomplished if you secure the loop to your work surface. Use masking tape to hold the ring down.
Also, tear off two more pieces of masking tape at least 1.5” long and set these aside for later.
Also, tear off two more pieces of masking tape at least 1.5” long and set these aside for later.

For the braiding, I referred to braiding instructions online. This tutorial is for a four-stranded braid.
To begin, bring the string on the four right over the string to the immediate left of it.
To begin, bring the string on the four right over the string to the immediate left of it.

Bring the string on the far left over the two middle strings.

The string on the far right will always just cross one string next to it. The string on the far left will always cross two strings next to it.

Continue the braiding pattern until you have braided as far as you can. Secure the end of the Coral braid with a piece of masking tape from Step 9.

Loop two pieces of the Gray strings through the key ring opposite the Coral braid.

Braid the Gray strings exactly like you did the Coral strings and secure with tape at the end.

Determine how long you want your bracelet to be to fit your wrist. Your wrist measurement minus the 1” ring, divided in half - will give you the Braided Side Measurement. For example, a 7” bracelet, minus 1” for the key ring = 6”. Divide 6” by 2 and each braided side should be 3” long. We will call this the “Braided Side Measurement”.
Thread all four strands of the Gray side onto a white pony bead to the “Braided Side Measurement” that you determined for your bracelet.
Thread all four strands of the Gray side onto a white pony bead to the “Braided Side Measurement” that you determined for your bracelet.

Add two drops of instant setting glue into the area where the strings come out of the pony bead.
Allow the glue to dry completely and then trim the tails with scissors.
Allow the glue to dry completely and then trim the tails with scissors.

On the coral end, you need the Braided Side Measurement plus an additional 1” to make a loop. Flatten the four strands side by side by pinching them between your thumb and finger. Then glue the strands to each other side by side with instant setting glue.

Fold the flat ends back onto the braid leaving enough slack to create a little loop. Glue the ends of the four strings to the braid.

When the glue has set, the bracelet will be ready to wear by threading the bead through the loop.

- Choosing a selection results in a full page refresh.
- Opens in a new window.