

Original Sculpey® Terra Cotta Earrings
Original Sculpey® Terra Cotta Earrings
Designed by Phoebe Doehring
Read More
Read Less
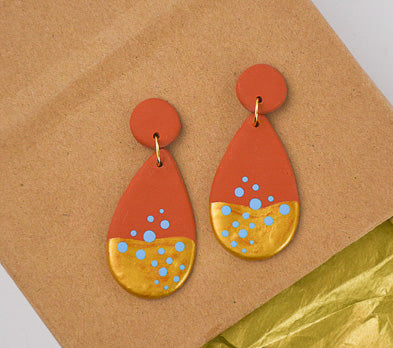
Original Sculpey® Terra Cotta teams up with the Sculpey Tools™ nested cutters to help create these boho-vibe earrings.
ADDITIONAL SUPPLIES
- Acrylic Paints: Gold, Turquoise
- Paintbrush
- Gold Jump Rings
- Gold Earring Posts
- 5 in 1 tool or toothpick
- Stippling Tools (optional)
Project Instructions
- Getting Started:
Start with clean hands, unwrap and knead clay until soft and smooth, or condition by running clay though a Pasta Machine. We recommend using a designated machine for clay purposes only. When working with multiple colors, clean hands with soap and water or baby wipes (we have found that baby wipes work best) before switching colors. Shape clay, pressing pieces firmly together. Wash hands after use.
- Baking:
Condition a 1” ball of clay. Flatten and run the clay through the clay machine on the #2 setting.
Lay a piece of plastic wrap over the top of your clay sheet. Cut out two small circle shapes and two teardrop shapes from this sheet of clay. The plastic wrap helps to give the shapes nice, curved edges. Smooth the edges of all pieces.
Use the pointed tip of your 5 in1 tool to make holes at the bottom of each little circle shape and the pointed tops of the teardrop shapes.

Bake according to the directions above and allow to cool.

Paint the bottom half of your teardrop earrings in Gold. Allow to dry.

Use stippling tools or just the tip of your paintbrush and make random dots in different sizes in the Gold painted area to the corresponding left and right sides of the earrings. Paint some dots going up into the Terra Cotta area as well. The dots should mirror each other on the pair of earrings.
Attach your Gold jump rings and glue the earring posts onto the back of the little circle tops of the earrings with Super Glue.
Attach your Gold jump rings and glue the earring posts onto the back of the little circle tops of the earrings with Super Glue.

- Choosing a selection results in a full page refresh.
- Opens in a new window.