

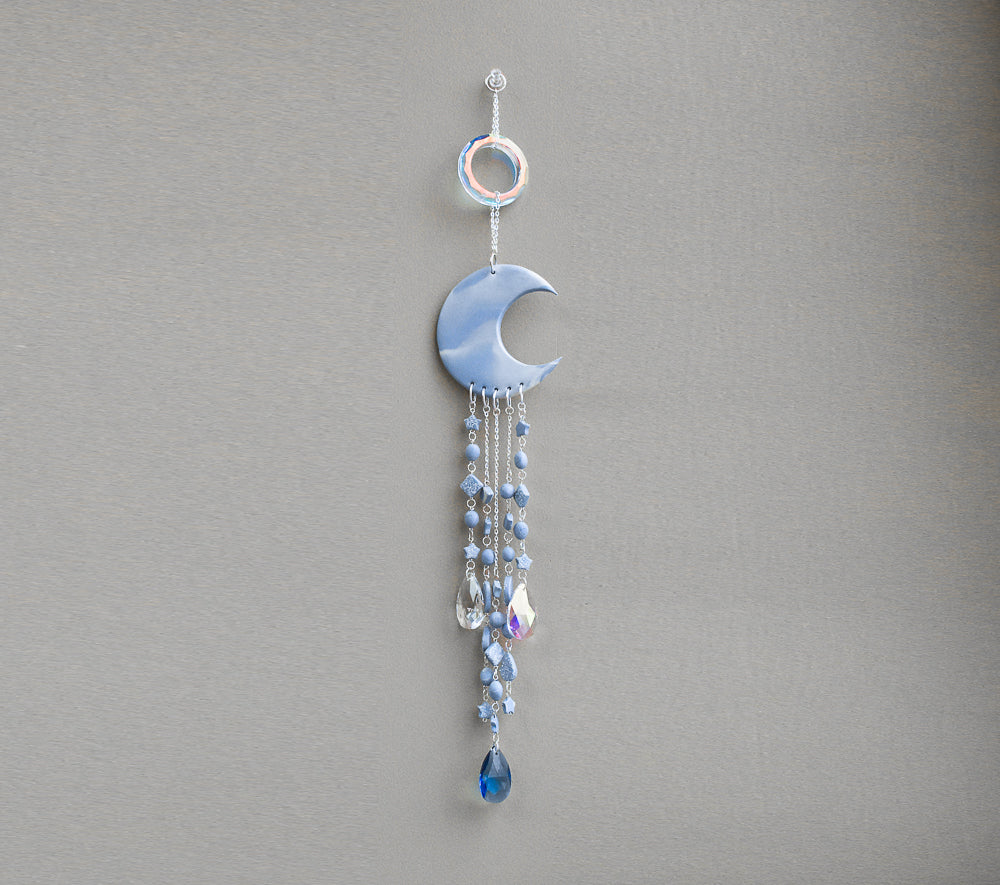
Sculpey Premo™ Celestial Moon Catcher
Sculpey Premo™ Celestial Moon Catcher
Designed by Amy Koranek
Read More
I really like the way this cool piece came together - very cloud like, ethereal, and dreamy.
You don’t mind my calling it a “moon” catcher instead of a “sun” catcher…. Now do ya? ;)
COMPLETION TIME: 2 Hours to make, bake, and assemble
Read Less
ADDITIONAL SUPPLIES
- Holographic glitter
- Paintbrush
- 10 mm Silver tone jump rings (10)
- 4 mm Silver tone jump rings (32)
- 1” Silver tone eye pins (21)
- 2” Silver tone eye pins (7)
- 38 mm Pear shaped prisms with a hole in the top (3)
- 50 mm Round ring crystal prism
- 16” Silver tone chain - divided
- Wire cutters
- Flat nose pliers
- Round nose pliers
- Ruler
Project Instructions
- Getting Started:
Start with clean hands, unwrap and knead clay until soft and smooth, or condition by running clay though a Pasta Machine. We recommend using a designated machine for clay purposes only. When working with multiple colors, clean hands with soap and water or baby wipes (we have found that baby wipes work best) before switching colors. Shape clay, pressing pieces firmly together. Wash hands after use.
- Baking (also called Curing):
Shape 1.5 ounces (3/4 bar) Ice Blue Pearl into a log.
Shape .5 ounce (1/4 bar) Pearl into a log.
Shape .5 ounce (1/4 bar) Pearl into a log.

Push the two logs together smashing them into each other.

Twist the log to create stripes.

Roll the twist up into a coil.

Roll the coil into a ball in your palms.

Gently knead the ball just a couple times.

Place your favorite part of the marbling up facing you.

Flatten the ball into an even patty with the Roller to 3-3/4” circle and 1/4” thick.

Use the 1.5” Circle Cutter to remove a piece of the moon changing it to a crescent shape.

Use the 2 mm Ball Tool to poke holes front to back - 5 holes across the bottom and 1 at the top.

Flip the moon over and poke the holes again back to front to make them really neat.

Flip the moon face up again and make sure the holes look nice.

Select mini geometric shapes to cut from the scrap marbled clay.

Cut out as many shapes from the marbled clay as you can.

Roll all the trimmings up into a twisted rope.

Divide the rope into 10 equal pieces.

Roll the pieces into balls.

Pierce the balls with the Needle Tool.

Pierce the geometric shapes from side to side with the Needle Tool.
The teardrops and ellipses were pierced long ways for variety.
The teardrops and ellipses were pierced long ways for variety.

Pick up the shapes one at a time by sticking them to the end of your finger.

Dip one side of each of the shapes directly into the glitter.
Bake the crescent moon, ball beads, and shapes following the baking instructions for Sculpey Premo™.
Allow to cool completely before handling.
Cover the glitter sides of the bead shapes with a thin layer of Glossy Glaze and allow to dry completely.
Bake the crescent moon, ball beads, and shapes following the baking instructions for Sculpey Premo™.
Allow to cool completely before handling.
Cover the glitter sides of the bead shapes with a thin layer of Glossy Glaze and allow to dry completely.
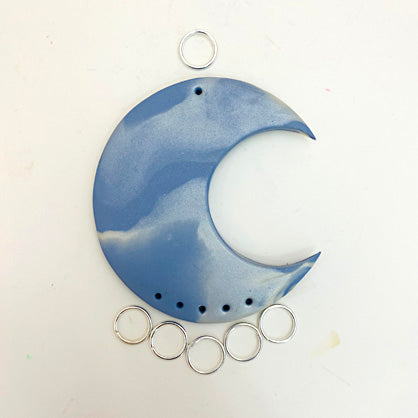
This is the layout for the crescent assembly.
Each hole will get one 10 mm jump ring.
Each hole will get one 10 mm jump ring.

Use flat nose pliers to open and close the jump rings threading them through the holes.

This is the layout for the beaded strands that have the pear-shaped crystals at the bottom.

String every bead onto either a 1”or a 2”eye pin.
Use round nose pliers to curl another eye into the tail of every bead.
I used 1” eye pins for the stars, beads, diamonds, and short diamonds.
I used 2” eye pins for the teardrops and ellipses.
Use round nose pliers to curl another eye into the tail of every bead.
I used 1” eye pins for the stars, beads, diamonds, and short diamonds.
I used 2” eye pins for the teardrops and ellipses.

Connect the beads together with the 4mm jump rings using flat nose pliers creating a continuous strand.

Make three strands that have a pear-shaped prism at the bottom, attaching the prisms with 10 mm jump rings.
Make two strands with the remaining clay beads.
Make two strands with the remaining clay beads.

Layout your design to determine how long you want your strands to hang down from the crescent.
I hung the two outside strands directly to the crescent.
The two inner strands were connected to the crescent with 2” of chain.
Chain can easily be cut with wire cutters.
The center strand was connected to the crescent with a 4” piece of chain.
I hung the two outside strands directly to the crescent.
The two inner strands were connected to the crescent with 2” of chain.
Chain can easily be cut with wire cutters.
The center strand was connected to the crescent with a 4” piece of chain.

For the top connection to the round ring prism, I cut two 3” lengths of chain and doubled them through the prism, connecting both ends of the cut chain to a 4 mm jump ring.
Connect one cut chain to the top of the crescent on the bottom; and the other end of the cut chain to a large jump ring at the top.
Connect one cut chain to the top of the crescent on the bottom; and the other end of the cut chain to a large jump ring at the top.

The Celestial Moon Catcher is ready to display.
