

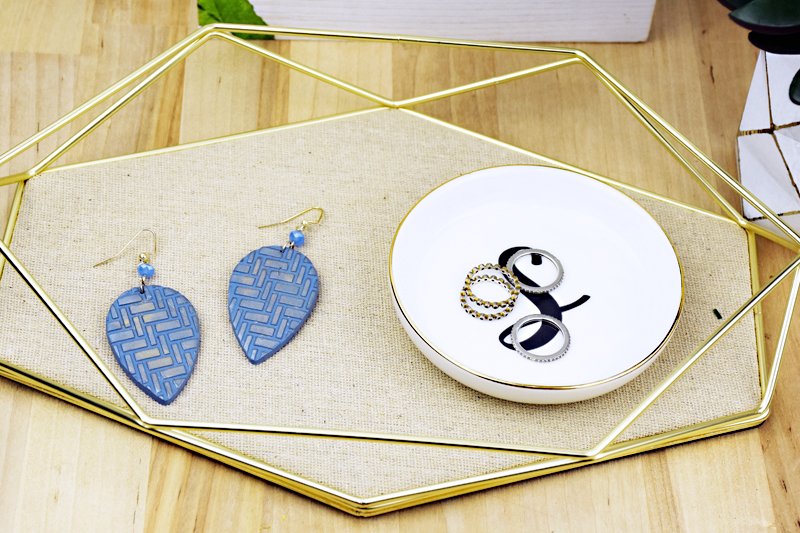
Sculpey Soufflé™ Patterned Earrings
Sculpey Soufflé™ Patterned Earrings
Designed by Syndee Holt
Read More
These quick and easy earrings, created with Sculpey Souffle, are so fun to make and wear, you will want them in all colors! Add a dramatic element to your textured clay by enhancing the texture with mica powders.
Read Less
ADDITIONAL SUPPLIES
- Mica powders (gold and silver)
- Brush for glazing
- 2 medium beads to match
- 2 10mm silver-toned jump rings
- 2 silver-toned ear wires
- 2 silver-toned eye pins
- Jewelry tools – wire cutters, round nose pliers
- Small spray bottle of water
- Texture sheet of your choice
Project Instructions
- Getting Started:
Start with clean hands, unwrap and knead clay until soft and smooth, or condition by running clay though a Pasta Machine. We recommend using a designated machine for clay purposes only. When working with multiple colors, clean hands with soap and water or baby wipes (we have found that baby wipes work best) before switching colors. Shape clay, pressing pieces firmly together. Wash hands after use.
- Baking:
Sheet out the conditioned Bluestone clay on the second from widest setting on the Sculpey Clay Conditioning machine. Lightly spray your selected texture (NOTE: I cut my different texture on the sheet apart) with water and press firmly into the sheet of clay.

Use the largest (or size of your choice) teardrop cutter to cut out two earrings.

CHECK TO MAKE SURE THAT ALL THE WATER FROM THE STAMPING PROCESS IS GONE! I often use a small piece of a soft paper towel to lightly touch the clay in the areas I can see water still! Carefully open the Silver Mica Powder (open it facing away from your work area and NOT in front of a fan like I did!) Touch the pad of your finger onto just the top of the mica powder and gently wipe is across the upper surfaces of the texture. Repeat this process, as needed, to build up the color.

You can even add a few swipes of the Gold mica powder across the design for extra interest!

Use the Sculpey needle tool to drill a hole in the top center of each earring before baking. Bake as directed.

Once the earrings have baked and cooled, apply a thin layer of the Sculpey Gloss Glaze to the surface. NOTE: I dip my brush into clean water and then I dip just the very bottom portion of the brush into the glaze. This gives me a thin, smooth application of the glaze. Allow the earrings to dry.

Assemble the earrings by threading the jump ring through the hole in the earring. (NOTE: you may need to press the needle tool through the BACK of the hole after baking to enlarge it). Thread the eye pin into the opened jump ring before closing it. Slide a bead onto the eye pin and trim the pin to about 1/2 inch. Use the round nose pliers to create a loop with the 1/2 inch of wire. Reopen the loop and add the ear wire. Close the loop and wear your new earrings!

