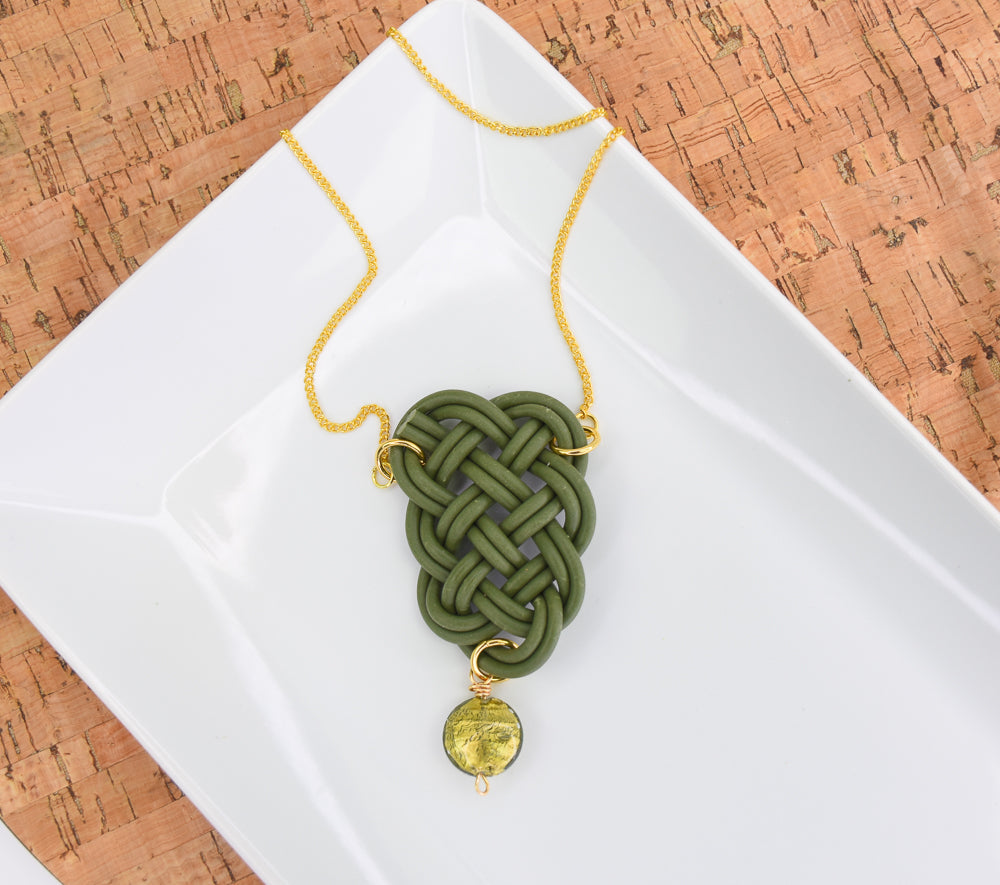

Sculpey Soufflé™ Prosperity Knot Pendant
Sculpey Soufflé™ Prosperity Knot Pendant
Designed by Amy Koranek
Read More
Tie any of your favorite knots using baked Soufflé™ as the cord. The strength and flexibility of baked Soufflé™ is the perfect recipe for knot tying.
COMPLETION TIME:
60 Minutes to make, bake, and assemble It will be helpful if you have a basic knowledge of knot construction.
Read Less
ADDITIONAL SUPPLIES
- Straight pins
- Cork board
- G-S Hypo Cement
- 8mm Gold tone jump rings (3)
- 4mm Gold tone jump rings (2)
- 4” 22 Gauge gold tone aluminum wire
- Large decorative color coordinated glass bead
- 18” Gold tone necklace chain with clasp
- Flat nose pliers
- Round nose pliers
- Wire cutters

Project Instructions
- Getting Started:
Start with clean hands, unwrap and knead clay until soft and smooth, or condition by running clay though a Pasta Machine. We recommend using a designated machine for clay purposes only. When working with multiple colors, clean hands with soap and water or baby wipes (we have found that baby wipes work best) before switching colors. Shape clay, pressing pieces firmly together. Wash hands after use.
- Baking:
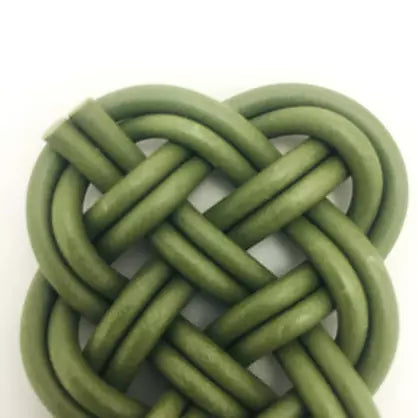
We will actually be making a decorative knot out of baked Soufflé™! This is so exciting because baked Soufflé™ is super strong and super flexible and comes in so many colors that you can use it to tie knots, make cords, and stringing components for jewelry finishing that you can color coordinate completely! I have a very limited knowledge of knot tying and every time I tie a beautiful knot like this one, I have to start from the very beginning and re-learn the skills. So bear with me here. I’ve created my own diagram for instruction so as not to infringe on any other artist’s copyrighted material.
Start by really conditioning 1/2 bar of Khaki Green Soufflé™ making absolutely sure it is very soft and flexible. Then roll a rope that is consistent in thickness from the entire 1/2 bar. The thickness of the rope should be not more than 1/8” thick and the length we are going for is about 48”. If you would rather, you can extrude the rope through an extruder, but I rolled mine by hand because that’s how I roll.
Even though we need a very long straight piece of string, you can coil the string as shown for baking purposes and to take up less room in the oven. Bake following the baking instructions for Sculpey Soufflé™ and allow to cool completely before handling.

After the coil is cool, gently straighten out the length of string.
We are going to tie a double stranded knot. So first, cut the long string into two equal parts and set one part aside. The baked Soufflé™ will cut easily with a Clay Blade. We will tie the knot loosely and then add the second strand in later.
Whether you are tying with baked Soufflé™ or with cording, it’s easy to get started by laying out the basic pattern on a cork board using pins to hold everything in place. You can even pierce the baked Soufflé™ with the pins without worrying about it breaking.
Starting at the top of the board lay the cord out starting with the center of the cord length in the topmost straight pin position. Then follow the blue arrows gently curving back and forth as shown and placing straight pins as needed at the bends. The remainder of the string should exit at the bottom left.

Starting at the top again and in the center of the cord again (which is held in place by the straight pin between the blue and the red arrows) weave the string as indicated this time by the red arrows. You will have to add more straight pins as you go. Pay close attention to the layout shown here because there are a couple of places where you are weaving under the original string. Sometimes I use the pins to pierce the string and hold it in place and sometimes I just wind the string around the back side of the pins.

Carefully remove the Soufflé™ loosely tied knot from the straight pins and from the cork board.

Take the other half of the string that we set aside in Step 3 and follow all the twists and turns and weaves exactly as the first string. Make sure the two strings are laying very neatly side by side.

Once both strings are woven entirely through the knot, tighten the knot by pulling the ends and working the strings closer and closer together while closing the holes. You can leave the knot loose like this one or you can pull it completely tight with no openings. Also note that now the entire knot has been flipped vertically because I decided I want the two lobes at the top of my design and the single lobe hanging at the bottom.

Trim the ends of the cord with a Clay Blade. Glue the cut ends tightly to the knot itself with G-S Hypo Cement (which is glue for bonding knots) or your favorite instant drying craft glue.
To make the hanging bead accent, first bend a loop in the end of the 4” wire with round nose pliers. The hole in the glass bead that I selected was quite large, so I am making a connector with a bend in the end so that the wire doesn’t slip through the bead hole.

String the bead onto the wire hiding the short tail inside the bead.

Use round nose pliers to bend a neat loop above the bead and wrap the tail of the wire around the base of the loop just above the bead. Trim the wire with wire cutters.

Connect the bead accent to the bottom of the knot with the 8mm jump ring using flat nose pliers.
Cut the chain in half at the midpoint with wire cutters. Insert 4mm jump rings through the cut ends of the chain. Connect the small jump rings to the knot with 6mm jump rings using flat nose pliers.
Cut the chain in half at the midpoint with wire cutters. Insert 4mm jump rings through the cut ends of the chain. Connect the small jump rings to the knot with 6mm jump rings using flat nose pliers.

- Choosing a selection results in a full page refresh.
- Opens in a new window.