

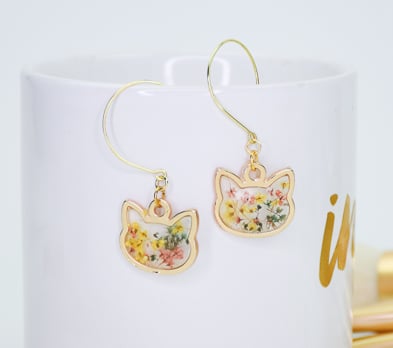
Liquid Sculpey® Floating Flowers Earrings
Liquid Sculpey® Floating Flowers Earrings
Designed by Amy Koranek
Read More
Open bezels can easily be filled with Liquid Sculpey® for a stylish design. Add dried flowers, glitters, or foils to complete the look.
TIME TO COMPLETE:
45 Minutes to make, bake, and assemble
Read Less
ADDITIONAL SUPPLIES
- Paper towel
- Silicone baking sheet or glass baking dish
- Sharp craft scissors
- Tweezers
- Dried flowers - tiny flowers made for fingernail art
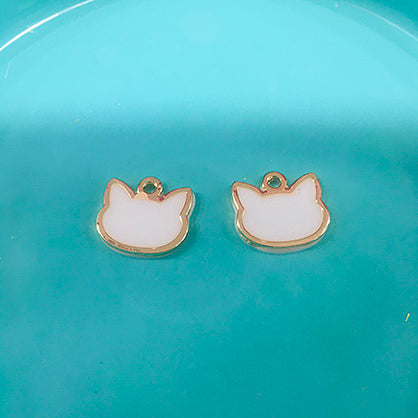
- Open bezel charms in cat head shape (2)
- 6 mm Gold tone jump rings (2)
- 4 mm Gold tone jump rings (2)
- Gold tone wire earring loops (2)
- Flat nose pliers
- X-acto knife
Project Instructions
- Getting Started with Liquid Sculpey®:
- Baking:
- It is important to use oven thermometer when you bake the liquids so that you can ensure your oven is at the correct temperature.
- Do not microwave the liquids. They must be baked in a Preheated oven at 275 ºF (130 ºC) for liquid colors and 300 ºF (149 ºC) for Clear – Do not exceed baking temperatures.
- If your piece is less than 1/4” bake for 15 minutes. For thicker pieces that are 1/4” or above bake for 30 minutes.
- If your liquid project has become yellowed or discolored in the oven, when you remake it, tent it by placing either – folding an index card in half and placing your project under it or by using aluminum foil over your project.
After making sure the Clear Liquid Sculpey® is stirred really well, you are ready to fill the bezels. Silicone baking pans provide a little bit of a grip. This helps the Clear Liquid Sculpey® (LS) to stay in place on the silicone and not run as much. However, if you don’t have silicone baking pans or sheets, a glass pan will work just fine.
Place the bezels on the silicone or glass baking pan. Squirt the stirred Clear LS in the bezels. Allow the LS to spread into the area.
Place the bezels on the silicone or glass baking pan. Squirt the stirred Clear LS in the bezels. Allow the LS to spread into the area.

Fill the bezels almost to level with the Clear LS.
Add dried flowers to the Clear LS. You may want to cut the dried flowers into tiny pieces with sharp scissors. Tweezers will help you to position the dried flowers in the liquid.

Add as many flowers as you wish. Sink the flowers into the liquid with the tip of the Needle Tool.

Bake the bezels following the baking instructions for Clear Liquid Sculpey® on the silicone pan or glass baking pan. The Clear will need to be heated to 300F in order for it to go completely clear.

Allow the pieces to cool completely before handling or removing from the baking pan. The pieces can be easily peeled from the baking pan by breaking the seal along the edge with your fingernail or the tip of a sharp knife. If there is excess baked liquid around the outside edges of the bezels, trim it away carefully with the sharp scissors or with a sharp craft knife.

Assemble as shown using flat nose pliers.
