

Sculpey Premo™ Pastel and Silkscreened Succulent Planter
Sculpey Premo™ Pastel and Silkscreened Succulent Planter
Designed by Amy Koranek
Read More
Read Less
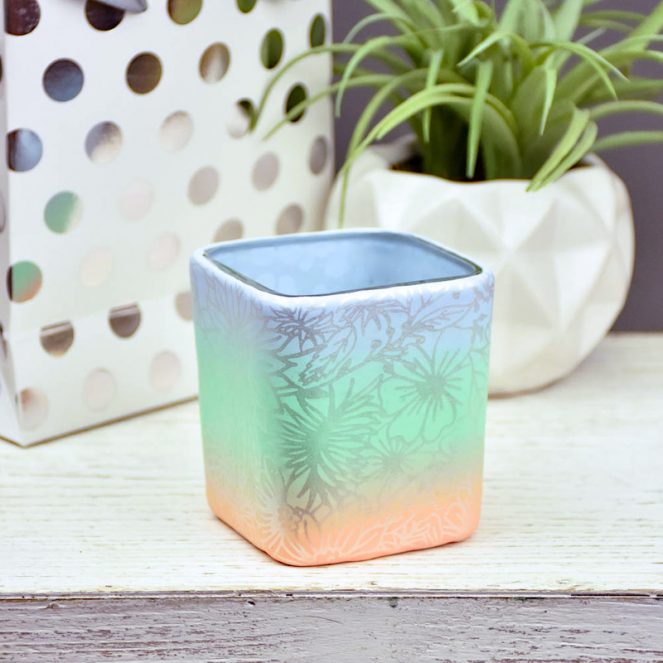
Sculpey Premo in pastel colors is perfect for covering a glass vase. Add a Sculpey silkscreen to make your own custom succulent planter, vase, or candle holder.
TIME TO COMPLETE:55 Minutes to make & bake
ADDITIONAL SUPPLIES
• Small glass vase
• Acrylic paint in metallic pearl
• Water basin large enough to hold the silk screen
• Paper towel or small microfiber towel
Project Instructions
- Getting Started:
Start with clean hands, unwrap and knead clay until soft and smooth, or condition by running clay though a Pasta Machine. We recommend using a designated machine for clay purposes only. When working with multiple colors, clean hands with soap and water or baby wipes (we have found that baby wipes work best) before switching colors. Shape clay, pressing pieces firmly together. Wash hands after use.
- Baking:
Sheet one ounce each of April, Mint Green, and Clearwater Blue through the pasta machine on the thickest setting. Overlap the sheets slightly as shown and make sure the total width of all three sheets is only as wide as the pasta machine rollers.

Press the three colors thru the pasta machine to seal the overlapping areas together. Then fold the sheet in half matching like color to like color and press through the machine on the thickest setting again. Repeat this process of folding and pressing the sheet through the machine always matching like color to like color and always pressing the fold through first.

Press and fold through at least ten times and you will see the colors start to blend into each other. You can keep folding and pressing the clay through to keep blending the colors as much as you wish. Sheet the clay to the second thickest setting and make sure that the clay sheet will reach completely around the glass vase. If the sheet is too short, you can thin it through the pasta machine to the third thickest setting to make it longer.

Place water in a shallow basin and have it nearby to clean the screen. Burnish the Floral Silkscreen to the clay with your fingertips starting at one edge of the clay. It was important for my design to start at the far edge of the clay because I screened the image twice to make sure I had enough pattern to cover my vase all the way around. Make sure there are no air bubbles trapped between the screen and the clay. Squirt a bead of pearl metallic acrylic paint across the short end of the screen.

Hold the squeegee at a 95 degree angle and firmly screen the paint across the image. Make sure the entire image receives paint. Gently peel the silkscreen back to reveal the beautiful pattern. Place the silkscreen and squeegee immediately in the water basin. Rinse all the paint away from the screen and blot the screen dry with paper towel or small microfiber towel.

Allow the paint to dry completely on the clay.

Position the screen a second time right up next to the dry paint from the first image. Burnish the screen down with your fingertips making sure there are no air bubbles trapped between screen and clay.

Squirt another bead of paint across the end of the screen. Squeegee the image again across the clay and allow the paint to dry completely on the clay. Immediately clean the screen and squeegee before returning them to storage.

After the paint is dry on the clay you can place it on the side of the vase. Cut a straight edge along one end of the clay first. Carefully press the clay to the glass as fully as you can eliminating as many air bubbles as possible from between the clay and glass.

Roll the vase and continue pressing the clay to the sides making sure there are as few air bubbles as possible. The clay will not actually bond to the glass but it will stay on well enough to be used as a planter that is not washed or overly handled.

When you get to the fourth side, measure and mark the remainder of the clay.

Cut a straight edge for the seam with the Super Slicer.

For the seam, it’s better to come up a bit short than to overlap the clay. The seam can be easily stretched and coaxed together. Then smooth the seam with your fingertip.

At the bottom of the vase, box pleat the excess clay as shown. Smooth the overlapping clay with your fingertips making it as neat as possible

Trim the excess clay away using a square cutter that best fits the bottom of your vase. [

Trim the top edges of the clay away from the rim with the Super Slicer. Smooth the cut edges with your fingers. If your vase will be used as a candle holder, make sure the clay does not go over the top of the rim where it will be exposed to flame.

Bake the vase following the baking instructions for Premo and allow to cool completely.
