

Sculpey Premo™ Unique Multiples Pebble Earrings
Sculpey Premo™ Unique Multiples Pebble Earrings
Designed by Amy Koranek
Read More
This the first part of a six-part series of tutorials based on mass producing earrings that are all unique in design. This series features Terrazzo, Floral, Pebble, Gold Leaf, Texture, and Scrap all in the same colorway for a myriad of combinations. A great way to create lots of mix and match pieces that can be combined into unique styles. If you are just starting out to sell jewelry, this instruction teaches mass production techniques while building your business. The entire line of earrings that I have created with these pieces - over 40 pairs of earrings - came from just 6 – 2-ounce bars of clay.
The Tools and Supply Lists here may be overkill for just this one section of the tutorial. I’m including everything in each section for the total project so that you can keep the overall outcome in focus.
Read Less
The Tools and Supply Lists here may be overkill for just this one section of the tutorial. I’m including everything in each section for the total project so that you can keep the overall outcome in focus.
ADDITIONAL SUPPLIES
- Interfolded clear plastic deli and bakery wrap - or - plastic kitchen wrap
- Stiff cardboard or extra baking trays for scrap organization
- Gold composite leaf
- Dremel or Dremel Stylo
- Egg cartons for sorting pairs
- 6 mm Gold tone jump rings
- 8 mm Gold tone jump rings
- Gold tone ear wires
- Gold tone ear posts and backs
- Gold tone connectors in various shapes
- Silicone glue or instant drying glue
- Flat nose pliers
- Teardrop Clay Cutters by Craft Smart®
- Square & Circle Premium Clay Cutters by Craft Smart®
- Edgy Texture Sheet Set by Craft Smart®
Project Instructions
- Getting Started:
Start with clean hands, unwrap and knead clay until soft and smooth, or condition by running clay though a Pasta Machine. We recommend using a designated machine for clay purposes only. When working with multiple colors, clean hands with soap and water or baby wipes (we have found that baby wipes work best) before switching colors. Shape clay, pressing pieces firmly together. Wash hands after use.
- Baking:
First, we will make a Pebble Slab sheet and then, once that is complete, we can turn half of that sheet into a Pebble Slab with Florals. It’s a great way to get two different looks that complement each other.
Start by mixing 1/4 bar White with 3/4 bar Beige to make Wheige. This will be our background color.
Sheet the Wheige through the pasta machine on the second thickest setting. Cut away the rough edges so you have a nice square shape to work with. Set the scrap edges aside to be used in the Scrap tutorial.
Keeping scraps organized along the way will make them easier to use later. Store solid color scraps together on pieces of plastic wrap placed on top of something stiff. The plastic wrap will keep the clay from leaching its valuable plasticizer away. The stiff object, like an extra baking tray or a piece of cardboard, will make it easy to pick up and move the scrap clay around to bring it into or away from the project at hand.

Next add pebble shapes of Gray Granite and Beige to the sheet. Make little random sized smooth lumps of the colors and pinch them super flat between your fingers, then press them to the sheet. I put the Beige pebbles down first and then let the Gray Granite ones overlap here and there.
Once the pebbles are all applied to your liking, roll over the sheet with the Acrylic Clay Roller to make the sheet level again. Now you have a beautiful Pebble Slab sheet to use. Next, we will take some of the Pebble sheet and add little floral decorations in the Unique Multiples Floral Slab tutorial.
Once the pebbles are all applied to your liking, roll over the sheet with the Acrylic Clay Roller to make the sheet level again. Now you have a beautiful Pebble Slab sheet to use. Next, we will take some of the Pebble sheet and add little floral decorations in the Unique Multiples Floral Slab tutorial.

In this photo you can see how many shapes I cut from the corner of the slab that is just the Pebbles. I used the medium sized circle and the medium sized square to cut out several component parts for the Pebble earrings.
Designer’s Note: I didn’t actually cut the shapes out until I had the floral parts added as shown. When I added the floral elements, I decided it needed the dark Alizarin Crimson spots to tie it all together, so they were added later. I also added the textured needle strikes during the Floral Slab design.
Move the cut shapes from the work area onto pieces of plastic wrap placed on top of something stiff. The plastic wrap will keep the clay from leaching it’s valuable plasticizer away. The stiff object, like an extra baking tray or a piece of cardboard, will make it easy to pick up and move the shapes around as needed.
Save the scraps for later. We will use these in the “Unique Multiples Scrap Earrings” tutorial.
Keeping scraps organized along the way will make them easier to use later. Store patterned scraps together on pieces of plastic wrap placed on top of something stiff. The plastic wrap will keep the clay from leaching it’s valuable plasticizer away. The stiff object, like an extra baking tray or a piece of cardboard, will make it easy to pick up and move the scrap clay around to bring it into or away from the project at hand.

Following the tutorials in this set for Pebble, Floral, Terrazzo, Gold Leaf, Texture, and Scrap, make lots of mix and match pieces from each pattern. Then combine the pieces to make earring layouts as you like.
Here’s a view of the layout for several pairs of earrings. Lots of unique styles can be created by mixing and matching the different patterns. Once you like the look of the designs, you can mark where holes will need to be drilled with the Needle Tool. Be sure to mark holes for ear wires if you want the earrings to dangle. Leave top pieces unmarked for holes if you want them to be post style earrings.
Bake the pieces following the baking instructions for Sculpey Premo™. Allow pieces to cool completely before handling.
After baking, the holes can be drilled with a Dremel drill or Dremel Stylo for speedy production drilling. When using an electric drill, use a bit that is larger than the jump rings. This way the pieces will be allowed to move freely when assembled.

After drilling, drop pairs of earrings into empty egg cartons to keep all the parts of a pair of earrings together and sorted.

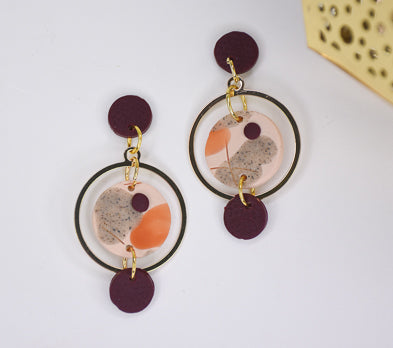
Here’s a look at how some of the Pebble elements were used in finished earrings.

Here’s a closeup look at just one of the pairs of earrings that feature the circles cut from the Pebble Slab. I used the medium sized circle cutters and combined the Pebble with textured elements at top and bottom. They are assembled with jump rings between elements and adding the large round metal connectors for accents. These earrings will be finished as post earrings by gluing posts to the buttons at the top.
