

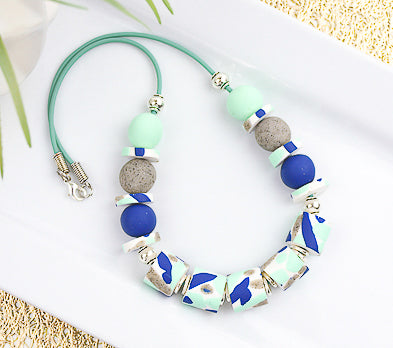
Sculpey Premo™ Speckled Tube Bead Necklace
Sculpey Premo™ Speckled Tube Bead Necklace
Designed by syndee holt
Read More
A Back-to-Basics approach to creating an on-trend necklace, created with Sculpey Premo™.
TIME TO COMPLETION: 75 minutes including baking
Read Less
ADDITIONAL SUPPLIES
- Bamboo skewer
- Round silver-tone beads to fit cording(4)
- 2 mm rubber cording or leather cording (about 24 inchs)
- 9 mm silver toned clasp eavy duty jump rings (12)
- 2 mm cord end caps (mine are for leather)
- Silver-toned clasp
- Instant Glue
- Jewelry pliers
- Small sheet of fairly smooth paper – mine is a patty paper from butcher
- 2 sheets of regular print paper
Project Instructions
- Getting Started:
Start with clean hands, unwrap and knead clay until soft and smooth, or condition by running clay though a Pasta Machine. We recommend using a designated machine for clay purposes only. When working with multiple colors, clean hands with soap and water or baby wipes (we have found that baby wipes work best) before switching colors. Shape clay, pressing pieces firmly together. Wash hands after use.
- Baking:
Roll about a 2 inch ball of the conditioned White clay and thread it onto the bamboo skewer by gently twisting the skewer through the ball. Place the ball on a sheet of clean paper and gently roll the ball back and forth to spread the ball of clay along the skewer to form a tube. Use both hands when it gets long enough. Roll the tube to about 3/4 inch diameter.
My tube ended up being about being about 4 inches long. You can make two tubes if needed.
My tube ended up being about being about 4 inches long. You can make two tubes if needed.

Roll out small pieces of the other conditioned clays on the thin setting on your clay conditioning machine. I’ve use #5 here. We will be cutting small slivers of these colors and adding to the tube as shown.
I also added small dots of the colors by using the medium Etch n’ Pearl tool.
I also added small dots of the colors by using the medium Etch n’ Pearl tool.

Here is a look at my tube with all the colors added.

Gently roll the clay back and forth, using the piece of patty paper (or small thin paper) over the top of clay to prevent finger marks and to help hold the pieces together. The tube can lengthen slightly during this process.
This will help integrate the pieces into the background clay of the tube. My finished tube is about 1/2 inch in diameter
This will help integrate the pieces into the background clay of the tube. My finished tube is about 1/2 inch in diameter


Now we can remove the skewer and cut our tube beads. I cut 6 large beads at 1/2 length (using my first cut as the measurement) and then I cut 6 thinner slices as well. Set these aside.

Here is a look at my beads ready for the oven. These beads can be baked standing up as shown, but separate the thinner beads.

To create the round beads, I rolled out a small piece of each of the accent colors on the wide open setting on my clay conditioning machine.
ARTIST TIP: I use small pieces of baked clay with the setting #s on them and I take a quick photo so I know what settings I used for a project!
Use the second from largest circle cutter (1.75 inches) to cut out a circle of the clay sheet and roll into balls. Create two of each color.
ARTIST TIP: My young sons showed me years ago that the best way to create a round ball was to keep your hands gently cupped while rolling the ball.


I love to use the bead needles included in the Sculpey Tools™ bead baking rack. They are nice and long and very sharp! Gently twist the needle through the bead. I like to place a finger on the opposite side of the needle as I work. As soon as I can feel the needle, I stop. Then turn the bead around and find the little bump from the needle and reinsert the needle and twist to the other side. This method not only keeps the ball nice and round, but it prevents an “exit would” tear on one side of the smooth ball.
Once we have this “Pilot hole” in the bead, we can then gently twist a bamboo skewer through the drilled bead to enlarge the hole. Leave the bead on the skewer and place the tip of the skewer on the metal bead baking rack. Bake all the beads according to the directions in step 1.
Once we have this “Pilot hole” in the bead, we can then gently twist a bamboo skewer through the drilled bead to enlarge the hole. Leave the bead on the skewer and place the tip of the skewer on the metal bead baking rack. Bake all the beads according to the directions in step 1.

Once the beads have baked and cooled to warm, twist the round balls off the skewer. (This is easier to do when the clay is warm, but it is also possible with cooled clay as well.) Begin to string your beads on the cording, using two of the jump rings between each of the large tubes.
Alternate the thinner tube beads with the round beads as shown.
Alternate the thinner tube beads with the round beads as shown.


Measure the length of the necklace for your preference and trim the cording.
Attach a jump ring to the left side of the cord end clasp. Attach the clasp, using a jump ring to the right side.
Attach a jump ring to the left side of the cord end clasp. Attach the clasp, using a jump ring to the right side.

Add a small drop of glue to the end of the cord and slide one end of the clasp in place.
Use the jewelry pliers to find the end of the looped clasp and pinch it tightly against the cording as shown. Repeat with the other side.
Use the jewelry pliers to find the end of the looped clasp and pinch it tightly against the cording as shown. Repeat with the other side.


Allow the glue to dry and your new necklace is all set!

- Choosing a selection results in a full page refresh.
- Opens in a new window.