

Sculpey III® Aztec Pattern Office Tray
Sculpey III® Aztec Pattern Office Tray
Designed by Amy Koranek
Read More
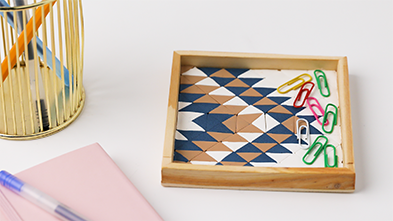
Create this dramatic faux-tile tray for a quick gift – to a great friend or even yourself!
COMPLETION TIME:
90 Minutes to make and bake
Read Less
ADDITIONAL SUPPLIES
- Small wooden tray, approximately 4” x 4”
- Pencil
- Ruler
- Deli paper
Project Instructions
- Getting Started:
Start with clean hands, unwrap and knead clay until soft and smooth, or condition by running clay though a Pasta Machine. We recommend using a designated machine for clay purposes only. When working with multiple colors, clean hands with soap and water or baby wipes (we have found that baby wipes work best) before switching colors. Shape clay, pressing pieces firmly together. Wash hands after use.
- Baking:
When adding oven bake clays to wood items, it is good practice to pre-bake the wood item to make sure unwanted sap is released from the item. Place the wood item in a pre-heated oven at 275F and bake for 20 minutes. Allow to cool completely before handling. If sap is visible on the surface after baking, it can easily be scraped off with a blade.
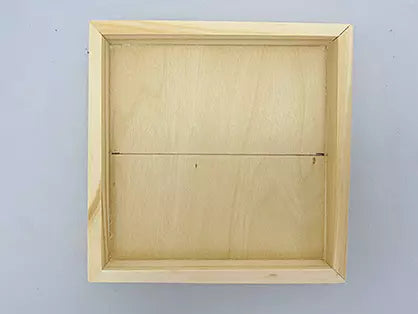
Mark a center line horizontally across the middle of the tray with a ruler and pencil. This will serve as a guideline for getting the first row of clay pieces straight.
Mark a center line horizontally across the middle of the tray with a ruler and pencil. This will serve as a guideline for getting the first row of clay pieces straight.
Squirt a bead of Sculpey® Oven Bake Clay Adhesive into the bottom of the tray.

Spread the Oven Bake Clay Adhesive all over the inside of the tray bottom (avoiding the vertical sides) with your fingertips. Set the tray aside while preparing the Sculpey III®. This will allow the Clay Adhesive to absorb slightly into the wood. Sculpey® Oven Bake Clay Adhesive is the prefect bond between oven bake clays and any porous surface.

Prepare the clays by rolling each color into flat sheets 1/8” thick. You can use the Mini Tube Roller or a pasta machine on the thickest setting.
All the little triangles in this tutorial were actually made from pieces that started out as squares. Cut squares from the clays using the 3/4” Square Cutter. As you cut out the squares, placing them on a piece of deli paper or even copy paper, will help you keep them organized.
Cut out squares, then cut the squares in half diagonally to make triangles. Finally cut the triangles in half again to make little triangles. Each square that was cut will yield four triangles.
From White you will need at least 10 squares cut into 40 triangles.
From Navy Pearl you will need at least 7 squares cut into 28 triangles.
From Tan you will need at least 9 squares cut into 36 triangles.

Bring the tray back into your work area. You may notice that the Clay Adhesive is more matte looking after it has soaked slightly into the wood.

Starting on the left side, add three triangles of White as shown. Follow the guideline as closely as possible.

Add Navy Pearl and Tan triangles as shown. Where possible, line up points of triangles on the guideline.

Continuously work from left to right adding triangles as closely as possible to the guideline.

Add the next row of triangles above the first one.

It is helpful to use the Mini Blade as a straight edge. Hold the Mini Blade vertically against the last row of triangles and apply light pressure to the clay to make sure it is lined up well.

Add a row of triangles across the bottom copying the pattern from above, except upside down and backwards creating a mirror image pattern.

Here’s the third row above and below. As I’m working from left to right, once the colorful pattern is complete, I left the solid White area on the right to fill in last.

Two more mirror image rows above and below.

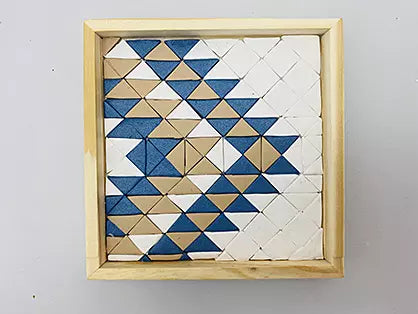
My rows have finally reached the top and bottom of the tray. I filled in the little gaps at the top and bottom with partial pieces of triangles as needed.

Fill in all the empty spaces on the right with White triangles.
To make the surface of the clay pieces really smooth, place a small piece of deli paper over the top.

Slide over the deli paper with the Lentil Bead Maker from top to bottom and from side to side to smooth any unevenness out in the clay surface.

Remove the Lentil Bead Maker and the deli paper.
Bake the tray following the baking instructions for Sculpey III®.
Allow the tray to cool completely before handling.
Bake the tray following the baking instructions for Sculpey III®.
Allow the tray to cool completely before handling.

Here are a couple more designs that I tested. The middle tray has more of a quilted pattern. The bottom tray is exactly like the top one, but using half sized triangles instead of quarter sized triangles.

- Choosing a selection results in a full page refresh.
- Opens in a new window.