

Sculpey Bake Shop® Kawaii Owl
Sculpey Bake Shop® Kawaii Owl
Designed by Phoebe Doehring
Read More
Read Less
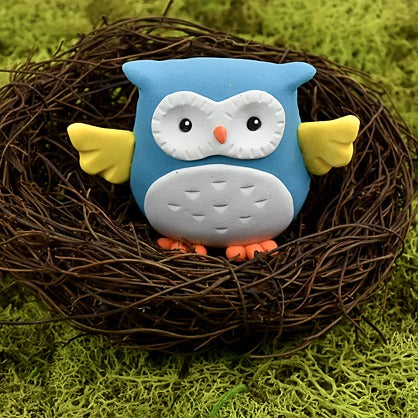
Create this clever little owl in a couple of hours! In fact, you might want to create a flock out of all the different Bake Shop colors.
ADDITIONAL SUPPLIES
Create this clever little owl in a couple of hours! In fact, you might want to create a flock out of all the different Bake Shop colors.
Project Instructions
- Getting Started:
Start with clean hands, unwrap and knead clay until soft and smooth, or condition by running clay though a Pasta Machine. We recommend using a designated machine for clay purposes only. When working with multiple colors, clean hands with soap and water or baby wipes (we have found that baby wipes work best) before switching colors. Shape clay, pressing pieces firmly together. Wash hands after use.
- Baking:
Mix 1/3 of a block of Turquoise with 1/4 of a block of White clay together to make a Light Turquoise color. Roll into a ball. Shape the ball into a chubby owl shape. Pinch and shape two pointed ears on either side of the head. Smooth the owl’s body with your fingertips.


Roll two balls of White clay. One ball should be approximately 1/4” in size and the other should be approximately 1/2” in size.
Shape the smaller ball of White clay into an oval. Use your acrylic roller to roll flat and thin. Now shape this flatten oval into a mask shape. Press this mask onto the face part of your owl.
Roll the larger White ball flat and thin now. Press this onto your owl to make his belly. Use the end of your pinky finger to make two eye indents on either side of the mask.

Using the Sculpey Etch and Pearl tool, use the pointed end and make line indents all around the edge of your owl’s eyes. Now use the other end of the Etch and Pearl tool and make feather like indents on the owl’s belly. Roll two tiny balls of Black clay and press these on in the center of each eye socket. Roll a very tiny ball of Orange clay and make it into a little pointed beak. Press on in the center of the mask.


Roll two equal sized balls of Yellow clay approximately 1/2” in size. Shape both of these into flattened triangular wing shapes. Use the pointed end of your Etch and Pearl tool and make a couple of indents on the sides of the triangle shapes to make them look more like wings. Press a wing on either side of your owl.
Roll six tiny balls of Orange clay. Roll them all into teardrop shapes. Press three teardrop shapes together at the pointed ends to make a foot. Repeat with the other three teardrop shapes to make the other foot. Press the feet onto the bottom of your owl. Bake according to package directions. Allow to cool.
Roll six tiny balls of Orange clay. Roll them all into teardrop shapes. Press three teardrop shapes together at the pointed ends to make a foot. Repeat with the other three teardrop shapes to make the other foot. Press the feet onto the bottom of your owl. Bake according to package directions. Allow to cool.
