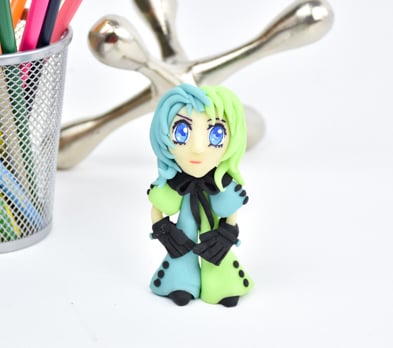

Sculpey Bake Shop® Glow in the Dark Anime-Amy Figurine
Sculpey Bake Shop® Glow in the Dark Anime-Amy Figurine
Designed by Amy Koranek
Read More
Read Less
Your characters take on that special glow when you make them with Sculpey Bake Shop® Glow in the Dark. At some point in my artistic training I was taught that we can never quite get away from putting our own faces on portraits. When I was finished with this guy, I thought, “yah, I did it again, I made myself”.
TIME TO COMPLETION: 60 minutes
ADDITIONAL SUPPLIES
- Toothpicks (4)
- Heat set crystal
- Empty clean coffee mug
- Acrylic paints in white, black, and blue
- Fine detail paintbrush
- Fine tip black permanent marker
- Fine tip red permanent marker

Project Instructions
- Getting Started:
Start with clean hands, unwrap and knead clay until soft and smooth, or condition by running clay though a Pasta Machine. We recommend using a designated machine for clay purposes only. When working with multiple colors, clean hands with soap and water or baby wipes (we have found that baby wipes work best) before switching colors. Shape clay, pressing pieces firmly together. Wash hands after use.
- Baking:
For the body using 1/4 bar of Blue make a long club for a leg and a short fat club for a shoulder. Repeat with 1/4 bar of Green. Use 1/8 bar of Black to make two teardrop feet.

Elongate the leg pieces and pinch the ends to make bell bottoms. This type of leg will add more volume to the base of the figure and help it stand up better.

Push a toothpick up into the bell bottom leaving enough sticking out the bottom to insert into the feet. Toothpicks are a great way to add support and rigidity to characters and figurines.

Push the feet onto the bottom of each leg and onto the toothpick. Press the legs together at the top and make sure the legs will stand up on their own.

Make little bell shapes from the sleeve pieces. Make long skinny club shaped arms from 1/8 bar of Glow

Insert the arms into the sleeves and pinch the sleeves just enough to hold the arms inside. Position the arms on the body as shown.

Make a little Black collar and wrap it around the shoulders.

Add a little Black bow to the collar.

From 1/2 bar of Glow, shape the head. Press the head onto the end of the ball tool to help you hold it up as you shape it. The head is basically an egg shape with a pinched chin. I used the ball ended tool to push in eye sockets and drew a mouth just barely in with the straight edge. Pinch off a little more Glow for a triangular shaped nose. Carefully remove the tool from the head.
Add little bits of Glow to the hands for thumbs. Add little Black buttons to the pants. Put Black stripes on the sleeves
Add little bits of Glow to the hands for thumbs. Add little Black buttons to the pants. Put Black stripes on the sleeves

Break a toothpick to a length that can go into the head and into the body but not show between the legs. Push the toothpick into the neck area. Push the head down on top of the shoulders and onto the toothpick. Make sure the little guy can still balance enough to stand up.

Make lots of little tapered pieces in Blue and Green for tendrils of hair
Make lots of little tapered pieces in Blue and Green for tendrils of hair

It will be easiest if you go ahead and put the eyebrows on before the hair. Draw on eyebrows with a fine line black permanent marker. Allow the marker to dry for a few seconds and then place the tendrils of hair on the head.

Make sure to put hair all over the head front and back.

Here’s the hair style I settled on. I used to have this exact same hair cut! Place your character in a coffee mug standing up and using the sides of the mug to balance it. Bake following the baking instructions in Step 1 above.

Allow the figurine to cool completely in the mug. Now you can start painting the eye details. I found that paint is the best application for getting the eyes to look right. I also searched lots of characters to get an idea of how I wanted my eyes to look. Start by painting flat white circles in the eye sockets.

Mix some white paint with the blue paint and apply lighter blue irises.

Make a dark blue circle in the very center. Highlight the top of the circle with a blue that is half way between the dark blue and the lighter blue.

Place a light blue swish at the bottom of the pupil and add white highlight dots to the top and bottom.

When the eyes are dry, go back and outline them with the fine line black permanent marker. Add eyelashes too. Use a fine line red permanent marker to indicate a little mouth in the groove.

Here’s my finished AnimeAmy. At this point I decided I didn’t like the wimpy little hands and wanted to add a detail that would show some fierceness.

I made very flat shapes from Black and pressed them over the hands to make gloves.

I made a little pancake from Green and pushed in the edges with a toothpick to make it more flower shaped.

Then I pinched out the points on the Green flower so it became a star. I put the star on a Blue disk, placed a Black circle in the middle and pressed in a heat set crystal. I added details to the star with the flat knife tool. Sandwich a toothpick into the star with some clay on the back and you’ve got a wand of sorts.
I positioned the wand above the left facing glove and under the right facing glove. Then I added thumbs to the gloves to help hold the wand in place. I scored finger lines in the gloves as well. I put little Blue buttons on the gloves too.
I positioned the wand above the left facing glove and under the right facing glove. Then I added thumbs to the gloves to help hold the wand in place. I scored finger lines in the gloves as well. I put little Blue buttons on the gloves too.

I baked AnimeAmy one more time in the coffee mug and, voila! AnimeAmy Is ready for anything! Allow your character to charge up under the lights and it will glow in the dark.
- Choosing a selection results in a full page refresh.
- Opens in a new window.