
Sculpey III Little Toucan
Sculpey III Little Toucan
Read More
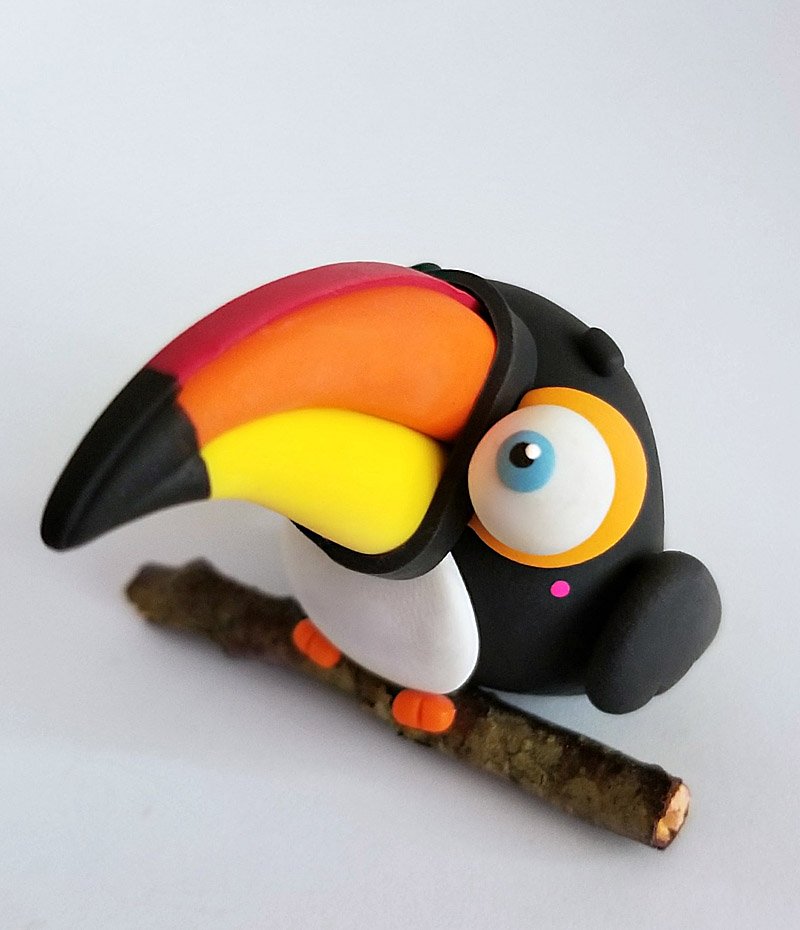
This friendly little Toucan would be a great addition to a plant you are gifting to a friend....or YOURSELF!
Design by Little Laazies
Read Less
ADDITIONAL SUPPLIES
Exacto Knife; Small Stick; Thick Wire; Acrylic Paint – WHITE, BLACK, PINK; small brush
Project Instructions
- Getting Started:
Start with clean hands, unwrap and knead clay until soft and smooth, or condition by running clay though a Pasta Machine. We recommend using a designated machine for clay purposes only. When working with multiple colors, clean hands with soap and water or baby wipes (we have found that baby wipes work best) before switching colors. Shape clay, pressing pieces firmly together. Wash hands after use.
- Baking:
Toucan Body: Prepare your Black Sculpey III Polymer Clay by kneading it until it is soft and pliable – let rest for 10-20 minutes. Once the clay has rested, take a ball in your hands and with your palms create an oval shape for the Toucan body. Then with your thumb and index finger pull some of the clay at the base of the oval to make a flatter piece / the tail feathers. TIP: Keep in mind this might take a few attempts to get exactly right; don’t give up!

Toucan Wings: Take more Black clay for the Wings – create teardrop shapes with your palms then flatten and shape to make the Wings. Next, with an Exacto Knife, make feather indentations along the sides of wings. Do this same step to the back of the Toucan where the tail feathers would be.

Toucan Belly & Eye Sockets: Prepare/knead a small piece of White clay and create a small, flat oval. Also take a small piece of Yellow clay and Orange clay and knead or mix together to create a Golden Yellow color and with that create two small, flat circles. Take the Toucan Body and attach the White oval by gently pressing onto the Belly of the Body. Do the same with the two Golden Yellow circles; gently press them where the Eyes would be. With the Large Ball Tool push firmly into the circles to create sockets for the Eyes. Set aside the Toucan Body and Wings. TIP: If your hands get messy while mixing clay, take a break to wash them. You can also keep Hand Wipes handy or use a chunk of White clay to roll on your hands to collect any dust, dirt, or excess clay!

Prepping the Toucan Beak: Prepare/knead each of these clays separately - Orange, Yellow, Red and Black clay. With your Rolling Pin, flatten out a thin piece of Red and a thicker piece of Black clay – then using the Exacto Knife, cut a thin strip of Red clay and a thick strip of Black clay. Set aside. Take your Orange clay and create a long, teardrop shape then flatten it. Do the exact same thing with the Yellow clay.

Assembling the Toucan Beak: Align both the Yellow and Orange pieces of clay you just made, then press together to make the Toucan Beak. With your fingers, take the thin end of the Beak and pull it downward to form a curve in the Beak. TIP: Remember you can use any colors for the Beak – the Toucan is a very colorful creature!

Finishing the Beak: Grab the two strips of clay – the Black and the Red. Place the Red strip along the center of the Beak to the end of the curve, then cut to fit. Make sure it is straight and attached. Then take your Black strip and wrap it around the base of the Beak, then cut to fit - there will be a seam at the bottom of the Beak, or you can gently smooth it out with your fingers. Cut a small piece of Thick Wire and push into the base of the Beak – this helps hold the Beak onto the body.

Assembling Part I: Now it is time to start assembling the Toucan! Take your Beak and apply some Sculpey Bake and Bond – This bakeable adhesive forms an incredibly strong bond between two pieces of polymer clay. Take the Beak and press between the two indents/sockets that you made for the eyes. Make sure it is firmly attached. Then with White clay, form two small balls for the Eyeballs – dab a small amount of Bake and Bond in the indents/sockets then place the Eyeballs. Prepare/knead some White clay and Turquoise clay to form a Light Blue color. This will be the iris of the eyes! Form two small balls of the Light Blue clay then flatten them and press into the center of the Eyeballs.

Assembling Part II: Grab the Wings and apply a dab of Bake and Bond to the back of each, then firmly press onto each side of the Toucan Body. Make small oblong shapes with your Black clay for the Eyebrows and place above the eyes – depending on how you place them your Toucan could look happy, sad, mean, etc! Next take a small Stick to fit the Toucan, then apply some Bake and Bond to the Body and press the Stick at the base of the Toucan. Next comes the feet – take two small pieces of Orange clay and make them oblong shape. Using the Bake and Bond again, place the feet at the base of the Belly and above the Stick. TIP: No need to buy a Stick… You can find plenty of free Sticks outside your home - Just take a walk and find one that has fallen from a tree!

Bake and Paint: Once you are done and happy with your unbaked Toucan, bake it according to the instructions in Step 1. Remove from oven and let cool completely! Once cool, check to make sure the Stick is secure – if it falls off, then apply a tiny bit of Super Glue to attach it again – leave it to dry for 20-30 minutes. Next take the Acrylic Paint out and with a Toothpick or Small Ball Tool dab into the Black paint and make a small dot for the Pupil of the Eye. Continue this step for the white accent on the Pupil and the pink Cheeks of the Toucan. TIP: If you are not comfortable with paint, you can always make these details in clay instead!

Paint the Beak: Once the paint from the Eyes and Cheeks is dry then pick up the Toucan and slowly dip the tip of the Beak into Black Acrylic Paint. If it is too thick, you can use your finger or a paintbrush to gently dab some of the paint off making sure not to smear or remove too much paint. Let dry and you are done! TIP: Again, if you are not comfortable with paint, you can always make this detail in clay instead!
