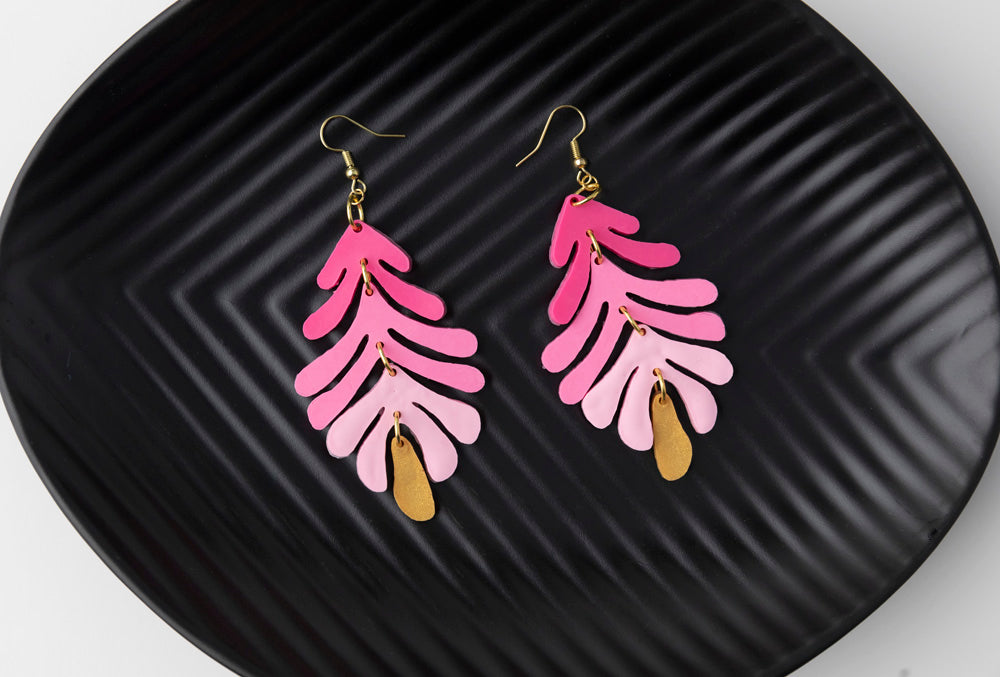

Liquid Sculpey® Stacked Dangle Earrings
Liquid Sculpey® Stacked Dangle Earrings
Designed by Amy Koranek
Read More
Liquid Sculpey® and bakeable silicone molds are a match made in crafter heaven! Make these awesome dangle earrings in an afternoon of crafting. TIME TO COMPLETE:
60 Minutes to make, bake, and assemble
Read Less
ADDITIONAL SUPPLIES
- Paper towel
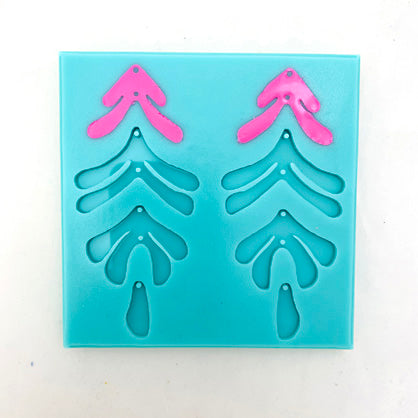
- Silicone mold (Etsy: search abstract leaf multi dangle pendant)
- Gold tone ear wires (2)
- 4 mm Gold tone jump rings (2)
- 6 mm Gold tone jump rings (6)
- Flat nose pliers

Project Instructions
- Getting Started with Liquid Sculpey®:
-
Baking:
- -It is important to use oven thermometer when you bake the liquids so that you can ensure your oven is at the correct temperature.
- -Do not microwave the liquids. They must be baked in a Preheated oven at 275 ºF (130 ºC) for liquid colors and 300 ºF (149 ºC) for Clear – Do not exceed baking temperatures.
- -If your piece is less than 1/4” bake for 15 minutes. For thicker pieces that are 1/4” or above bake for 30 minutes.
- -If your liquid project has become yellowed or discolored in the oven, when you remake it, tent it by placing either – folding an index card in half and placing your project under it by using aluminum foil over your project.
Here’s a tip for baking perfectly in silicone molds. Dampen a dish towel with water and wring out as much of the water as you can. Fold the damp towel so that the molds can sit level on top of it. The damp towel will slow down the curing process so that the LS will cure evenly throughout and avoid warping.
Fill the Silicone Mixing Cup to the 10 ml line with Fuchsia Liquid Sculpey® (LS).
Add four measuring spoons of White LS and stir in completely.
Add four measuring spoons of White LS and stir in completely.

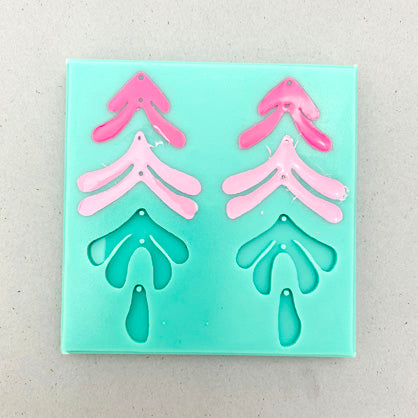
Fill just the top two leaf shapes with the LS mixture. Tap the mold on the work surface to release air bubbles.
Add four more spoons of White LS to the remaining mixture in the cup to lighten the liquid.
Stir completely.
Fill the middle leaf shape. Tap the mold on the work surface to release air bubbles.
Stir completely.
Fill the middle leaf shape. Tap the mold on the work surface to release air bubbles.
Add four more spoons of White LS to the remaining mixture in the cup to lighten the liquid.
Stir completely.
Fill the bottom leaf shape. Tap the mold on the work surface to release air bubbles.
If you have left over LS, you can save it by placing the cap on the cup. When the cup is emptied as much as possible, bake the cup to cure the residue and then peel the residue out when the cup is cool. Do not bake the lid or stir stick.

Fill the bottom dangle shape with Gold LS.
Tap the mold on the work surface to release air bubbles.
Bake the mold following the baking instructions for Liquid Sculpey®.
Tap the mold on the work surface to release air bubbles.
Bake the mold following the baking instructions for Liquid Sculpey®.

Allow the mold to cool completely before flexing it to release the pieces.

Here’s the layout for the earrings.

Assemble the earrings using flat nose pliers to open and close the jump rings.

Repeat assembly for the second earring.
