
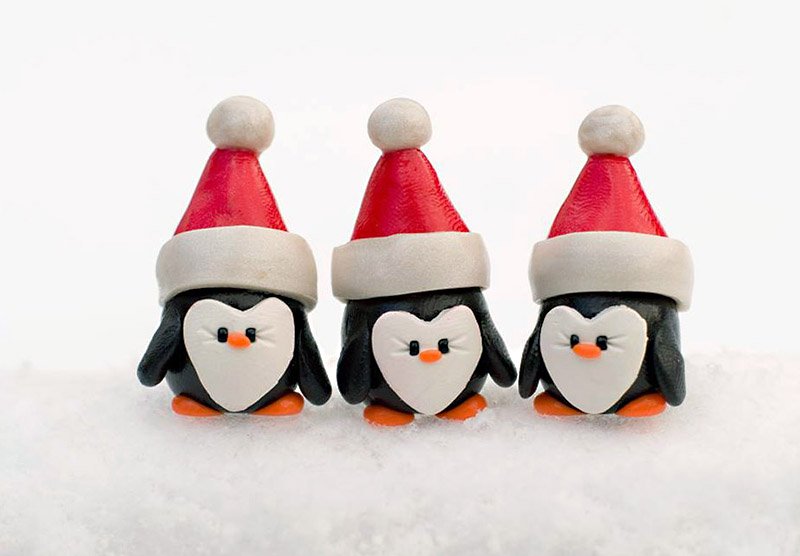
Sculpey III Holiday Penguins
Sculpey III Holiday Penguins
Read More
These lovable characters will be a great addition to your holiday decor!
Design by Megan Durocher
Read Less
ADDITIONAL SUPPLIES
Small black seed beads
Project Instructions
- Getting Started:
Start with clean hands, unwrap and knead clay until soft and smooth, or condition by running clay though a Pasta Machine. We recommend using a designated machine for clay purposes only. When working with multiple colors, clean hands with soap and water or baby wipes (we have found that baby wipes work best) before switching colors. Shape clay, pressing pieces firmly together. Wash hands after use.
- Baking:
Roll out a ¾ inch ball of black clay and then pinch it into a fat oval.

Use the acrylic roller to roll out a thin strip of white clay. Use a small cutter in the shape of a heart which will be part of the face. Press it onto the front of the black oval.

Roll out two small balls of black clay for the wings. They can be as small or as big as you want on your penguin! Squish between your fingers to flatten the balls, and press each one on their side of the black oval.

Use a needle tool for this step. Put a seed bead onto the needle and press into the white heart area of the penguin. Repeat for the other eye. If you do not have seed beads, you can use black clay to make small eyes instead! Use the end of the needlepoint tool or a toothpick to press creases into the sides of the eyes

Set aside the penguin. Roll a ½ inch ball of red clay. Pinch the top all around to make the ball into a cone shape. Use your forefinger and thumb to widen the base of the ball all around the edge. Press the cone onto the top of the penguin, being careful not to get any of the red pigment onto the white! Your fingers are likely stained in red by now! Once you’re done pressing the cone onto the penguin, wash your hands of the red stain before you move on to the next steps.

With clean hands, roll out pearl white clay into a thin strip. Use a cutter tool to cut a 2-inch-long strip, ¼ inch wide. Press the white strip onto the penguin, covering the penguin’s forehead and the bottom of the red hat. Press all the way around until the white strip ends connect at the back of the hat

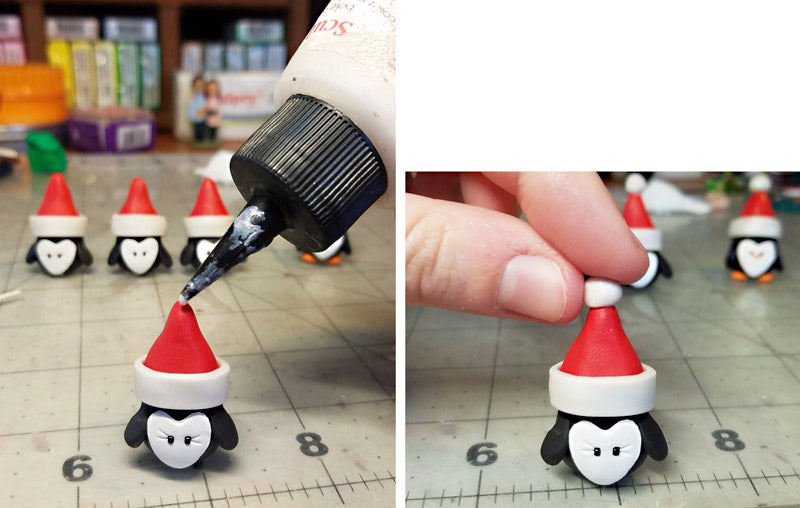
Use Sculpey Bake & Bond to squeeze a dot of it onto the top of the red hat. Once you’ve done that, pick up a small bit of pearl white clay and roll into a ball. Press onto the top of the hat.
Roll another ball of black clay similar to the size of the wings. Flatten and press onto the lower back of the penguin to make a little tail.

Roll out two small balls of orange clay. These will be the feet! Squish these a bit to flatten slightly. Press them onto the bottom of the penguin toward the front so that the inside of each foot is almost touching the bottom of the white heart shape

With the tiniest bit of orange clay, roll a small oval. Press it onto the face just below the eyes. This is the nose

Bake this little penguin in a conventional oven on a baking sheet at 275 degrees F for 15 minutes. Let cool.

Once cooled, use a paintbrush to apply a coat of Sculpey gloss glaze onto the penguin (this is optional!). Enjoy your penguin!
