Sculpey Bake Shop™ Solar System 3D Poster Project
Sculpey Bake Shop™ Solar System 3D Poster Project
By Amy Koranek
Read More
Read Less
Bake Shop clay is colorful and easy to shape making it a great choice for building your own solar system diagram for a school project or to just decorate your room!
ADDITIONAL SUPPLIES
- 1/2” Black foam core board 15” X 20” or a 30” X 20” board cut in half
- Round toothpicks (5)
- Clear drying white craft glue
- White chalk
- Labels printed out on white copy paper
- Scissors
- Glue stick
- Optional – Acrylic paint in Ultramarine, Night Sky, and True Blue
- Paintbrush
- Flat wire cutters
- Sharp craft knife

Project Instructions
- Getting Started:
Start with clean hands, unwrap and knead clay until soft and smooth, or condition by running clay though a Pasta Machine. We recommend using a designated machine for clay purposes only. When working with multiple colors, clean hands with soap and water or baby wipes (we have found that baby wipes work best) before switching colors. Shape clay, pressing pieces firmly together. Wash hands after use.
- Baking:
For starters, divide the clay into these proportions and make balls for each planet. Mercury: use 1/4 bar of Orange and make a ball. Mercury is now complete.
Venus: shape 1/2 bar of Pink into a ball. Later we will add Brown Spots.
Earth: roll 1/2 bar of Blue and 3/8 bar of Green together allowing the Blue and the Green to be mottled. Earth is done.
Mars: from 1 bar of Red make a large ball. We will also need 1/8 bar of Orange for the spots which we will add in the next step.
Jupiter: use 1 bar of Tan, and 1/4 bar each of Brown and Purple.
Saturn: we will need 1/2 bar of Orange, 1/8 bar each of Blue, Green, and Purple for the planet. For Saturn’s rings we will use 1/2 bar of White and 1/8 bar of Pink.
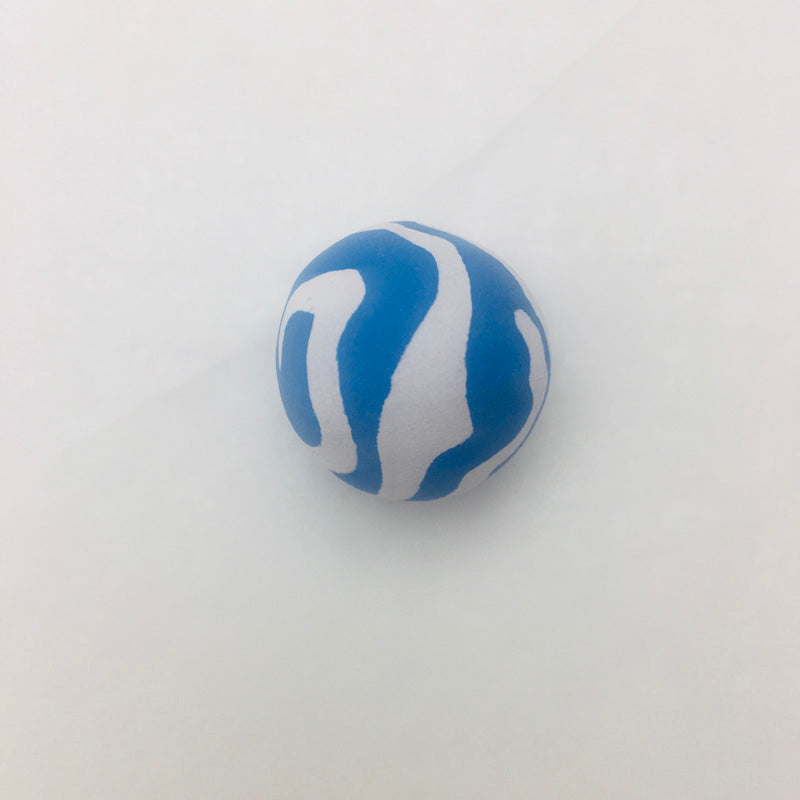
Uranus: just 3/8 bar of Blue and we will later add White swirls.
Neptune: a simple 1/2 bar of Purple rolled into a ball and Neptune is complete.
Venus: shape 1/2 bar of Pink into a ball. Later we will add Brown Spots.
Earth: roll 1/2 bar of Blue and 3/8 bar of Green together allowing the Blue and the Green to be mottled. Earth is done.
Mars: from 1 bar of Red make a large ball. We will also need 1/8 bar of Orange for the spots which we will add in the next step.
Jupiter: use 1 bar of Tan, and 1/4 bar each of Brown and Purple.
Saturn: we will need 1/2 bar of Orange, 1/8 bar each of Blue, Green, and Purple for the planet. For Saturn’s rings we will use 1/2 bar of White and 1/8 bar of Pink.
Uranus: just 3/8 bar of Blue and we will later add White swirls.
Neptune: a simple 1/2 bar of Purple rolled into a ball and Neptune is complete.

Venus: add randomly shaped little Brown spots to the outside of the Pink ball. Roll the ball in your hands to make sure all the spots are rolled in smoothly.

Mars: divide the Orange that we set aside in Step 2 into random pinched off pieces. Place these all over the Red ball. Roll the ball to smooth the spots into place.

Jupiter: roll the Purple and the Brown pieces we made in Step 2 into flat ropes. Position the ropes on the outside of the Tan ball as shown.

Roll and twist the ball into a thick snake to get more stripes.

Compress the log back into a thick square shape

Roll in your hands to smooth it once again into a ball shape.

Saturn planet: Roll ropes of each of the Purple, Green, and Blue. Wrap these around the outside of the Orange ball, leaving some of the Orange to show at the top and the bottom.

Roll the planet into a smooth ball. Partially mix 1/2 bar of White with 1/8 bar of Pink. Don’t mix it completely so that the rings will have stripes in them. Roll the White/Pink mixture into a thick rope that will just barely wrap around the planet.

Pinch the edges of the wrings so that they are thicker at the planet and thinner on the edge. Make sure the planet of Saturn still shows above and below the rings. Also make sure that the rings are sticking to the sides of the planet.

Uranus: place little ropes of White randomly over the surface. Roll the ball again to flatten the White to the planet.
For the Sun we will use 1 bar of Yellow, 1/2 bar of White, 3/8 bar of Pink, and 1/8 bar of Orange. Shape each color into random shapes.

Press the colors all together and knead them to help them partially mix

Keep kneading the colors until you like the swirly pattern that is created for the Sun’s gasses. Shape the Sun into a big ball.

Break or cut round pointed toothpicks in half. These will help hold the planets in place in their orbits on the display board. Poke the blunt end of 1/2 of a toothpick into each planet with the pointed end sticking out. Bake the planets for 30-45 minutes following the baking instructions for Bake Shop. The planets need the extra baking time because they are quite thick.

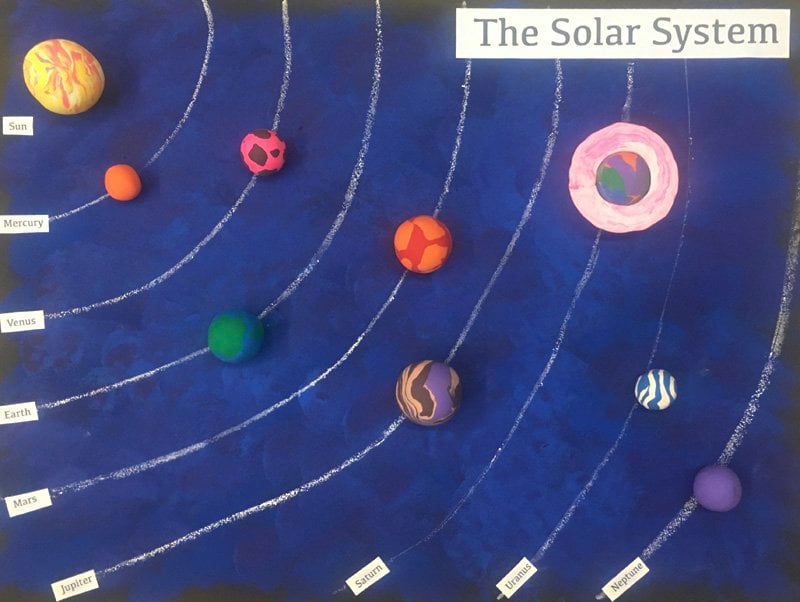
While the planets are baking, you can paint your background as desired. It’s not necessary to paint the background but you might enjoy doing so. I purchased a 20” x 30” 1/2” thick black foam core board which I cut in half to 20” x 15” for my display. Please have an adult help cut the foam core if cutting is necessary. First I painted splotches of Ultramarine Blue randomly all over the board. While the paint was still wet, I added splotches of True Blue and also Night Sky so my painting would be very mottled. Allow the paint to dry completely.

When the background is completely dry and the planets are completely cool, lay out the diagram to see how it looks. Just lay the planets loosely in place so it appears that they are orbiting the Sun.

With white chalk you can mark the orbits. I drew the orbits free hand right on top of the paint, using the planet positions as my guide. I just picked up each planet as I approached it with the chalk and then set it back into place.

Add a spot of clear drying white craft glue to the pointed tip of each toothpick. Push the pointed tip into the foam core board placing each planet in it’s orbit one at a time. Allow the glue to dry completely.

While the glue is drying, you can cut and paste the labels for your system onto the board as shown with a glue stick. Allow the labels to dry completely. After my display was completely done, I turned it over and trimmed the toothpick points that I had pushed through the board with flat wire cutters. Please have an adult assist if this is necessary for your display.
