
There are lots of ways to bond finished oven baked clay projects to jewelry findings and other smooth surfaces with silicone glues and even instant drying glues. However, for clay-to-clay adhesion and clay to porous surfaces adhesion, I prefer to use Oven Bake Clay Adhesive (formerly known as Bake ‘n Bond).
Unbaked Clay to Unbaked Clay:
Sometimes I want to connect very delicate unbaked clay parts or even very round parts to each other without using the necessary pressure to make things connect naturally. Knowing that the pressure required to join the two items would smoosh them slightly, I opt for using Oven Bake Clay Adhesive (OBCA) instead. By using OBCA, just a drop of the liquid can be placed at the joint which will create a strong bond during baking. For example, I recently created a project that included a grid of perfectly round balls with sides touching. Instead of pressuring them to stick to each other, I added a drop of OBCA at the joint where each ball touches. During baking, this drop almost completely disappears because the OBCA is translucent in color.

Unbaked Clay to Baked Clay:
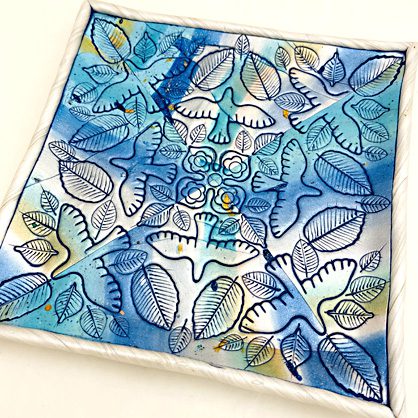
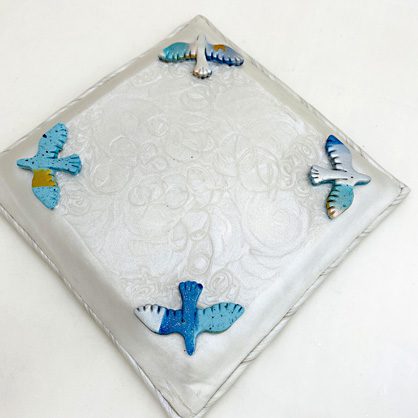
I recently created this little bird tray. I wasn’t sure where I was going on this one and so I didn’t have a plan for finishing the bottom. Once the top of the tray was finished, it sat so flat on the table and I just wasn’t satisfied with the outcome. I decided the tray should have some little feet on the bottom to provide a pretty finish. The tray was already baked so I cut out some little birds from the same scrap clay that I used for the top. I added them to the bottom corners of the tray with some OBCA. Since the tray itself was already baked, I allowed the bond between the raw clay and the baked clay to sit upside-down overnight (with the OBCA in between) so that the plasticizer in all the layers could leach into each other. Then I baked the tray again the next day. OBCA can be an added bonus when I don’t quite have all the details worked out ahead of time!
Unbaked Clay to Cardboard, Recycled Paper Boxes, and Paper Mache:
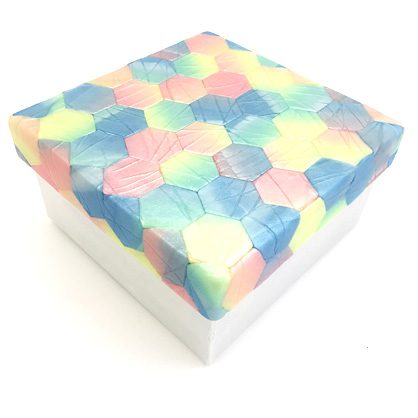
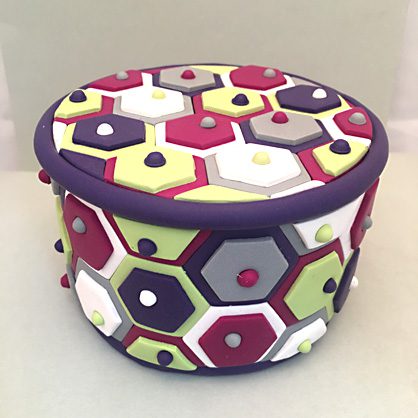
The next two projects feature an upcycled cardboard gift box (in which just the lid was covered with clay) and an upcycled cardboard cylinder box (in which I covered the bottom of the cylinder box and made an entirely oven bake clay lid to match.) In both of these projects, OBCA was spread all over the surfaces where the clays were going to be applied. The OBCA, when allowed to set for at least 30 minutes, will leach into the porous surface of the cardboard and create the perfect tacky surface for the clay to bond to. After baking, the OBCA adds a hearty layer of sturdiness to the project and really bonds the raw clays to the cardboard. Works great with paper mache too!
Unbaked Clay to Cork:
Nicely finished clay and cork coasters make lovely gifts. Applying OBCA between either raw or baked clay and the cork bottoms makes a really sturdy and permanent finish which is completely waterproof.

Unbaked Clay to Wood:
OBCA is the perfect bonding material between unbaked clays and wooden trays, photo frames, switch covers, etc. Just apply a thin layer of OBCA with a small trowel or your fingertips to the flat surface of the wood which will be covered with clay. Allow the OBCA to set for at least 30 minutes. When the OBCA sets, it will become cloudy looking. This change in appearance indicates that it is slightly soaked into the wood and ready to use. Then apply your clay design right on top of the OBCA and bake on the wood as normal. When working on porous surfaces that are pre-treated with OBCA, it’s important to already have your clay design planned out because it will be difficult to move once the OBCA has been allowed to tack.
You can also apply your clay design over the OBCA surface without allowing the OBCA to set or tack. If you work with the OBCA while it’s still liquidy, you can easily slide your clay pieces around to get them into perfect position. However, this method may rake up some of the OBCA which you might need to remove from the surface of the clay with paper towel or wet wipes before baking.


Unbaked Clay to Heavy Paper:
Believe it or not, notebooks that are 100% paper products with metal bindings can be placed in the oven. In this case, a notebook with a heavy card stock cover was used. OBCA was coated on the front cover and the clay design was applied on top. Then the whole notebook was baked. When baking paper products, you will want to add weight (like a heavy book) to the project as soon as it comes out of the oven so it won’t warp during cooling.
[Blog01-09 Notebook]
I’d love to see how you use oven bake clays and Oven Bake Clay Adhesive. If you post your projects to social media, please be sure to use the tags #HowDoYouSculpey and tags like #Premo™, #Soufflé™, #Liquid Sculpey so we can follow your work!
Having fun rolling clay, Amy
