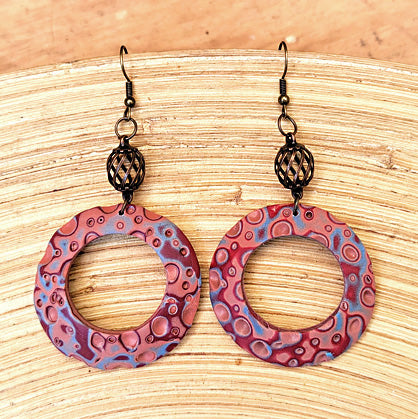
Sculpey Soufflé™ Sedona Circle Earrings
Sculpey Soufflé™ Sedona Circle Earrings
Designed by syndee holt
Read More
Read Less
Sculpey Soufflé™ Sedona teams up with Soufflé™ team mates Cabernet and Robins Egg to create these wonderfully textured earrings using a simple Mokume Gane technique.TIME TO COMPLETION: 30 minutes to make and 30 minutes to bake
ADDITIONAL SUPPLIES
- Small smooth tile to work on
- Antique Bronze wire beads, or glass beads to match (2)
- 6 mm Antique Bronze jump rings (4)
- Antique Bronze ear wires (2)
- Jewelry pliers
- Small smooth tile to work on
- Antique Bronze wire beads, or glass beads to match (2)
- 6 mm Antique Bronze jump rings (4)
- Antique Bronze ear wires (2)
- Jewelry pliers

Project Instructions
Step 1
- Getting Started:
Start with clean hands, unwrap and knead clay until soft and smooth, or condition by running clay though a Pasta Machine. We recommend using a designated machine for clay purposes only. When working with multiple colors, clean hands with soap and water or baby wipes (we have found that baby wipes work best) before switching colors. Shape clay, pressing pieces firmly together. Wash hands after use.
- Baking/Curing:
Step 2
Sheet out each of the 3 conditioned clays on a medium/thin setting (#3 on my machine). Cut 2-inch squares of each color.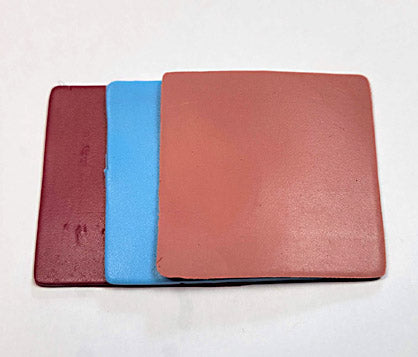
Step 3
Stack the colors on top of each other with the Robins Egg in the middle and run through the clay pasta machine again on the same #3 setting. Cut the long piece in half as shown and restack in same order.Repeat this step again.
NOTE: You may want to turn the stack and run the long end through this time to help create a more square piece of clay.

Step 4
After repeating Step 3 again, stack the two pieces together and make sure that the 1.75-inch round cutter will fit on your stack.
Step 5
Use the medium ball tool to gently press into the top of the clay (Sedona side up) in a random fashion.
Step 6
Repeat Step 5 using the small ball stylus. BE CAREFUL! Not to poke all the way through the clay stack.
Step 7
Place the clay stack on your smooth tile and gently press down to help it stick to the tile. Have a clean sheet of paper standing by on your worksurface as well.
Step 8
Grasp your flexible clay blade in both hands and use your thumbs to slightly curve the blade. Then slowly slide the blade through the top layers of the clay. It doesn’t matter how wide or long this slice is, just that you are staying in the top layers of the stack.
Step 9
Place the trimmed clay on your clean sheet of paper and admire your clay work! Make sure to say loudly, ”I meant to do that!”
Step 10
Repeat steps 8 and 9 until the entire surface has been trimmed.
Step 11
Use your clay roller (sparingly) to help smooth the surface and blend between the sliced areas a little.
Step 12
Audition which part of the stack you want for your earrings and use the 1.75-inch cutter to cut out that circle. Set aside.
Step 13
Sheet out a thin (#4) layer of the Cabernet clay and layer it under a #4 layer of Sedona. Then gently lay those trimmed pieces that we saved on the clean paper onto the stacked clay. Don’t press down yet!
Step 14
Compare your cut circle to the clays you have laid out to make sure that there is a decent match of colors.Once you are satisfied. Lightly press the clays together and repeat steps 5 and 6, using the medium ball stylus in the larger holes and the small stylus lightly in the smaller holes. Then cut your second circle out! Fiendishly clever right?

Step 15
Position your circle on the largest bump on the Hollow Bead Maker. I like to use the palm of my hand to gently press the clay onto the metal. Position the .75 circle cutter in the center of the clay. (NOTE: standing up while doing this greatly increases my chances of centering my circle correctly.
Step 16
Firmly press the cutter down and use the edge of your clay blade to gently pry the small circle off the metal. I also bake these circles for later use.Repeat steps 15 and 16 for the second circle on the other large bump.
If you make your holes in your beads before baking, make the holes now in what you deem top/center (blue arrow).
Place the Hollow Bead Maker on your baking surface and bake the clay according to the directions in Step 1 above.

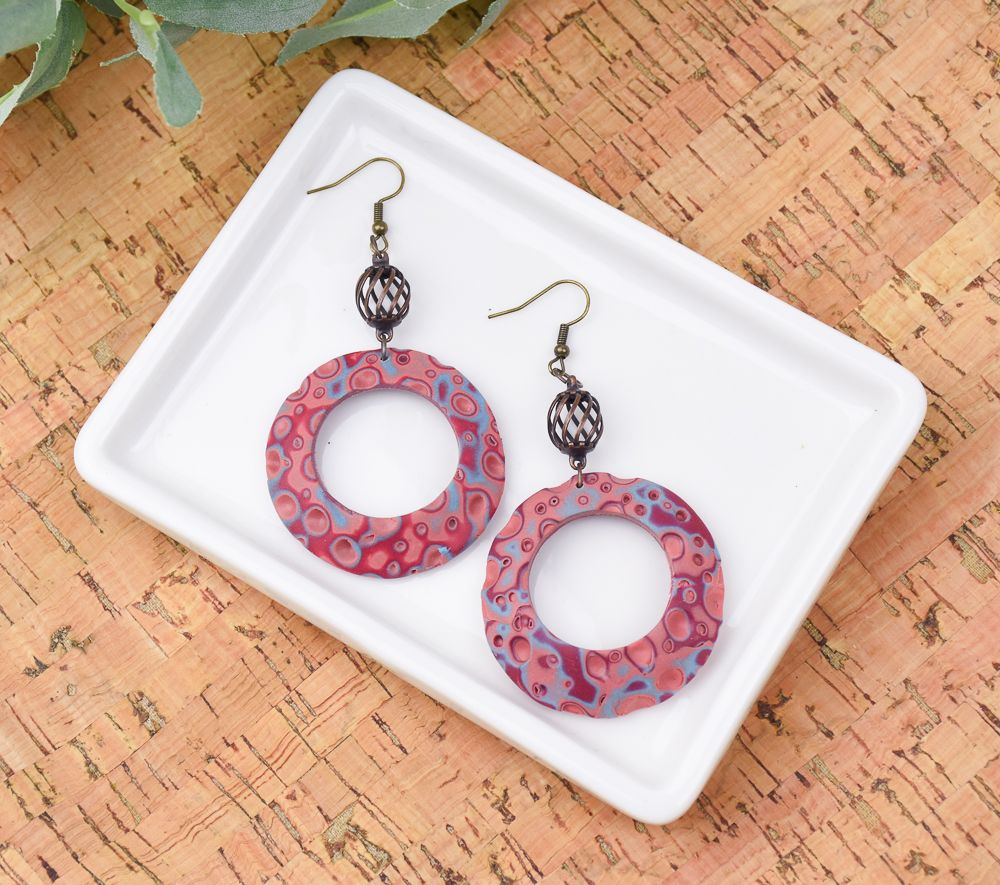
Step 17
Once the clay has baked and cooled, assemble your earrings as shown in this photo.
Step 18
Here’s a look at the big finish!