
Sculpey Soufflé™ Draped Oval Dangle Earrings
Sculpey Soufflé™ Draped Oval Dangle Earrings
Designed by Khyrstyne Dunaway
Read More
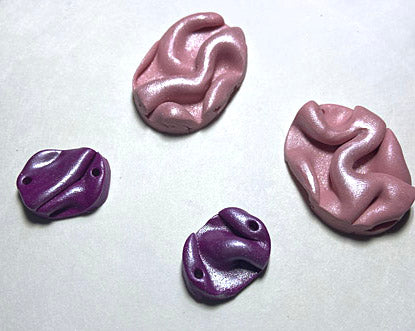
Polymer clay is an amazing medium that can create some of the most beautiful and sturdy fashion pieces. This project is inspired by the draping of a cloth, giving movement to your earrings. These earrings are lightweight and elegant, with a subtle shimmer that can be noticed when the light catches certain parts of the earrings.
Read Less
ADDITIONAL SUPPLIES
- Mica Powder
- Make up brush for mica powder
- Pink faceted crystal bead
- Toothpick
- Earring stud backs
- 4 jump rings
- 2 eye pins
- Oval clay cutters
- E6000 glue

Project Instructions
- Getting Started:
Start with clean hands, unwrap and knead clay until soft and smooth, or condition by running clay though a Pasta Machine. We recommend using a designated machine for clay purposes only. When working with multiple colors, clean hands with soap and water or baby wipes (we have found that baby wipes work best) before switching colors. Shape clay, pressing pieces firmly together. Wash hands after use.
- Baking:
Take your Souffle French Pink clay and roll it into a ball. Warm it up in your hands thoroughly in order to make it soft and ready to feed into a clay machine. Flatten it out on your clay mat and use an acrylic rolling pin to work the clay and warm it up. Next, run the warmed up and semi flat clay through the pasta machine. You will want the pasta machine on setting 3 for a semi thick, durable earring.

Next, take the clay slab you have and gently pinch sections of the clay to have a draped effect. You will want the clay to look loose, but also softly wrinkled. Note: It is ok if you have some of the clay crack. We will fix this in the next step.

You can now look at your draped slab and fix any cracks in the clay with a rounded clay tool. Fix the cracks by gently smoothing out the clay back and forth, until the crack is gone.

Take a large oval cutter and cut into your draped slab. Repeat steps 2-5 for the other earring.

Now take your Souffle Turnip clay and warm it up and roll it with your hands. Feed it through your pasta machine on setting 3. Repeat the draping process with the French Pink clay.

Take a small oval cutter and cut 2 draped turnip ovals.

You now have 2 large oval pieces and 2 small oval pieces. Take a toothpick and poke earring holes in the earrings. You will only need 1 hole for each of the larger ovals, and 2 holes for the smaller ovals.
IF DESIRED: Take a makeup brush or small paint brush and lightly dip it into white mica powder. Gently brush the powder across all 4 pieces of clay, making sure to emphasize the raised parts of the draping.
IF DESIRED: Take a makeup brush or small paint brush and lightly dip it into white mica powder. Gently brush the powder across all 4 pieces of clay, making sure to emphasize the raised parts of the draping.
You are now ready to bake! Bake your pieces according to the instructions provided and allow 15 minutes to cool. Once the clay is baked and cooled, you are ready to apply your findings and put the earrings together. Start by taking 2 silver jump rings and connect the large ovals to the small ovals.

Next, take an eye pin and thread it through a faceted bead. You will connect the bead to the smaller oval piece with 2 more silver jump rings.

Finally, you will glue your backings to the top the back of the large oval pieces. Allow at least 15 minutes to dry.
