Skip to product information
1 of 1

Sculpey Soufflé™ 2024 Color of the Year Earrings

Sculpey Soufflé™ 2024 Color of the Year Earrings

Read More
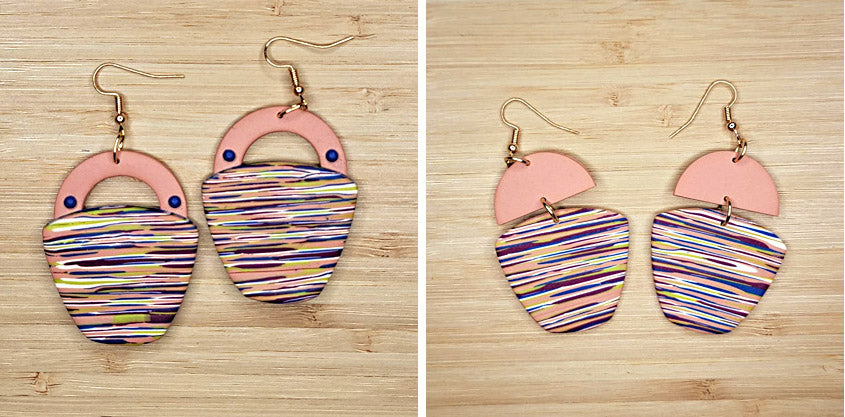
Color matching your clay to popular colors is easier than you think! I’ve mixed the 2024 Pantone Color of the Year, Peach Fuzz, for this project. I had so much fun I made TWO different versions of my earrings for you. TIME TO COMPLETION: 30 minutes to make, 30 minutes to bake Designed by syndee holt
Read Less
ADDITIONAL SUPPLIES
  • Gold-toned jump rings 5 or 6 mm – I’ve used a 5 mm oval jump ring for the top of the loop earrings
  • Gold-toned ear wires – 2 for each pair
  • Cutter shape of your choice for bottom of earring
View full details
Project Instructions

Step 2

Sheet out about 1/3 of each color- Concrete, Raspberry, Yellow Ochre and Ivory on the second widest setting on the Clay Conditioning Machine.Use the 2-inch circle cutter to cut out 2 circles each.Cut the second Ivory Circle in half.Mix these circles together to blend the colors. NOTE: Yes, you CAN use the entire second circle of Ivory if you want a slightly lighter version of the color!

I made two sets of the circles and blends.

Step 3

Create equal(ish) snakes of the Ivory, Turnip, Citron and Cornflower Mine are about the thickness of a pencil. Create a snake of the new color mix that is a little larger than the other snakes. Trim the snakes to about 4 or 5 inches long.

Step 4

Gently twist the colors together and continue twisting until the color stripes are
fairly vertical.

Step 5

Use the acrylic roller to gently smash the coil flat enough to go through the
widest setting on your Clay Conditioning Machine. NOTE: I’m not worried that my
Ivory isn’t showing much – it is the lightest color and I didn’t want it to
overwhelm the rich tones.

Step 6

Roll the clay through the WIDEST setting making sure to keep the stripes as vertical
as possible.

Step 7

Fold the sheet in half width wise, keeping the stripes vertical. Roll through on the
widest setting again. Repeat this fold and roll once more.

Step 8

Repeat this fold and roll once more.

Step 9

Cut the clay in half length wise and stack the two pieces as shown. You do NOT have
to match the striping colors!

Step 10

Cut this stack in half VERTICALLY to cut to fairly even sized pieces and restack them. Again, you do NOT have to match the striping colors! You can use your
roller to gently roll the pieces together and thin the stack slightly.

Step 11

Now just start cutting thin(ish) slice as equally as you can from the edge of the stack.  Aren't they gorgeous??

Step 12

I chose a cornflower backing layer (a thinner layer on the Clay Conditioning
Machine – depending on how thick your pieces were cut).

Lay your slices out so that they touch each other, trying to vary the striping.

Step 13

I had enough of the striping material to create a second set, so this time I
chose a backing layer of the Pach Fuzz mix and repeated Step 12.

NOTE:
Make sure that you set aside enough of the Peach Fuzz mix to create the tops of
the earrings before you use it as a backing sheet! You can also use any of the
other colors used in this project as the second backing sheet.

Step 14

Rotate the striping to vertical and use your acrylic roller to smooth and blends the seams a little.  Repeat for both stacks.

Step 15

Cut out your bottom shapes keeping the striping horizontal.
Of course, you can also cut them vertically if you wish.  Cut out two from each sheet of striping.

Step 16

For the little “purse handle” earrings, I selected the 1.25 inch cutter and the half inch cutter and centered the smaller cutter in the larger on a small sheet of the Peach Fuzz mix sheeted on a middle thickness. Cut two of these circles.

Step 17

Gently press the circles to the backs of the stripped pieces and I elected to add Cornflower “pearls” using my smallest Etch n’ Pearl tool.  Don’t forget to add your holes for assembly as well to the top center of the earring.  (I drill my holes after baking, but I digitally added a black dot to indicate where I will place my hole.) 

Step 18

When I place these earrings on my baking mat, I fold a small piece of index card to place under the bottom edge of the earring so that the striped layer will bake nice and flat even though I’ve added the clay circle behind it.

Step 19

For the other pair of earrings, I just used the 1.25 inch circle cutter and cut out a circle from the Peach Fuzz mix.  I cut that circle in half and used a half for
each earring.  I digitally added where I will drill my holes after baking. You can add your holes before baking with a needle tool.

Bake both pairs of earrings as directed in Step 1 above.

Step 20

Here is the assembly layout for both pairs of earrings. I elected to use an oval jump ring for the top of the loop earrings.