
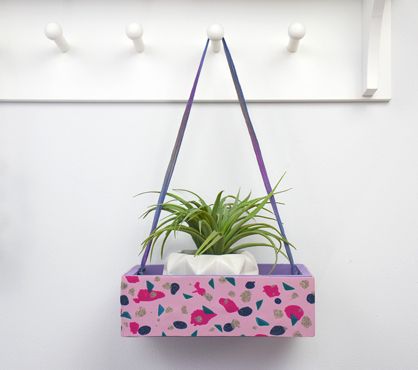
Sculpey Soufflé™ Lilac Mist Terrazzo Wall Planter
Sculpey Soufflé™ Lilac Mist Terrazzo Wall Planter
Designed by Amy Koranek
Read More
Read Less
This delicious looking planter will brighten any gardeners day! COMPLETION TIME: 90 Minutes to make, bake, and assemble
ADDITIONAL SUPPLIES
- Wood planter box
- Sandpaper
- Coordinating acrylic paint
- Paintbrush
- Drill or Dremel Tool with 1/4” drill bit
- 24” Coordinating ribbon
- Scissors
Project Instructions
Step 1
- Getting Started:
Start with clean hands, unwrap and knead clay until soft and smooth, or condition by running clay though a Pasta Machine. We recommend using a designated machine for clay purposes only. When working with multiple colors, clean hands with soap and water or baby wipes (we have found that baby wipes work best) before switching colors. Shape clay, pressing pieces firmly together. Wash hands after use.
- Baking (also called Curing):
Step 2
Prepare the wood box before covering with clay:Sand any rough surfaces as needed.
Paint the areas of the box which will not be covered with oven bake clay: top edges, box bottom, back of the box which touches the wall (optional).
This would be a good time to determine if the planter will be used to care for live plants or to display faux plants, or even air plants.
If live plants will be installed, you should consider placing live plants in plastic containers so they can be easily removed for watering.

Step 3
Allow paint to dry completely.
Step 4
Add a bead of Oven Bake Clay Adhesive (OBCA) to the outsides of the box which will be covered with clay
Step 5
Spread the OBCA all over the raw wood with either your fingertips or Knife Tool. The OBCA should be thin enough that you can clearly see the paint and the wood grain through it. You can squeegee off excess OBCA and return it to the bottle if needed.Set the box aside while preparing the terrazzo clay sheet. The OBCA will seep into the wood grain slightly as it sets making it the perfect clay to porous surface adhesive.

Step 6
The box in this tutorial is approximately 6”L X 5”W X 2.5”H, so I am working with 2 bars of the base color Soufflé™ Lilac Mist. If your box is smaller, you can adjust for size by using less clay.Sheet the Lilac Mist to a large sheet 1/8” thick or through a pasta machine on the thickest setting.
The width of my sheet is double the height of the box so I can get two height cuts from my sheet.
Sheet Premo™ Fuchsia as thinly as possible either with the Clay Roller or pasta machine on the 6th thickest setting.
Tear pieces of Fuchsia randomly and press them to the sheet.
Roll the sheet with the Clay Roller to level it.

Step 7
Roll Galaxy Glitter to a 1/4” diameter rope.Slice very thin pieces from the rope and press them randomly to the sheet.
Roll the sheet with the Clay Roller to level it.

Step 8
Slice very thin pieces of Peacock Pearl from the corner of the bar to make triangle shaped slivers.Press them randomly to the sheet.
Roll the sheet with the Clay Roller to level it.

Step 9
Pinch random sized bits from the bar of Gray Granite and press them to the sheet.Roll the sheet with the Clay Roller to level it.

Step 10
Slice the terrazzo sheet with a Clay Blade to the height of the box.Carefully wrap the side of the box as much as possible with the strip.
Smooth the clay to the box with fingertips and the Roller to push air bubbles out from between the clay and the box.

Step 11
Add as many strips of clay as needed to cover the outside of the box everywhere you placed the OBCA.Wherever strips of clay are jointed, cut straight edges and butt seams together.

Step 12
This is the same seam as in Step 11, but I was able to disguise the seam by covering it with more terrazzo colors around the corner
Step 13
Bake the entire box following the baking instructions for Sculpey Soufflé™.Allow to cool completely before handling.

Step 14
Next determine where the holes should be drilled through the box if you will display it as hanging from the wall. You can drill through the clay as well as the box with a standard drill or Dremel Tool.For my design, I drilled two holes toward the back of the box on both ends, so that the box would sit tightly to the wall for support.

Step 15
Then I looped one end of my coordinating ribbon through two holes on one end, securing the short tail to the long tail with a knot.
Step 16
Then I ran the long end of the ribbon through the 2 holes on the other side. I determined how long I wanted my hanging ribbon to be before tying the final knot and trimming the tails with scissors.