Sculpey Premo™ Terra Cotta Landscape Wall Art
Sculpey Premo™ Terra Cotta Landscape Wall Art
Designed by Cindi McGee
Read More
Read Less
Create a dynamic piece of original wall décor in just an afternoon! Or how about adding to a shelf for a splash of color?Time to create this project:Approximately 2 hours Baking time: 1 hour
ADDITIONAL SUPPLIES
- 6” Round cutter or 6” bowl/dish to trace
- Fine sandpaper
- Parchment paper

Project Instructions
Step 1
- Getting Started:
Start with clean hands, unwrap and knead clay until soft and smooth, or condition by running clay though a Pasta Machine. We recommend using a designated machine for clay purposes only. When working with multiple colors, clean hands with soap and water or baby wipes (we have found that baby wipes work best) before switching colors. Shape clay, pressing pieces firmly together. Wash hands after use.
- Baking (also called Curing):
Step 2
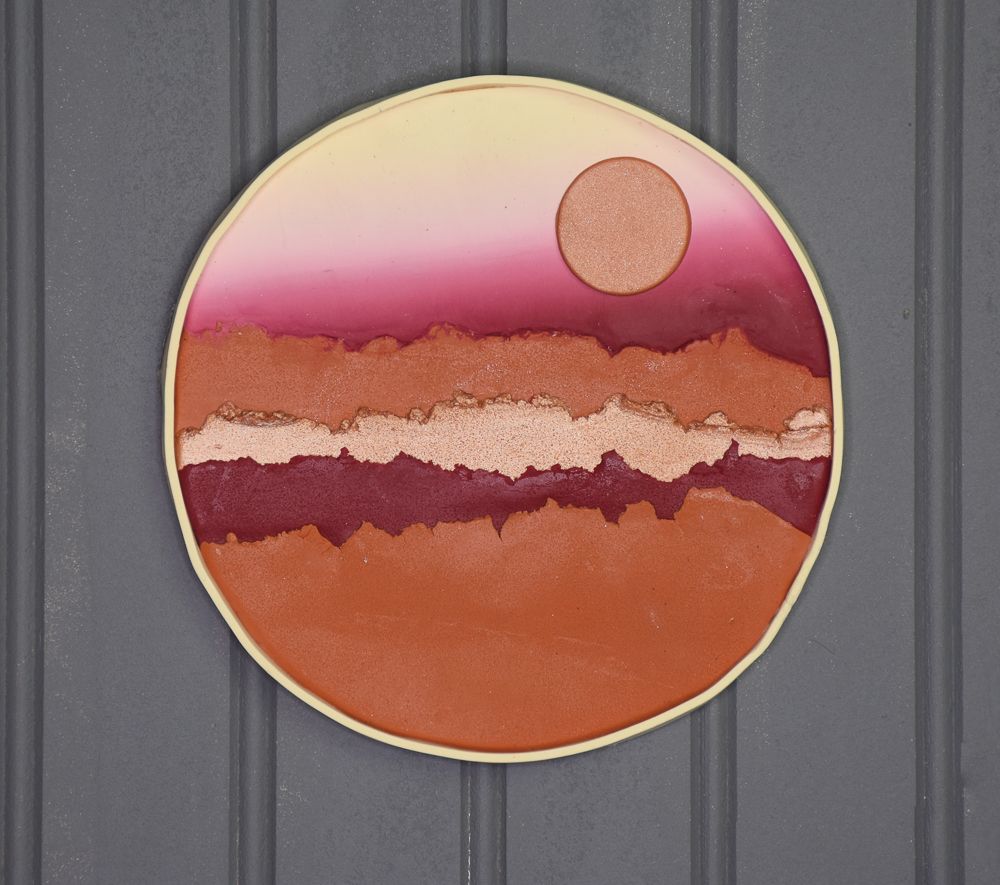
Roll Ivory clay to create a sheet large enough for a 6” circle. Use a 6” cutter, or trace a 6” round bowl, and hand cut the disc from the clay sheet.
Step 3
Make a Skinner Blend with Light Pink, Cabernet, and Ivory clay. Roll to a very thin sheet, large enough to cover the top 1/2 portion of the 6” circle. Place over the circle and gently smooth to remove bubbles. Trim around and remove excess clay.
Step 4
Mix equal parts Copper and Terra Cotta clay. Roll to make a sheet and use circle cutter to cut circle. Place in upper right quadrant of circle just above the Cabernet/Light Pink blend.
Step 5
Roll 2 sheets of Terra Cotta, 1 Copper, and 1 Cabernet clay. Gently tear the top edge of each. Use fine sandpaper to add texture to each sheet.
Step 6
Begin with the strip of Terra Cotta, place it beneath the sun, so the Cabernet/Light Pink blend is rising behind it.Then add the strip of Copper, then Cabernet, then the final Terra Cotta, varying the space between each color and allowing some to be at a slight angle.
Gently press between each layer to adhere and smooth to better hid the piece behind each layer.
Trim around the edge of the circle.

Step 7
Roll a long sheet of Ivory clay, use the clay blade to cut a strip about 1/4” wide and long enough to encircle the decorated circle. (Optional – Use a clay extruder to extrude a rectangular strip of Ivory clay.)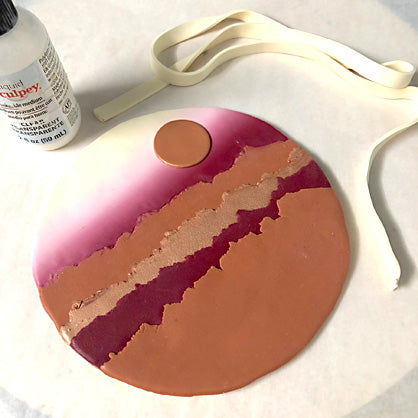
Step 8
Apply Liquid Clay or Clay Adhesive around the outer edge of the circle. Wrap the Ivory clay strip around the edge and trim so edges meet. Smooth the seam.
Step 9
Bake and let cool.