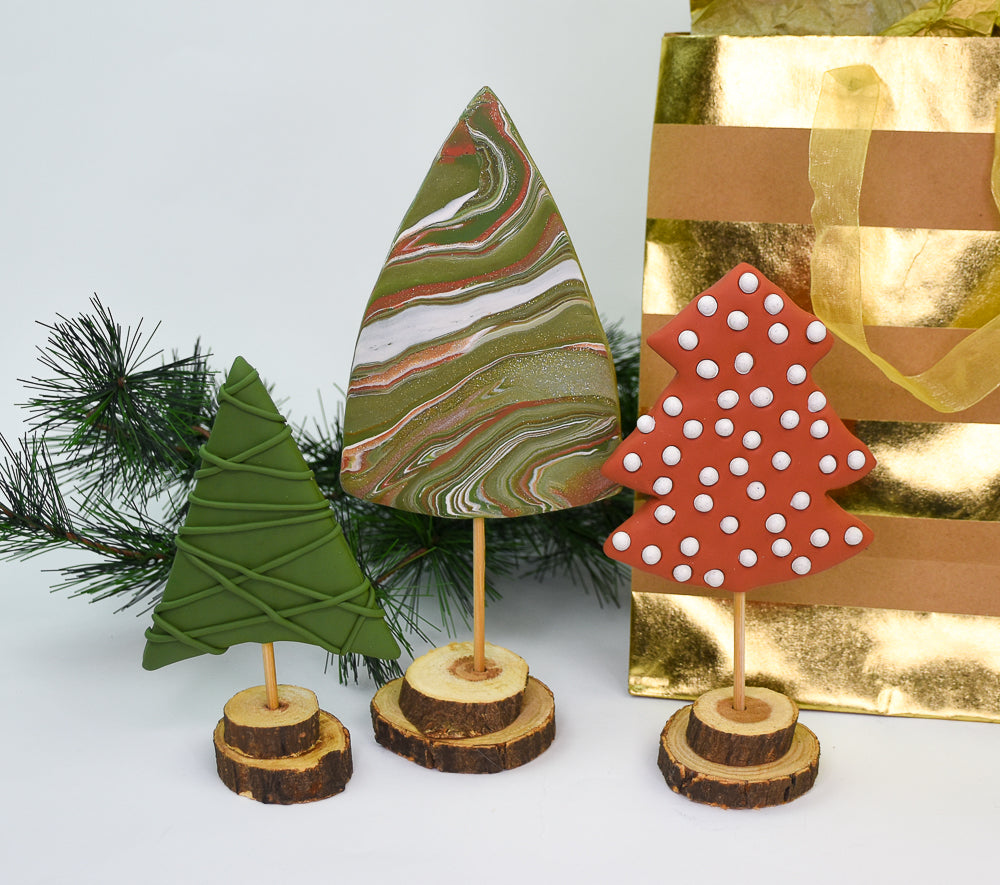
Sculpey Premo™ Tabletop Tree Trio
Sculpey Premo™ Tabletop Tree Trio
Designed by Amy Koranek
Read More
Read Less
Create this wonderful little tablescape, featuring Sculpey Premo™ earthtones (with a little bling from a glitter clay) for your holiday table, side board or wherever you wish to display it! It also makes a great hostess gift that will be sure to be a hit!
COMPLETION TIME:
2 Hours to make, bake, and assemble
ADDITIONAL SUPPLIES
- Paper templates of tree shapes (3)
- Scissors
- Wood skewers (3)
- Xacto knife
- Wood disks (6)
- Dremel drill or powered drill with a drill bit compatible to the size of the wood skewers
- Hot glue
- Hot glue gun

Project Instructions
- Getting Started:
Start with clean hands, unwrap and knead clay until soft and smooth, or condition by running clay though a Pasta Machine. We recommend using a designated machine for clay purposes only. When working with multiple colors, clean hands with soap and water or baby wipes (we have found that baby wipes work best) before switching colors. Shape clay, pressing pieces firmly together. Wash hands after use.
- Baking (also called Curing):
Start by deciding how large you would like your trees to be and what shapes.
Make paper or card stock templates for each tree.
I folded paper in half and scissor cut simplistic tree shapes through both layers of paper using the fold line as the middle. Then opened the paper to reveal the shape. If you want to change the shape, simply re-fold the paper and cut again. My largest tree is about 6” tall.

For the Terra Cotta tree, sheet 2 bars of clay through the pasta machine on the thickest setting or roll with an Acrylic Clay Roller to 1/8” thick.
Cut out three tree shapes.
Lay a wood skewer on the center shape and decide how long you want the trunk to be. I trimmed the skewer with an Xacto knife to about 2” passed the base of the tree.
Cut out three tree shapes.
Lay a wood skewer on the center shape and decide how long you want the trunk to be. I trimmed the skewer with an Xacto knife to about 2” passed the base of the tree.

Use a Clay Blade to score an area out of the center shape to house the skewer.
Lay the center shape on top of the base shape.
Lay the center shape on top of the base shape.

Place the skewer in the space in the center shape.

Sandwich the skewer into place with the top shape.

Smooth the outer edges with your fingertips.

Make divots in the tree randomly with the 6 mm (medium) Ball Tool.

Mix 1/8 bar White with 1/8 bar Yellow Gold Glitter completely.
Make small balls of the mixed color that are the same size as the Large Etch ‘n’ Pearl.
Set the balls in the divots. Seat them into place with the Large Etch ‘n’ Pearl.
Set this tree aside for baking.
Make small balls of the mixed color that are the same size as the Large Etch ‘n’ Pearl.
Set the balls in the divots. Seat them into place with the Large Etch ‘n’ Pearl.
Set this tree aside for baking.

Repeat Steps 2-6 to create a tree from Spanish Olive making it an entirely different shape.

Smooth the outside edges with your fingertips.

Use the Small Etch’n’ Pearl to score lines straight across the tree at random angles.
I lay the tool across the tree and then push down on it all at once creating a straight line embossed groove.
I lay the tool across the tree and then push down on it all at once creating a straight line embossed groove.

Roll very thin ropes of Spanish Olive and lay them in the grooves.
Trim excess clay away from the edges.
Set this tree aside for baking.
Trim excess clay away from the edges.
Set this tree aside for baking.

For the Marbled tree, start with 1/2 bar White, one whole bar Yellow Gold Glitter, and scraps of the other colors.
Roll each portion into ropes the same length.
Roll each portion into ropes the same length.

Bundle the ropes as shown.

Roll and twist the rope.
Fold the rope in half and in half again, then continue rolling and twisting.
Fold the rope in half and in half again, then continue rolling and twisting.

Repeat Step 16, until the rope is very twisted and the stripes are very thin.

Use the Acrylic Clay Roller to flatten the thick rope to a shape that will accommodate your third tree shape. In my case, this is my largest tree shape - about 6” tall. It is also about the same thickness as the two trees we just made earlier.

Place the tree template on top.

Cut out the tree shape with a Clay Blade.

Remove the template.

Push the wood skewer into the base of the tree. Place your hand flat on the face of the tree, slowly guiding the skewer as high up into the tree as you can without poking through the end or the face of the clay.

Decide which side of the marbled tree you like best.
I like the other side better, which will be my front.
Make sure all the cut edges are smooth with your fingertips.
Bake all three trees following the baking instructions for Sculpey Premo™.
Allow to cool completely before handling.
Make sure the tree trunks are the correct height. Trim as necessary with an Xacto knife.

For the bases, stack a smaller diameter disk on top of a larger disk. Prepare one pair of disks for each tree.
Drill a hole through the stack of disks with a drill bit that is compatible to your wood skewers.
Drill the holes through both disks in a stack at the same time, so that the hole in each disk lines up to its mate.
Drill a hole through the stack of disks with a drill bit that is compatible to your wood skewers.
Drill the holes through both disks in a stack at the same time, so that the hole in each disk lines up to its mate.

Fill only the bottom hole in the bottom disk with hot glue. Immediately place the top disk on top, and poke the skewer into BOTH the top and the bottom holes at once. That way the hot glue will hold both disks together and hold the skewer in place without being visible. Repeat for all three trees.
