Skip to product information
1 of 1

Sculpey Bake Shop® Bendy Clay Colorful Tassel Bookmarks

Sculpey Bake Shop® Bendy Clay Colorful Tassel Bookmarks

Read More
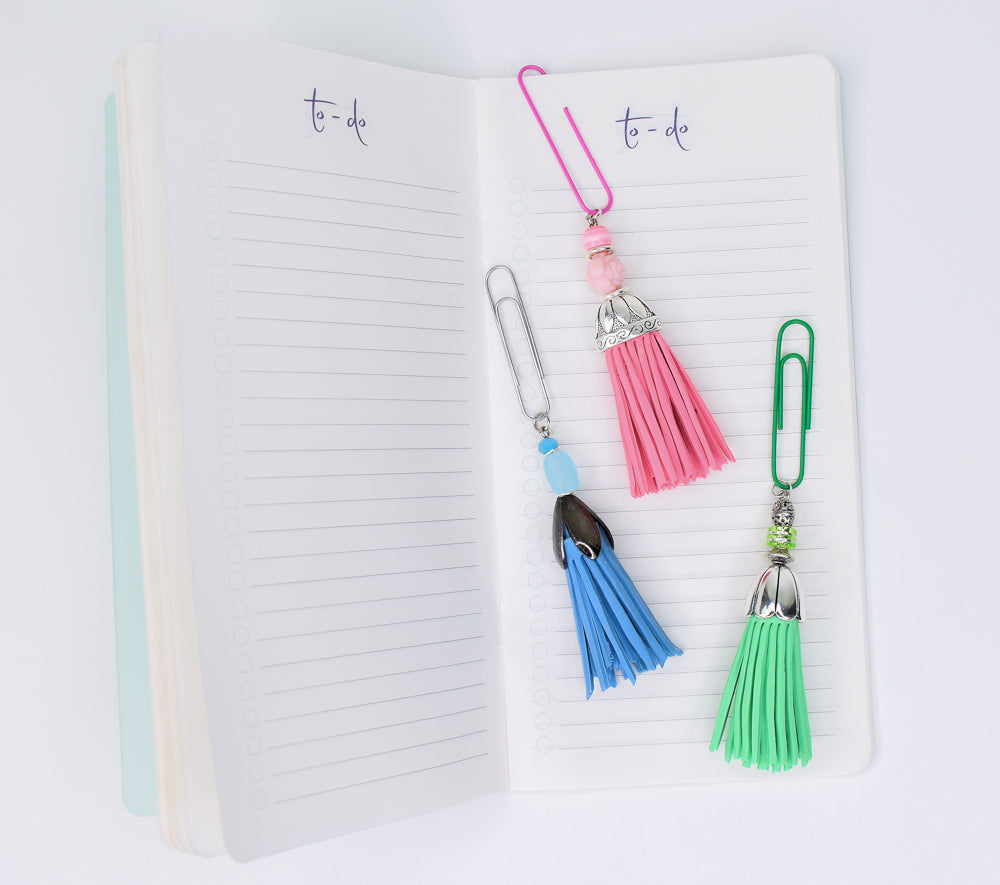
Bendy Clay is so strong and flexible that you can make your own fringe and then turn the fringe into tassels! Make bookmarks or tassel pendants with your finished designs.

Designed by Amy Koranek COMPLETION TIME:
90 Minutes to make, bake, and assemble
Read Less
ADDITIONAL SUPPLIES
  • Glass baking dish - optional
  • Large paper clips - 1 for each bookmark
  • Small sharp scissors
  • 2” Eye pins - 1 for each bookmark
  • 4 mm Ball beads - 1 for each bookmark
  • Instant drying glue
  • Large assorted bead caps
  • Assorted metal, glass, or plastic color coordinating beads
  • 4 mm-6 mm Assorted silver tone jump rings
  • Flat nose pliers
  • Round nose pliers
View full details
Project Instructions

Step 1

Getting Started:
Please make sure your work area is covered and you are not working on an unprotected surface. We recommend working on the Sculpey® Oven-Safe Work Mat, wax paper, metal baking sheet, or disposable foil. Uncured clay may damage unprotected furniture or finished surfaces. Be sure to cover your crafting area appropriately.

Start with clean hands, unwrap and knead clay until soft and smooth, or condition by running clay though a Pasta Machine. We recommend using a designated machine for clay purposes only. When working with multiple colors, clean hands with soap and water or baby wipes (we have found that baby wipes work best) before switching colors. Shape clay, pressing pieces firmly together. Wash hands after use.


Baking (also called Curing):
Begin by preheating oven to 285 °F (130 °C). After you are done creating; for best results bake/cure clay on an oven-proof surface such metal, aluminum foil, an index card or the Sculpey® Clay Mat at 285°F (130 °C) for 20 minutes per 1/4" (6 mm) thickness according to package directions. Oven safe glass or ceramic surfaces are also acceptable for baking/curing; however please note that the baking/curing times may take longer as the glass or ceramic surfaces take longer to heat up. For best baking results, use an oven thermometer. DO NOT USE MICROWAVE OVEN. DO NOT EXCEED THE ABOVE TEMPERATURE OR RECOMMENDED BAKING TIME.

Step 2

Complete instructions for making one Tassel Bookmark are included in this tutorial. Color mixing instructions are given for all three bookmarks shown.


To mix up the pastel colors:

Mix 1 part Blue to 2 parts White for Light Blue

Mix 1 part Green to 2 parts White for Light Green

Mix 1 part Red to 1 part White to make Pink
Mix 1 part Pink to 2 parts White to make Light Pink.

Step 3

Here are the pastel colors for the three tassel bookmarks shown in the finished photo.

Step 4

Use the Roller to roll the Light Green clay out into a very thin sheet - 1/16” or thinner. Trim the sheet to 2” x 6”.

Step 5

Place the clay sheet directly on top of the Sculpey® Oven Safe Work Mat so that it sticks to the mat. Having the clay stuck into place will make the next step easier because the clay won’t slide around. If you don’t have a Sculpey® Oven Safe Work Mat you can stick the clay down to a smooth glass baking dish. It’s also very important that whatever you are working on can go directly into the oven. It will be too hard to pick up the strip of clay once we’ve turned it into fringe.

Use the Knife Tool to cut fringe into the clay sheet. Leave a 1/4” border across the top to keep all the fringe connected together. Poke the tip of the Knife Tool into the clay close to the top border and then rock the Knife Tool blade down cutting all the way through the clay.

Step 6

Continue all the way across the clay sheet making a series of fringes that are connected across the top.

If you want to you can make Light Pink and Light Blue fringes now and bake them along with the Light Green one.

Step 7

Bake the clay following the baking instructions for Sculpey® Bake Shop Bendy Clay. When the clay is completely cool, you can remove it from the baking surface. Then use your fingers to gently pull each little strip apart from it’s neighbor. Be sure to leave the border across the top together.

Step 8

Here’s a look at our beautiful fringe!

Step 9

Next thread a small round ball bead onto an eye pin.

Step 10

Flip the fringe over so that the side that touched the baking surface is up. Lay the beaded pin on top of the border of the fringe.

Glue the bead to the end of the fringe as shown with instant drying glue.

Step 11

Carefully roll the fringe up tightly around the bead. Stop every once in a while to check if the rolled up fringe will be able to fit at least partially inside the bead cap.

Step 12

When you have rolled up an amount of fringe that should fill up the bead cap, carefully trim excess fringe off with small sharp scissors. Glue the end of the fringe in place so you have created a cute little tassel.

Step 13

Insert the tail of the eye pin up through the bead cap pulling the fringe inside the cap.

Step 14

Add color coordinating beads to the tail of the eye pin. Leave a 3/8” tail space at the end of the pin without beads. Curl this part of the pin down with round nose pliers to form a loop right above the beads.

Step 15

Finish off your tassels with coordinating beads to complete each one.

Step 16

Add large paper clips to the loop at the top to make bookmarks.